


Mile/Point Markers - Hazard Services
Mile/Point Markers
Purpose:
This jobsheet will walk the Focal Point through installing and configuring mile/point markers in Hazard Services.Tasks:
AT-A-GLANCE:
-
What? Configuring (and/or importing) mile/point markers for Hazard Services convective. If your site has a configured PointMarkerConfigs.py file, mile/point markers will carry over from hydro to short-fused. If not, mile/point markers will need to be obtained and/or imported into the maps database, then configured for Hazard Services.
-
Why? If you don’t already have mile/point markers configured for hydro, you could technically create an override manually in the PointMarkerConfigs.py file, but there are existing instructions to get this working in WarnGen and use parseWarnGenTemplate.py to create the file for you.
-
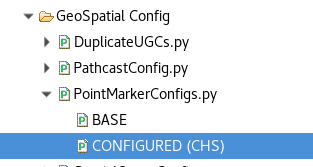
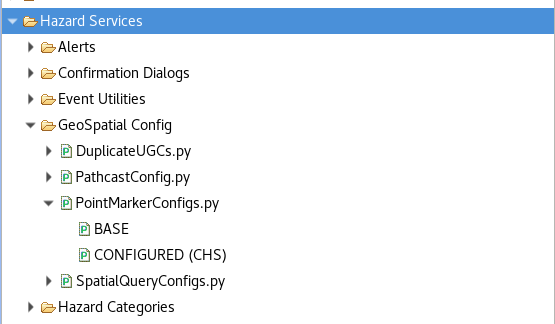
Before you start. Check to see if your site already has a CONFIGURED PointMarkerConfigs.py file. Do this by navigating to the Localization perspective, Hazard Services -> Geospatial Config -> PointMarkerConfigs.py. If there is only a BASE file, follow the instructions in the *NOTE below. If there is a CONFIGURED (site) file, you have mile/point markers installed, proceed to Section 3 to adjust mile markers by default/Hazard Type.
*NOTE: If you do not have a CONFIGURED (site) PointMarkerConfigs.py file, you will need to see if you have mile/point markers installed in WarnGen. In the Localization perspective navigate to D2D -> Warngen. For mile markers, open the mileMarkers.vm and mileMarkers.xml dropdown to identify if your site has any overrides. For point markers, open the pointMarkers.vm and pointMarkers.xml dropdown and also look for site overrides. If you do not see SITE overrides, this means you don't have mile/point markers installed in WarnGen, so you will need to start at Section 1. If there are SITE overrides, open the files to make sure they contain mile/point marker information (see example below). If they do, continue to Section 2.


Follow the steps below for more detailed guidance.
SECTIONS
- Installing Mile/Point Markers in WarnGen
- Transferring Mile/Point Markers from WarnGen to Hazard Services
- Adjusting Mile/Point Markers by Default/Hazard Type
1. Installing Mile/Point Markers in WarnGen
- If you are starting from scratch and don’t have mile markers already, you can either identify AWIPS-1 GELT files that might exist on your AWIPS, or you can generate mile marker .id text files from shapefiles. Follow the instructions in APPENDIX A of the WarnGen Guidance: Adding Mile Markers portlet. For point markers, follow the step-by-step instructions in WarnGen Guidance: Adding Point Markers. Once you have your .id files, you can move on to the next step.
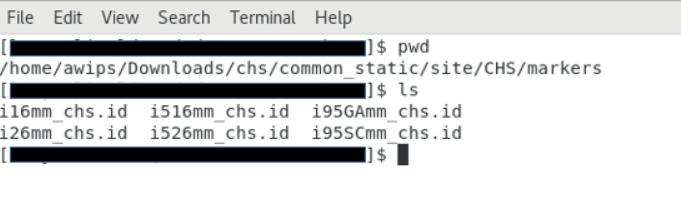
- The information from the .id files will need to be imported into the mapdata database. Open a terminal and find the directory where these are located and take note of the path. You will also want to take note of every single .id filename.
*NOTE: While this is left to the Focal Point's discretion, it is useful to include the WFO site identifier in the .id filename (ex: interstate_chs) so the mile marker functionality can work cleanly when in service backup.
- Change directory to the following path:
cd /awips2/database/sqlScripts/share/sql/maps - Run the following command for each .id file to create a separate table in the mapdata database in Postgres.
sudo -i -u awips $PWD/importMarkersInfo.sh <insert entire path to .id files directory> mapdata <tableName>
EXAMPLE:
sudo -i -u awips $PWD/importMarkersInfo.sh /home/awips/Downloads/chs/common_static/site/CHS/markers/i16mm.id mapdata i16mm_chs
*NOTE: If this is your first time running the importMarkersInfo.sh command, you might see a message like:
"NOTICE: table "i16mm_chs" does not exist, skipping"
This doesn't mean the script failed, rather, it may have ‘skipped’ the step of deleting the table before reinstalling it. You can continue re-running the command for every mile/point marker.
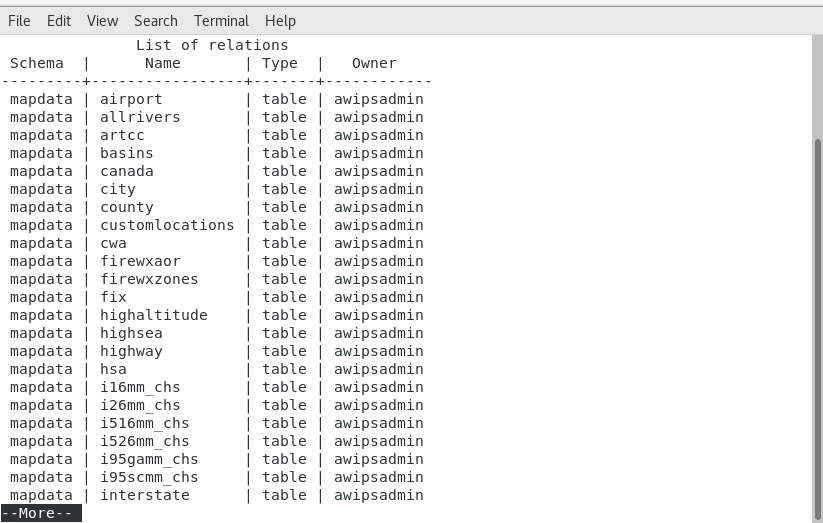
- In another terminal, enter the following command to ensure all of your mile/point markers are in the database:
psql -U awipsadmin maps
\dt mapdata.* - In the Localization perspective of CAVE, navigate to D2D -> WarnGen -> mileMarkers.xml (or pointMarkers.xml).
- Right-click BASE -> Copy To and select User. Open the USER override file.
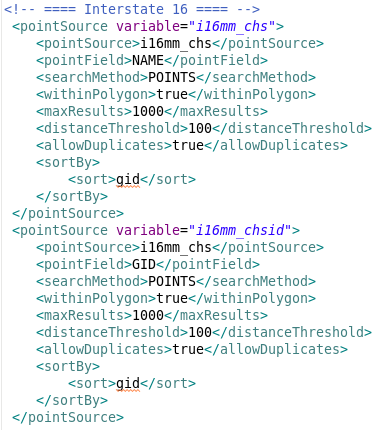
- Copy both pointSource paragraphs of code and fill with the mile/point marker name (ex: i16mm_chs) and id (ex: i16mm_chsid). Repeat for every mile marker.
- Next, navigate to D2D -> WarnGen -> mileMarkers.vm (or pointMarkers.vm).
- Right-click BASE -> Copy To and select User. Open the USER override file.
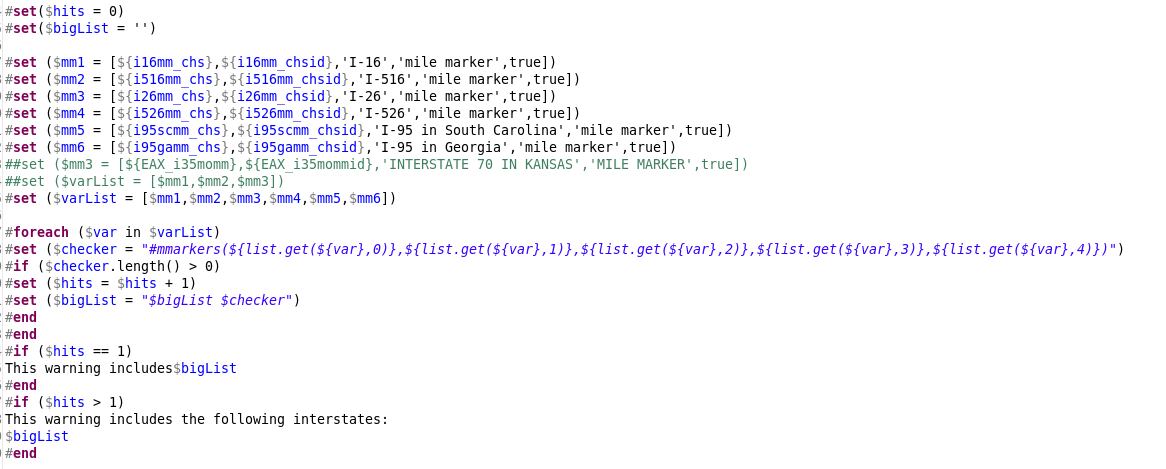
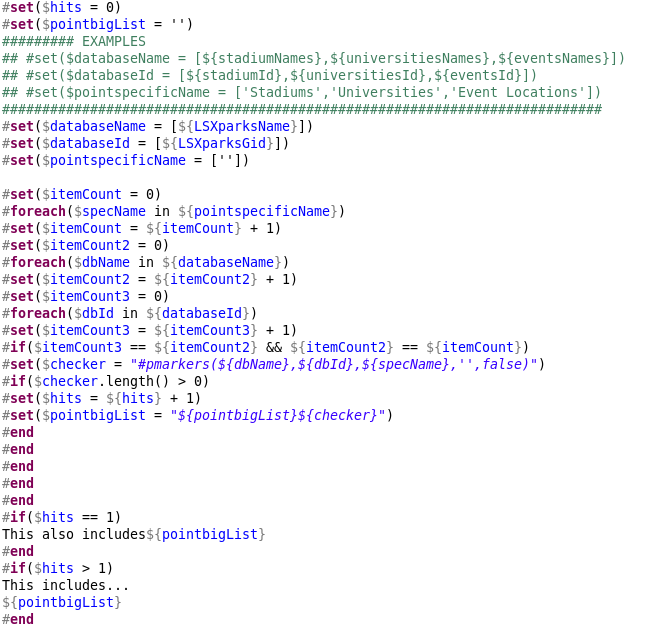
- For mile markers, erase the extra # at the beginning of the ##set ($mm... line. Adjust the code to fit your specific mile marker, add additional lines if needed. See the example image below:
- For point markers, erase the two extra ## at the beginning of the ## #set($... line. Adjust the code to fit your specific point marker, add additional lines if needed. See the example below:
- Save the USER override files using Ctrl+S. Merge if it asks you to.
- To test your mile/point markers, open the D2D perspective and launch WarnGen. Issue a severe thunderstorm warning over an interstate/point marker and check for mile/point markers in the preview text.
- When you are comfortable that the USER override is working as you want, return to the Localization perspective. Promote the USER overrides to SITE overrides by right-clicking USER in the File Browser and selecting Copy To –> Site. Proceed to Section 2.
2. Transferring Mile/Point Markers from WarnGen to Hazard Services
- Open a terminal and go to the following directory:
cd /awips2/edex/scripts/HazardServices - Run the following command to create a "CONFIGURED (site)" PointMarkerConfigs.py file:
./parseWarngenTemplate.py -m - Output should say: "WarngenFilter Script completed setup of: /awips2/edex/data/utility/common_static/configured/[site]/HazardServices/python/events/productgen/geoSpatial/PointMarkerConfigs.py" with [site] being your station identifier.
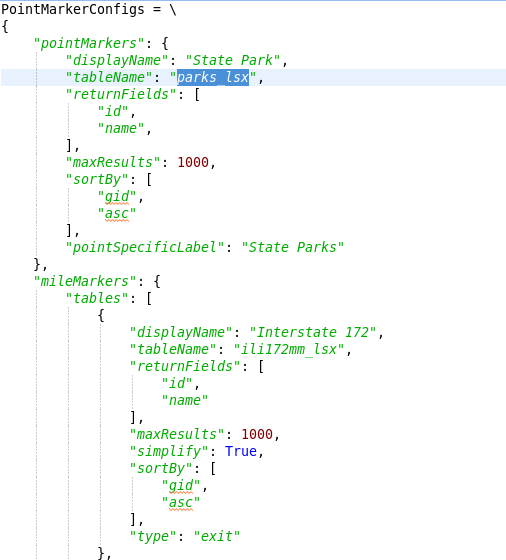
- In the Localization perspective of CAVE, navigate to Hazard Services -> GeoSpatial Config -> PointMarkerConfigs.py -> CONFIGURED (site). Open the file and make sure your mile/point markers have been transferred accordingly.
*NOTE: When using ./parseWarngenTemplate.py, it is essential to check the output of the CONFIGURED file. Check that the "simplify": element is set to True, and there is no leading/trailing whitespace in the value of "type": element.
- Take note of all the "tableName" mile/point marker entries.
Mile Markers:

Point & Mile Markers:
- Open a terminal and run the following commands:
- psql -U awipsadmin maps
\dt mapdata.* - If your mile/point markers are in the table, move on to Section 3. If no mile/point markers appear, we will now input these into the table. Exit out of maps (ctrl+c, then exit) and go to the following directory:
cd /awips2/database/sqlScripts/share/sql/maps - For each mile/point marker (noted from step 5 above), you will run the command below: tableName should be replaced with the mileMarkers/pointMarkers tableName(s) from step 5 (ex: i16mm_chs).
sudo -i -u awips $PWD/importMarkersInfo.sh <insert entire path to .id files directory> mapdata <tableName>
EXAMPLE:
sudo -i -u awips $PWD/importMarkersInfo.sh /home/awips/Downloads/chs/common_static/site/CHS/markers/i16mm.id mapdata i16mm_chs
Repeat for all mile/point markers. - In another terminal, repeat the following command to ensure all of your mile/point markers are in the table:
psql -U awipsadmin maps
\dt mapdata.*
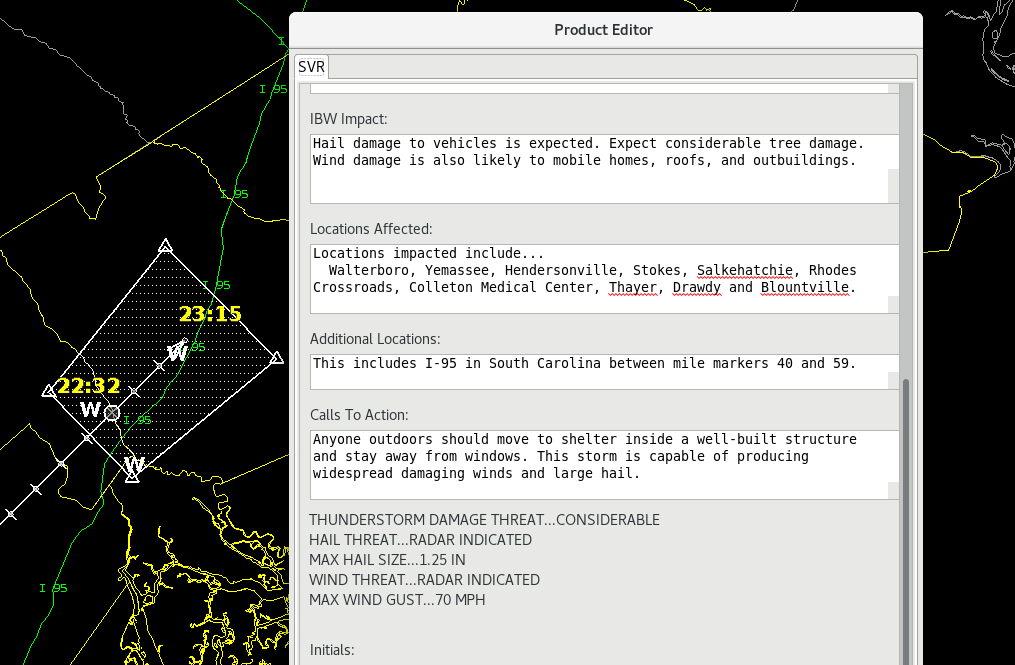
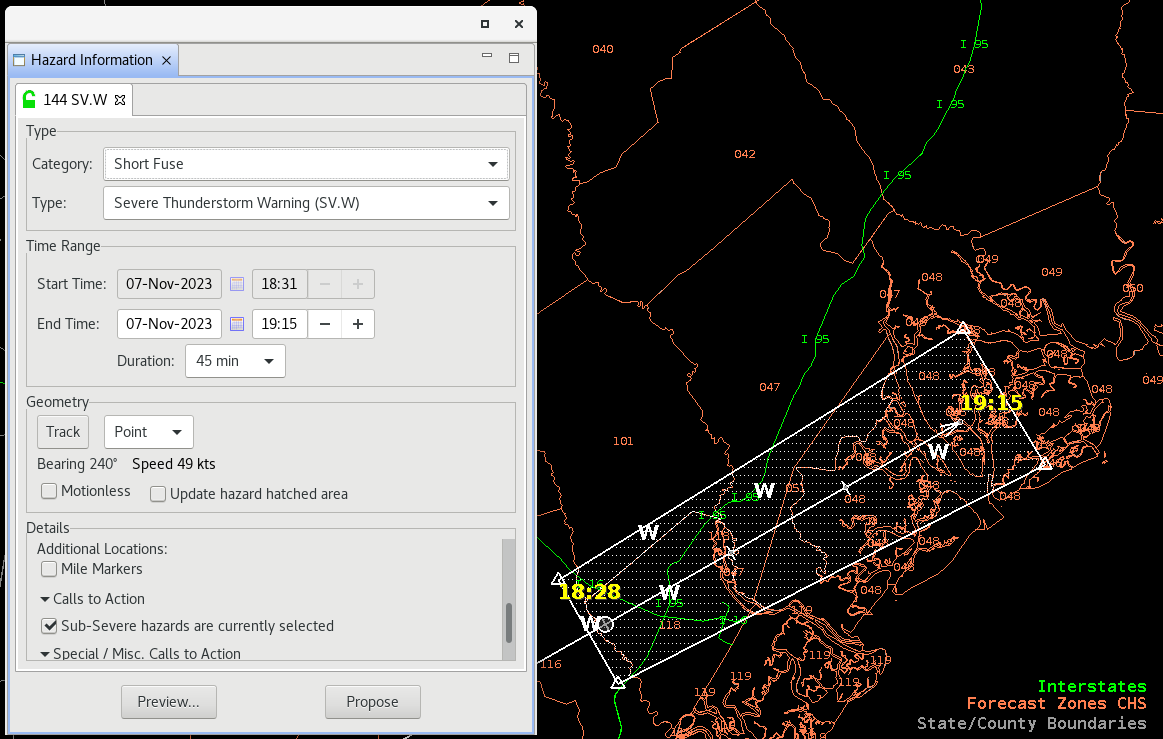
- Open CAVE and navigate to the D2D perspective. Launch Hazard Services and draw a hazard polygon over the location of a mile/point marker and ensure the Additional Locations: Mile Markers or Point Markers checkbox appears beneath the Details section. Preview the hazard and scroll down in the Product Editor to the Additional Locations section, your mile/point marker(s) will appear here.
If you have any issues with the transfer of mile/point markers from WarnGen to Hazard Services, refer to this document and/or email nws.wdtd.awips@noaa.gov for assistance.
3. Adjust Mile/Point Markers by Default/Hazard Type
*NOTE: A mile/point markers checkbox (unchecked) appears by default (beneath the details section of the Hazard Information Dialog) for all of the Short Fuse Hazard Types except EW.W, MA.S, and MA.W (mile/point markers do not appear for these).
- To make the mile/point markers checkbox always filled by default, in the Localization perspective navigate to Hazard Services -> Hazard Meta Data -> CommonMetaData.py and double click on BASE to load.
- If a USER override for CommonMetaData.py does not already exist, create one by right-clicking BASE –> Create Override File and selecting User. Open the USER override file.
- In the BASE file, use Ctrl+F to launch the Find/Replace tool and search for the function getAdditionalLocations(self). Copy the entire function definition into the USER override file.
- Beneath the if choices: statement, find the line that says values = []. Between the brackets, insert "milemarkers". If doing this for point markers, include "pointMarkers".
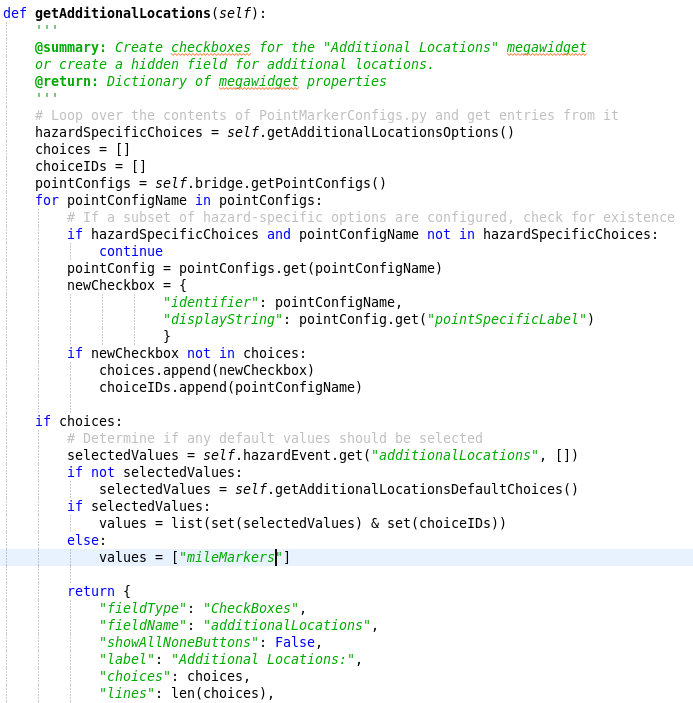
- Save the USER override file using Ctrl+S. Merge if it asks you to.
- To test your new default, open the D2D perspective and launch Hazard Services. Create a hazard segment and ensure Additional Locations: Mile Markers checkbox is checked beneath the Details section.
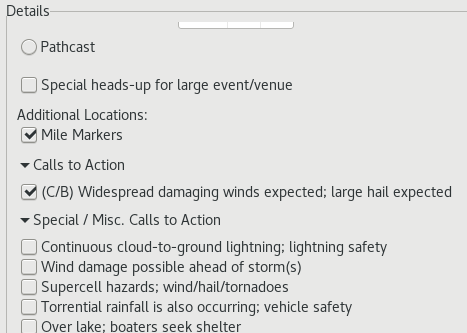
- To make the mile/point markers checkbox appear in a hazard type that doesn't exist by default (MA.S, MA.W, and EW.W), the specific metadata will need to be adjusted. For example, Extreme Wind Warning (EW.W) will be used to show this process. Navigate to Hazard Services -> Hazard Meta Data -> MetaData_EW_W.py and double click on BASE to load.
- If a USER override for MetaData_EW_W.py does not already exist, create one by right-clicking BASE –> Create Override File and selecting User. Open the USER override file.
- In the BASE file, copy the entire def execute function into the USER override file.
- Beneath the first else statement, find the line that says details = [ with various self. calls below it. Somewhere in this list, add the call self.getAdditionalLocations(). This will enable mile/point markers for EW.W.
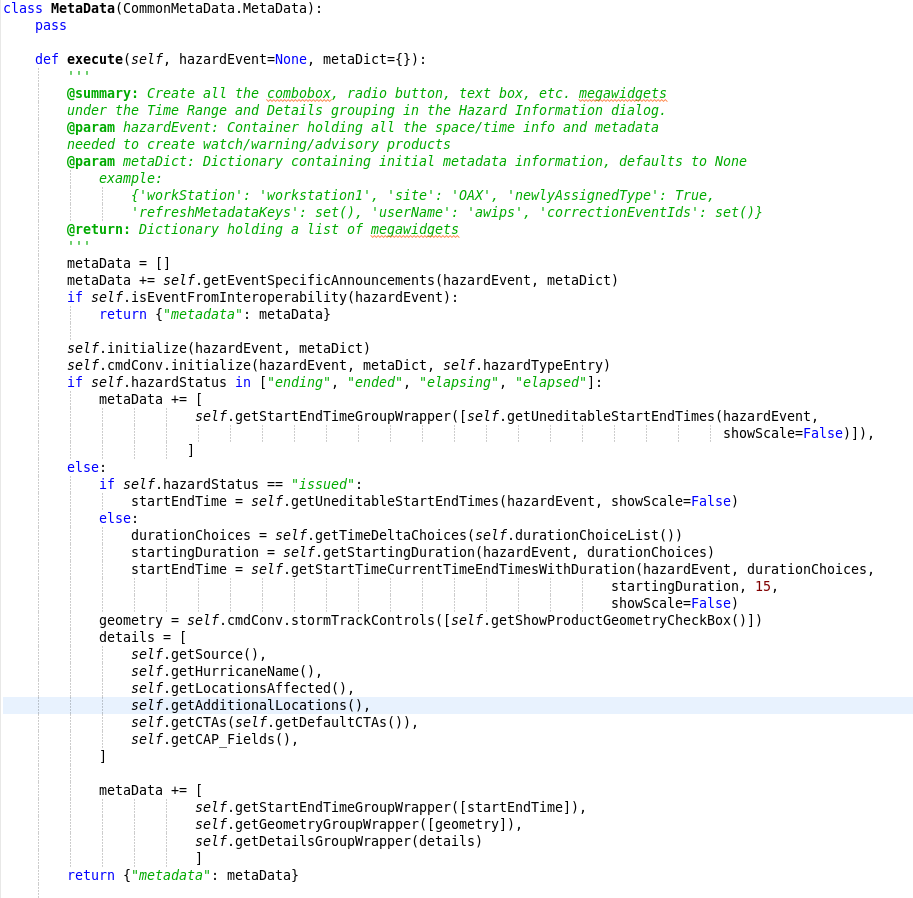
- Save the USER override file using Ctrl+S. Merge if it asks you to.
- To test your new default, open the D2D perspective and launch Hazard Services Short-Fuse. Draw an Extreme Wind Warning (EW.W) hazard segment and ensure the Additional Locations: Mile Markers (or Point Markers) checkbox appears beneath the Details section.
Congratulations, you've imported and configured Mile & Point Markers in Hazard Services.