Creating a Short-Fused Event (30 min) - Hazard Services
Short Fused Events: Completion Time ~ 45 min
Purpose:
In this jobsheet you will create short-fused hazards both manually (using the drawing tools) and then with the Recommenders (Flash Flood, Dam/Levee Break, and Burn Scar). This jobsheet should be done with CAVE in practice mode after the local focal has configured Hazard Services and prepared default short-fused and long-fused hydro warnings.Tasks:
Sections
-
Creating a FA.W, FA.Y or FF.W using the draing tools
-
Creating FF.Ws with the Flash Flood Recommender (FFR)
-
Creating a dambreak FF.W or FF.A using the “Dam/Levee Break Flood Recommender”
-
Creating a FF.W or FF.A using the “Burn Scar Recommender”
Creating a FA.W, FA.Y or FF.W using the drawing tools
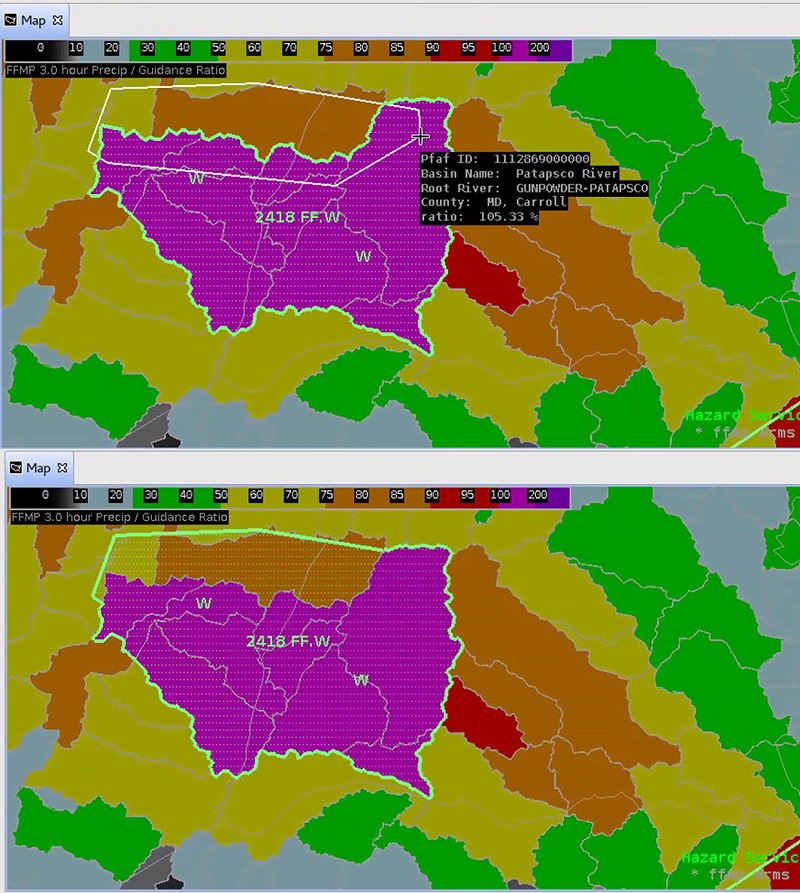
- This exercise will use the Non River Setting (loaded from SETUP icon Load Settings in console) in the D2D Perspective. If you have any FFMP data available you may choose to load FFMP first to draw a polygon over one of the heavy rain areas. This can enhance later the subsequent Flash Flood Recommender section.
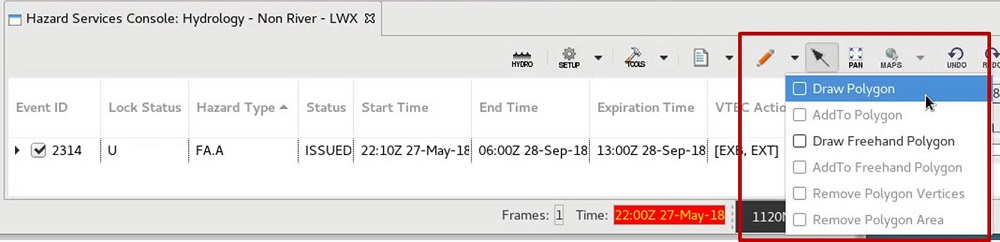
- Click the “Drawing Tools” button (initially a pencil icon) on the console and choose either the “Draw Polygon” or “Draw Freehand Polygon”.
- For "Draw Polygon": Left-click on the spatial display to set each vertex. Add as many as necessary, then right-click to complete the polygon.
- For "Draw Freehand Polygon": Left-click and hold in the spatial display and drag the pointer until the polygon is complete. The polygon is defined when you release the mouse button.
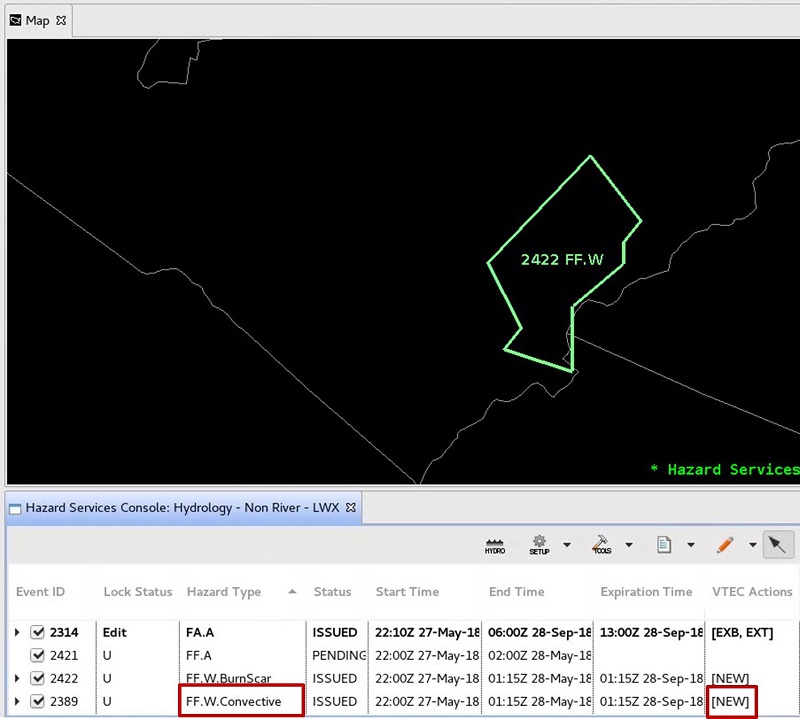
NOTE: Your hazard status in the Console will be PENDING to start. If at any time you want to start over, you can do so in one of two ways: 1) Right-click on the hazard row in the console and select "Delete This", or 2) right-click and hold within the polygon in the spatial display and select "Manage hazards" -> "Delete This".
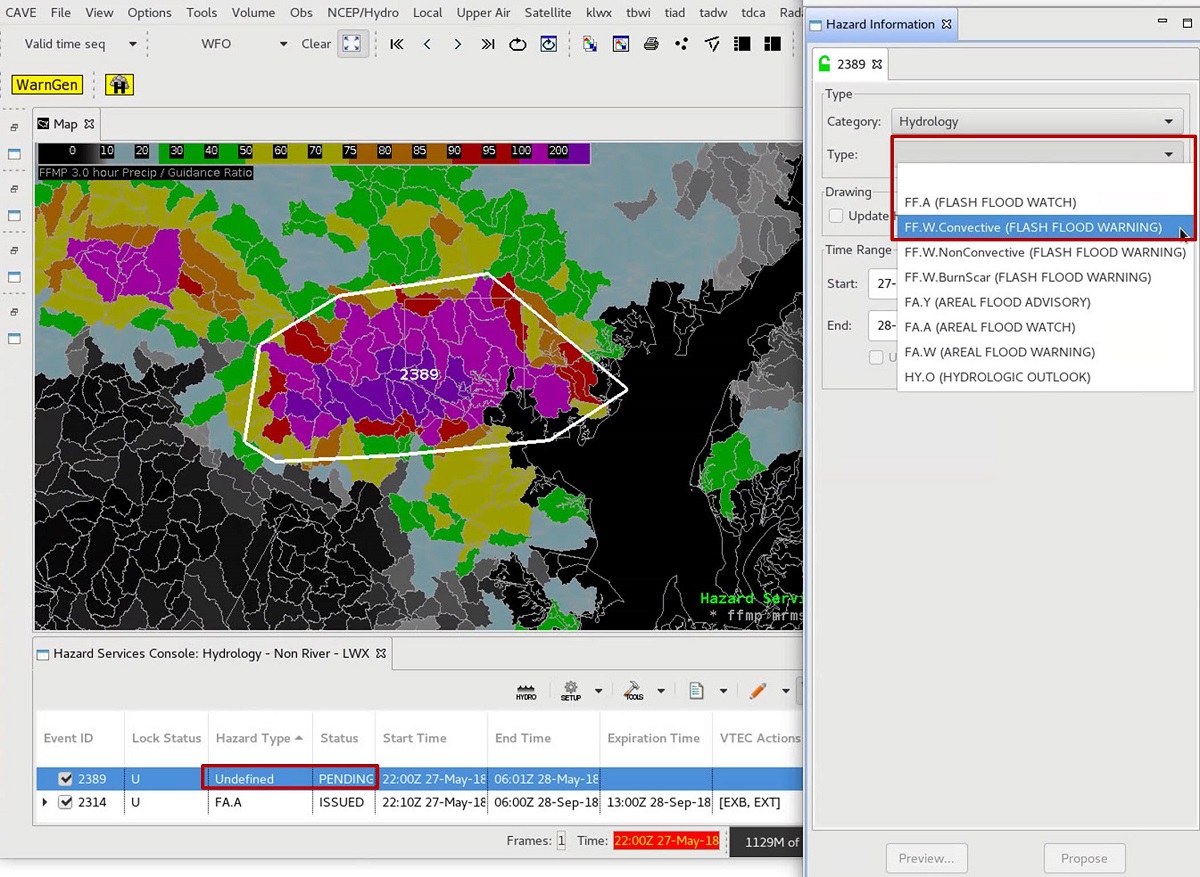
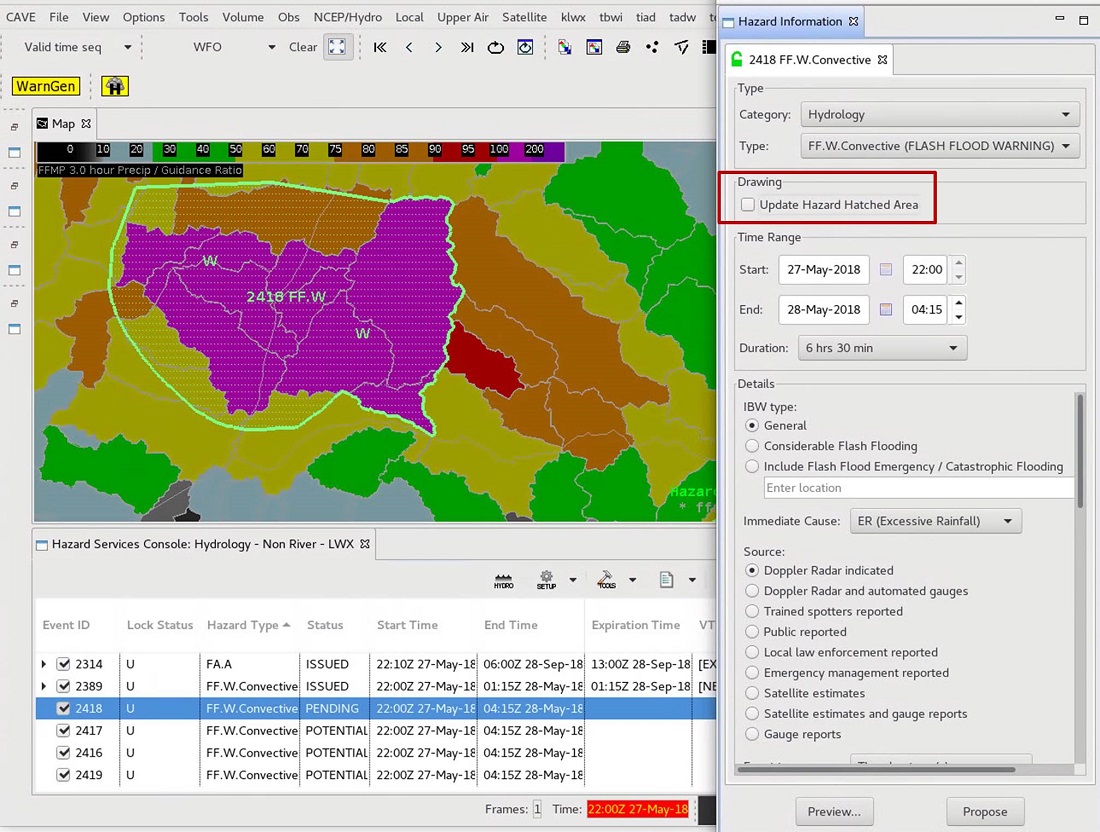
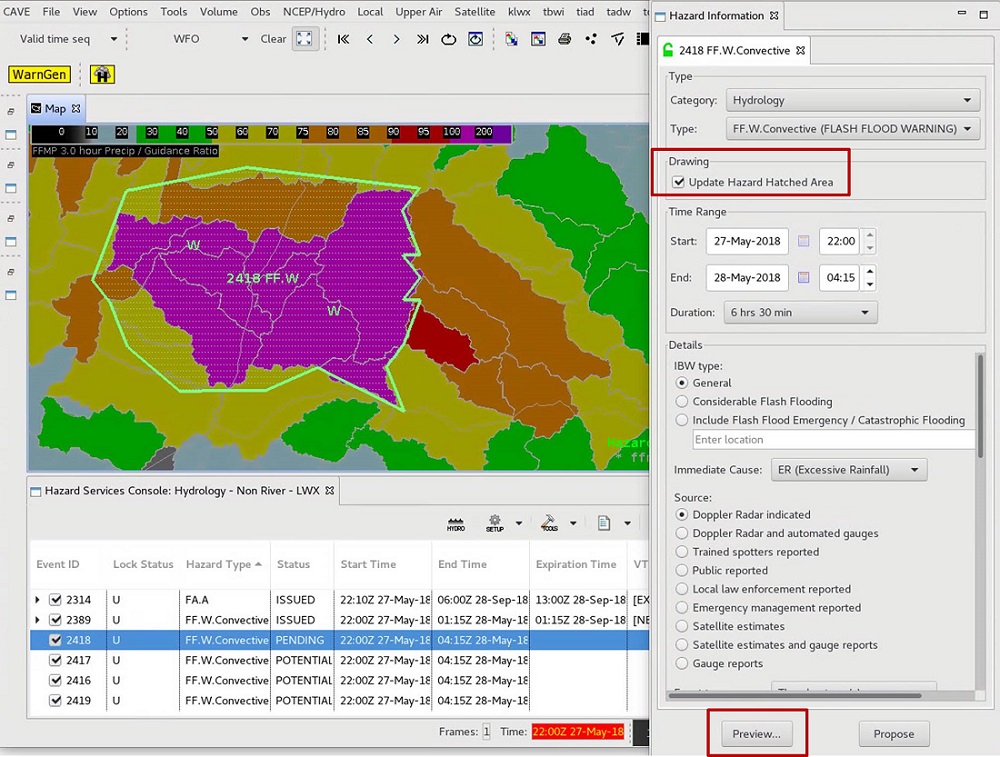
- After drawing the polygon, select "FF.W Convective (FLASH FLOOD WARNING)" from the Type menu in the HID. Note in later builds the name is changing in the HID to be Flash Flood Warning (FF.W.Convective).
- From this point, the HID will strongly resemble the WarnGen interface. However, there are a few difference worth noting here:
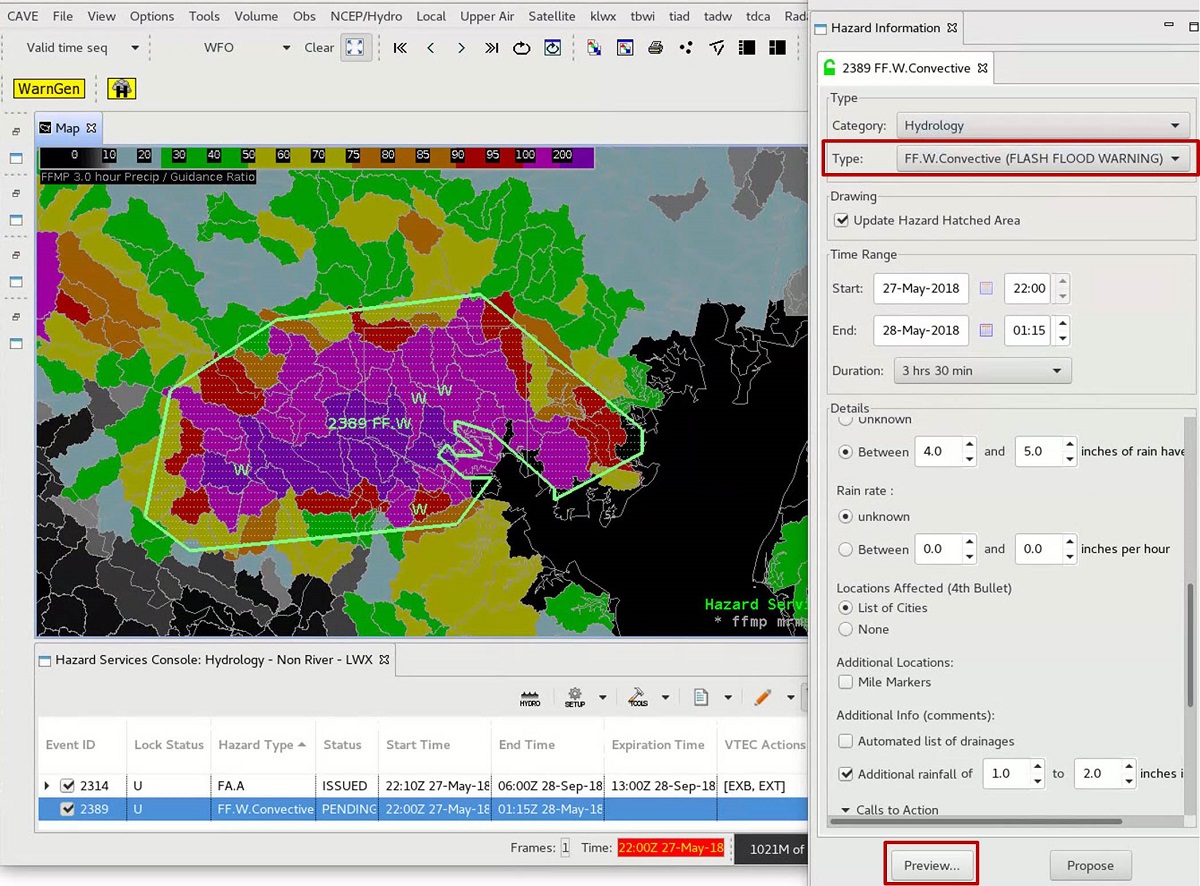
- In the "Drawing" section, the "Update Hazard Hatched Area" option will preview the down-sampling of the high-resolution polygon to the legacy 20 vertices limit (similar to the Warned/Hatched Area button in WarnGen).
- When all of the attributes have been specified (e.g. selecting "Considerable Flash Flooding" IBW type: from the "Details" section), click “Preview” in the HID. In later builds the Rain rate is replaced by an Amount/Duration entry and there will be other minor differences in the Details section.
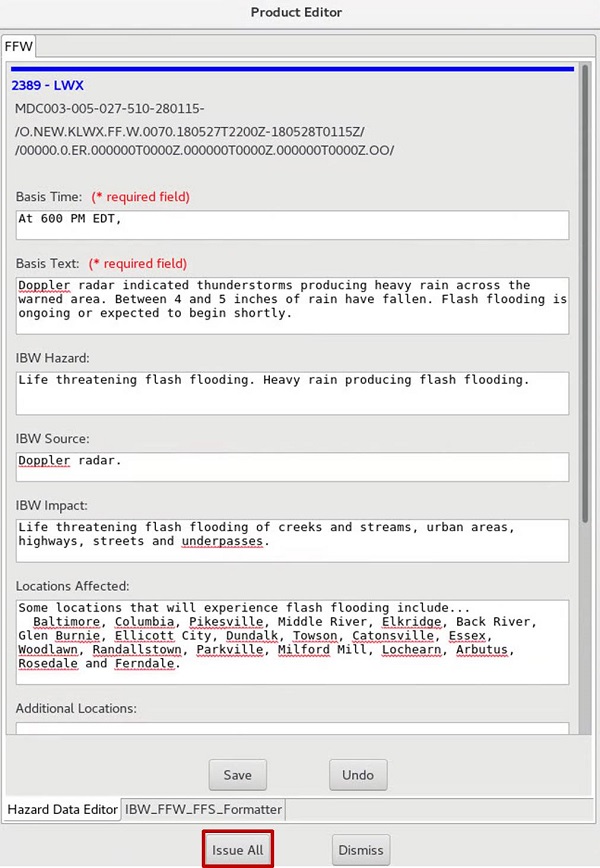
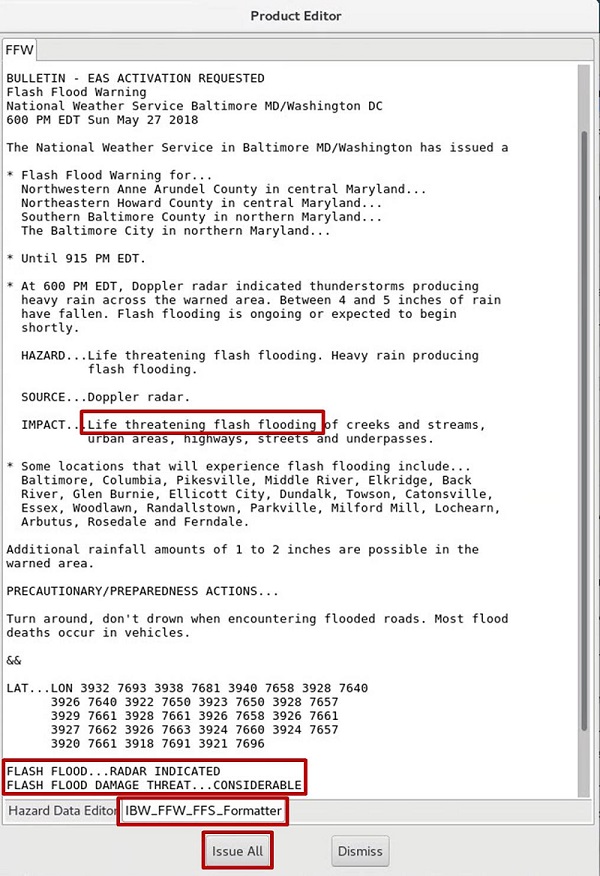
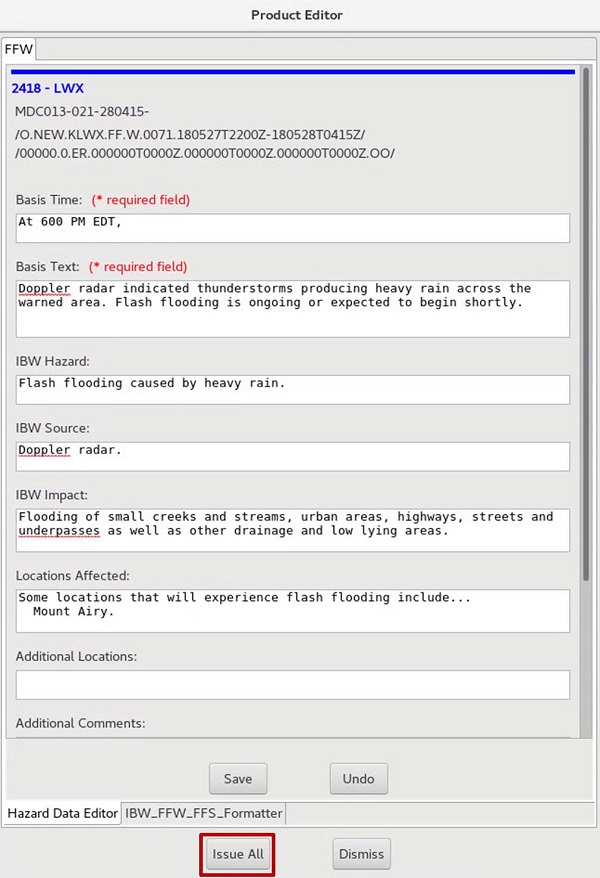
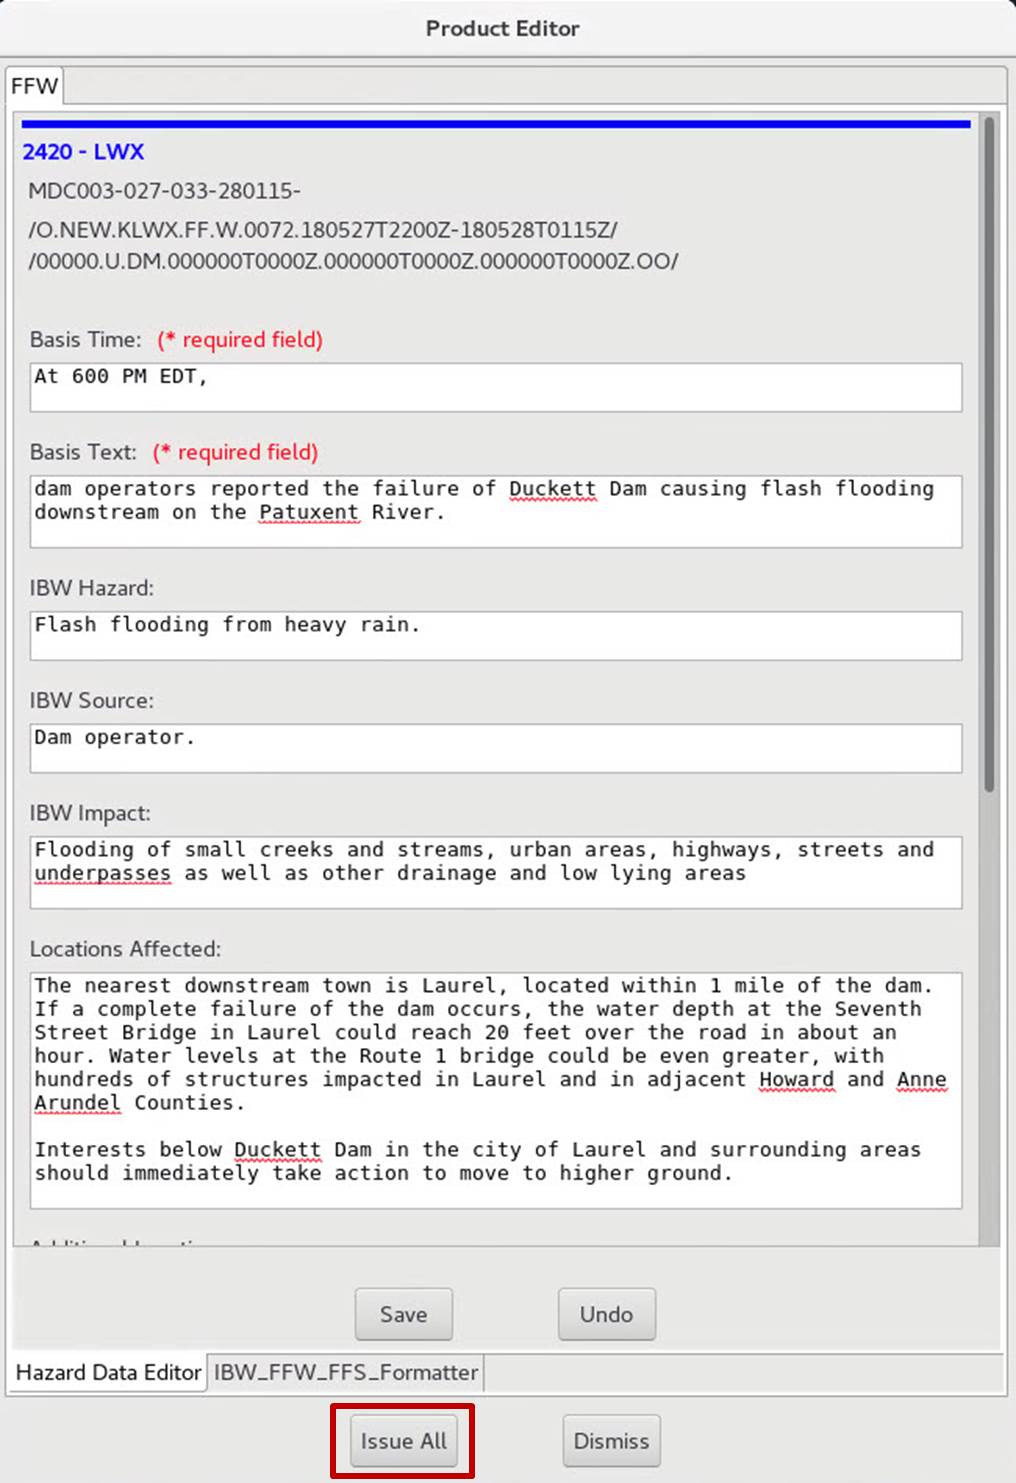
- Click on each of the tabs on the bottom of the Product Editor (Hazard Data Editor, IBW_FFW_FFS_Formatter, etc.) and note you can only edit information in the white boxes in the main Hazard Data Editor tab. The design is that text editing is done in the Hazard Data Editor and propagated to all other text products. Note the impact-base warning structure in the IBW_FFW_FFS_Formatter tab. After modifying the text in the Hazard Data Editor, click "Issue All". In later builds the Basis Time: is locked and not editable.
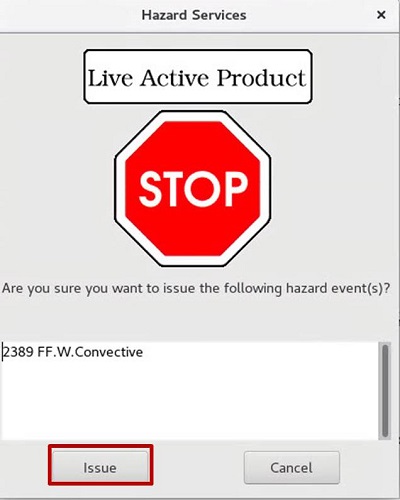
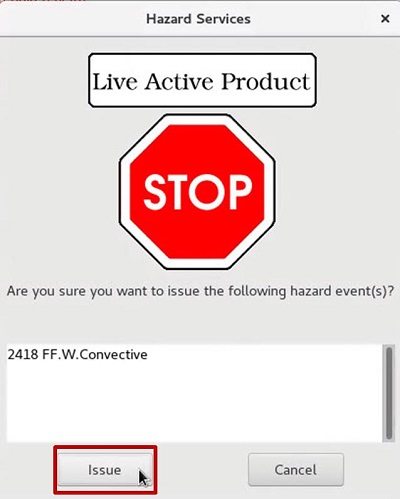
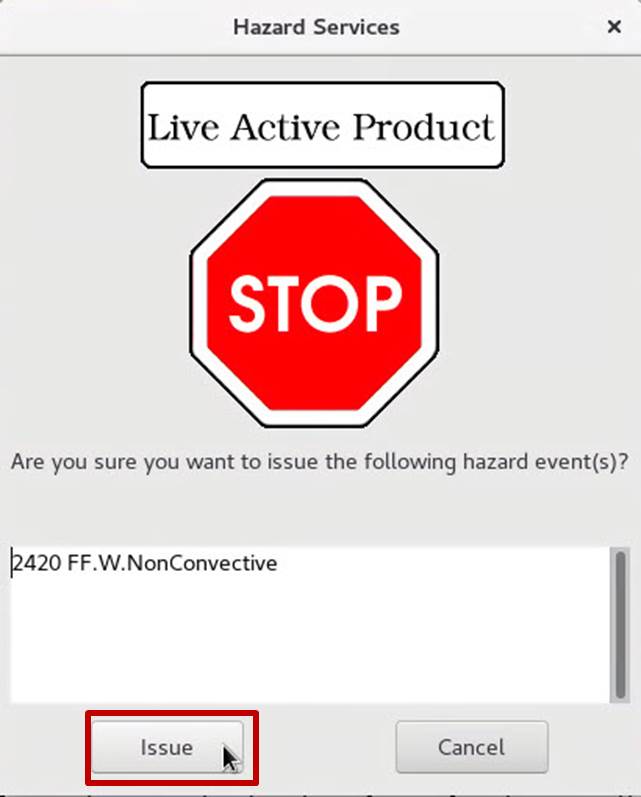
- When the "Live Active Product" dialog comes up, click the "Issue" button.
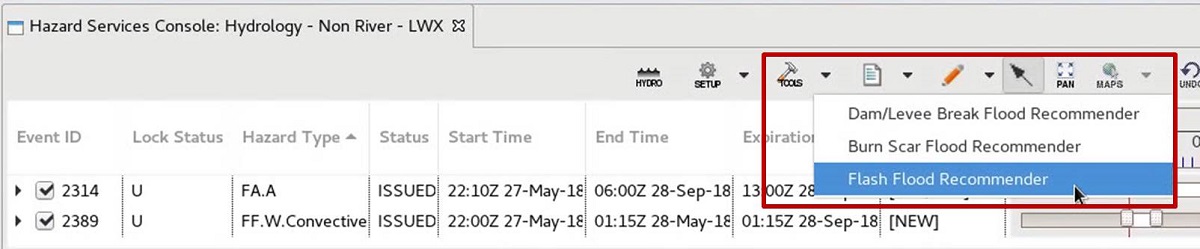
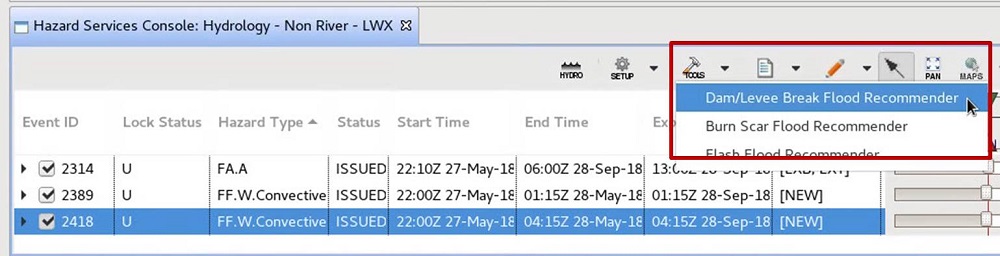
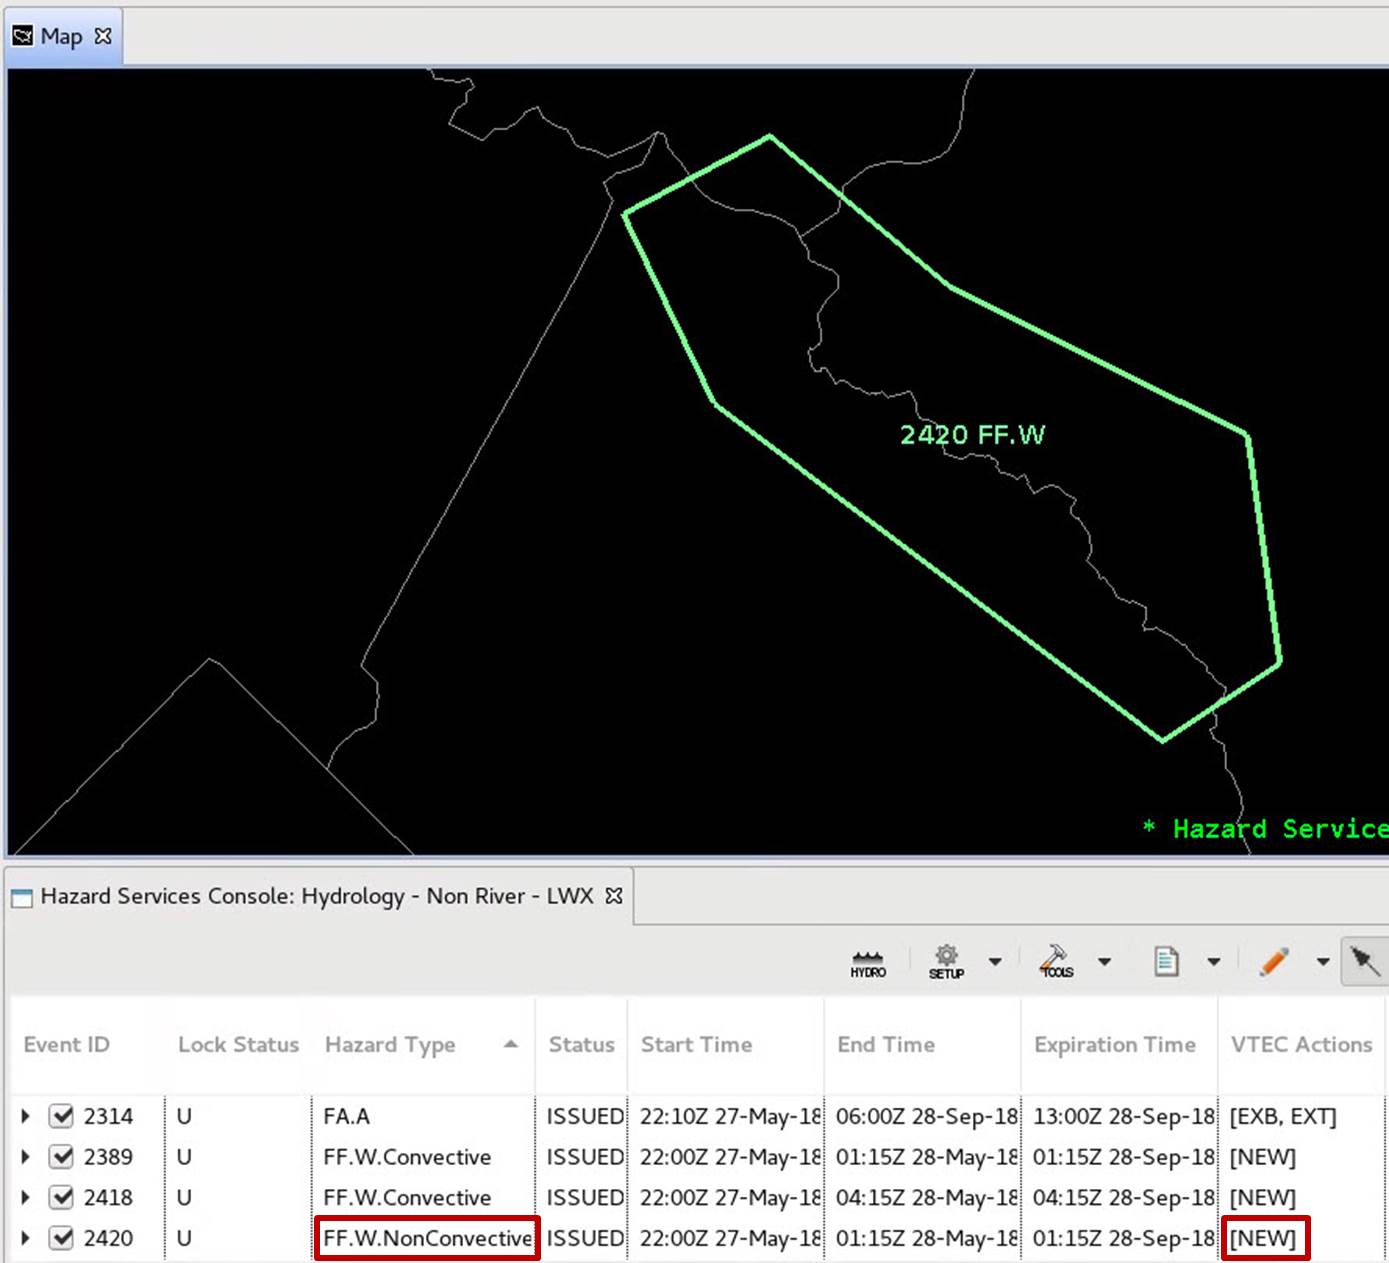
- The Console will update with the NEW VTEC Action and an "ISSUED" Status.

Creating FF.Ws with the Flash Flood Recommender (FFR)
The FFR is an FFMP-based recommender that uses your defined FFMP thresholds to combine the many basins that meet the criteria into something manageable. The most effective way to use the recommender is to evaluate the raw data before running the recommender and then input the thresholds desired for a first-guess polygon (e.g. 1hr ratio > 100% for an urban area or 3hr diff > 0.5" for training storms with a known bias in QPE or FFG). Vertices reduction to current policy can make the recommender challenging to use, and sometimes it is easier to manually draw a polygon.
- Load FFMP from the SCAN menu and view the data to determine the duration, display field, and thresholds that are appropriate for flash flooding (e.g. MRMS 3hr ratio >100%). Then click the TOOLS icon from the Console and choose the “Flash Flood Recommender”. In later builds some of the recommenders like Dam/Levee Break Flood Recommender are changing names to just Dam/Levee Break Flood.
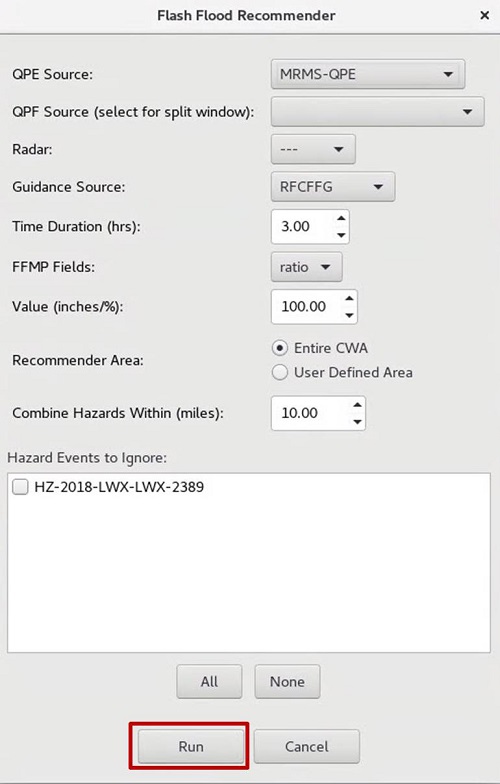
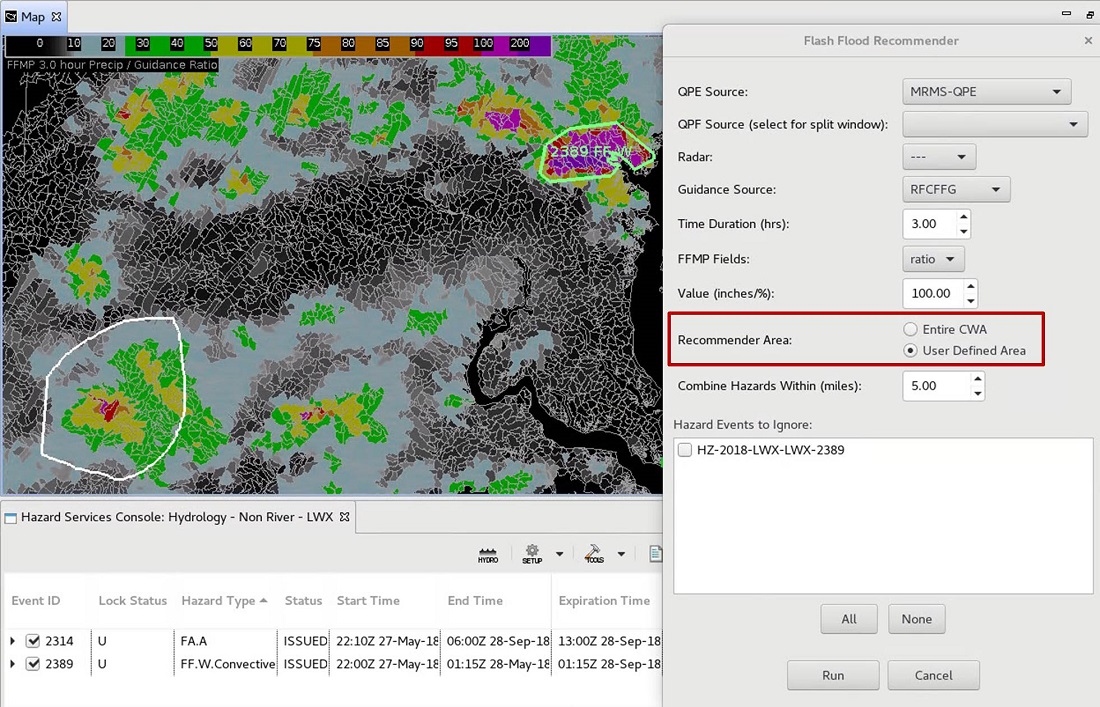
- The FFR dialog (see image below of top of the recommender GUI) will open. In later builds the Value (inches/%) is changing to Value (inches or percent).

- Most of the menu options will be familiar to FFMP users, but there are also some new ones:
- Select your QPE source.
- Most FFMP users don't use the FFMP QPF split window (typically 1hr QPF + remaining hours of QPE over the duration specified in the FFMP slider bar), so unless you are one of those rare users, then don't select a QPF Source or you are going to be using QPF in your estimate (inherently complicated).
- Select your radar (if choosing DHR or DPR sources), Guidance Source (usually RFCFFG), Time Duration, FFMP Field, and Value.
- The "Recommender Area" determines whether to run the recommender over the entire CWA or if the user will draw an area. If you select the "User Defined Area" option, you will need to left-click and hold over the desired area in the spatial display to draw where to run the recommender (Draw Freehand capability).
- If your recommendation has lots of small polygons with separate hazard IDs that are close to each other, you can increase the “Combine Hazards Within(miles)” value to have it combine hazards into a single hazard.
- If there are any current FFWs, then they will be listed, so you can potentially ignore basins that intersect any or all existing hazard polygons from the initial recommendation.
- After specifying the options in the dialog, click “Run”.
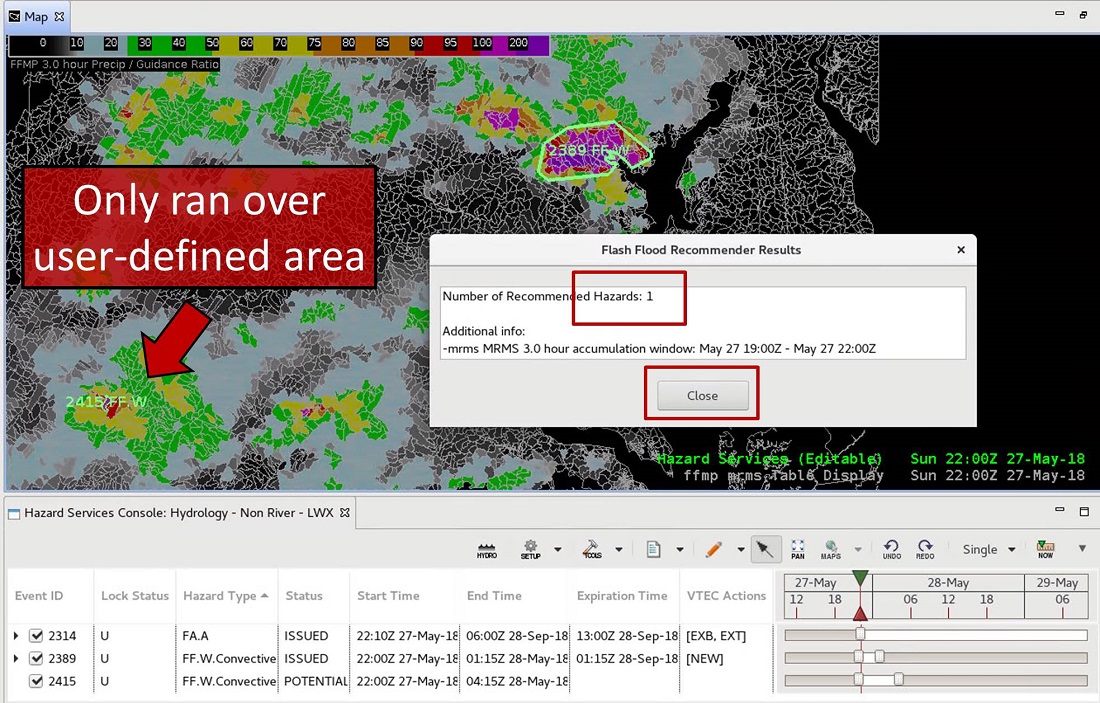
- The recommender results window will inform you how many hazards it recommended, and you will see a POTENTIAL event for each hazard in the Console. Click the "Close" button.
NOTE: You may want to reduce the brightness of FFMP to see the polygons by using "Ctrl + i" and reducing brightness to 70%. Additionally, you can left-click within the recommended area in the spatial display, and that will hatch the boundary of the threat area.
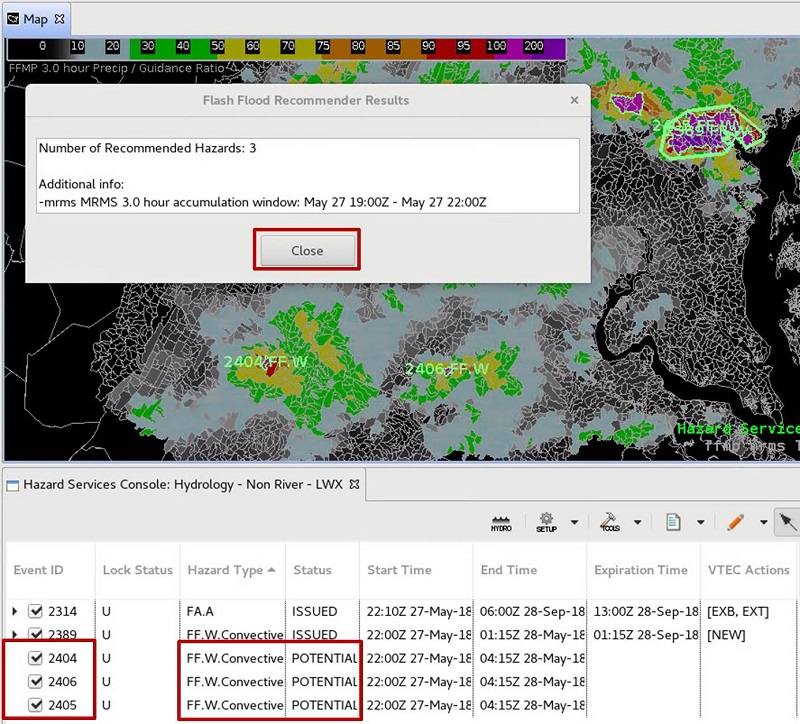
- The recommender results window will inform you how many hazards it recommended, and you will see a POTENTIAL event for each hazard in the Console. Click the "Close" button.
- The user may then select one or more “POTENTIAL” events from the Console and progress through the standard workflow of interacting with the HID to define the hazard event and issue a product. First we will step though the different options in the recommender.
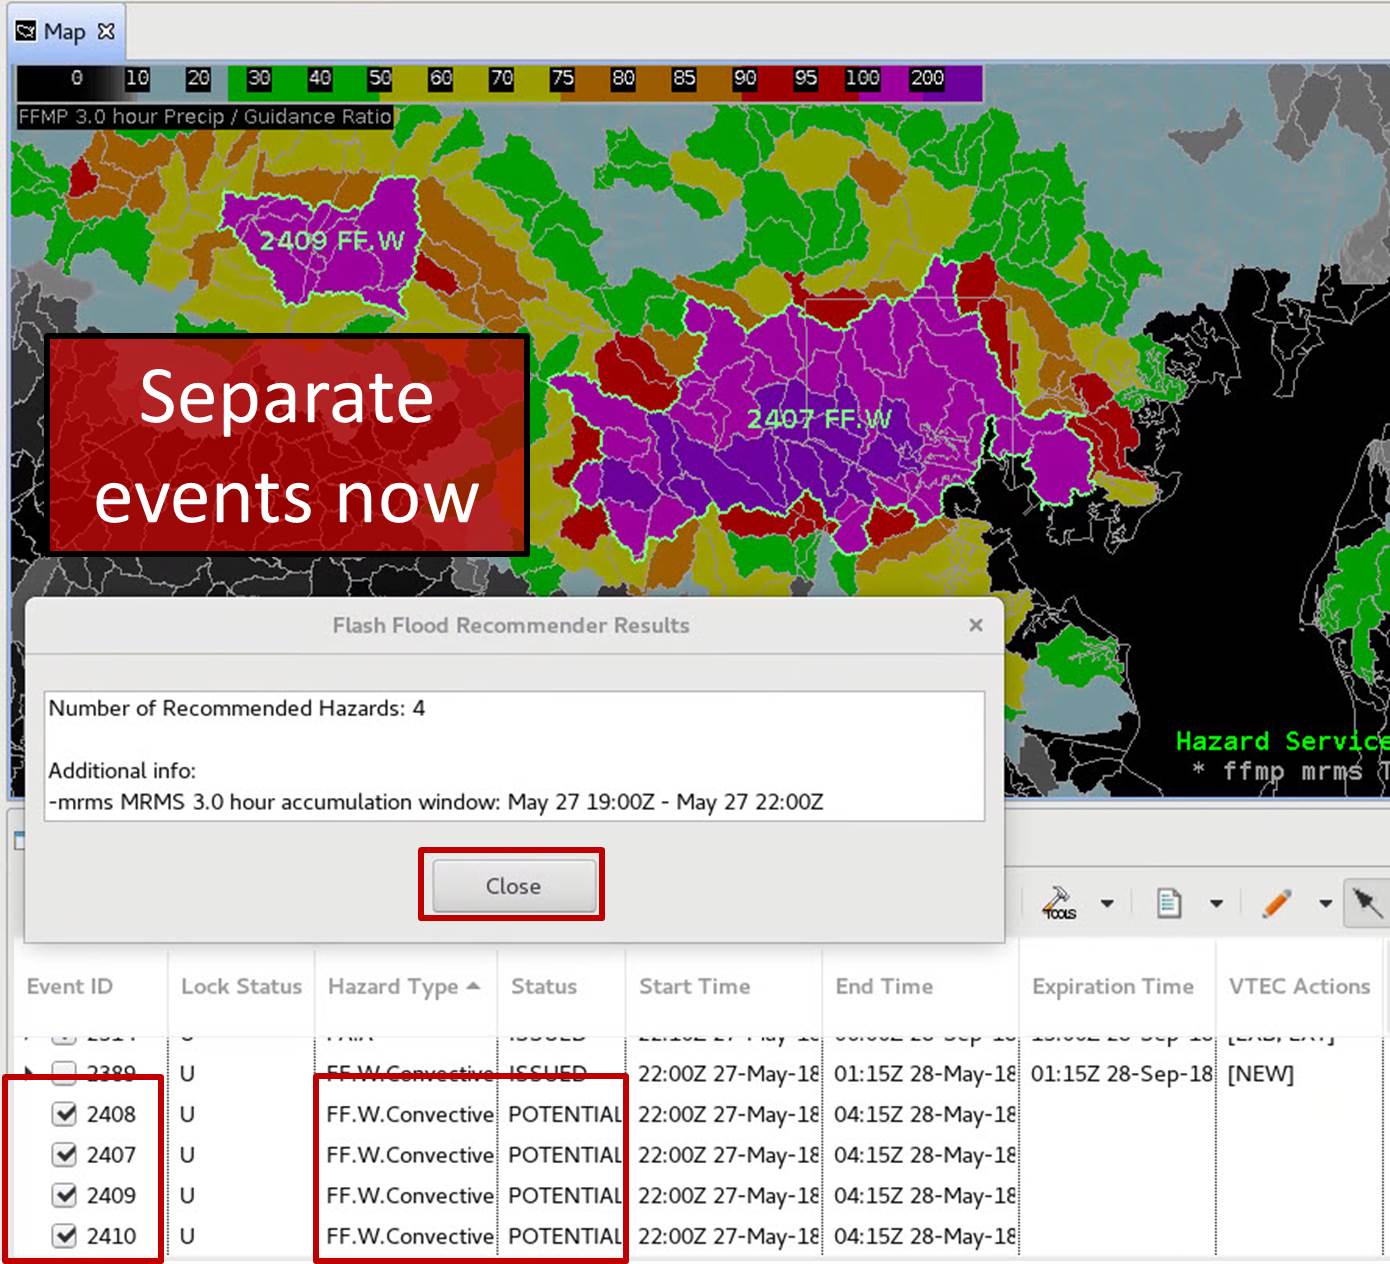
- Look for an instance where one hazard initially has more than one polygon. This is not allowed by policy and will be combined in the vertices reduction.
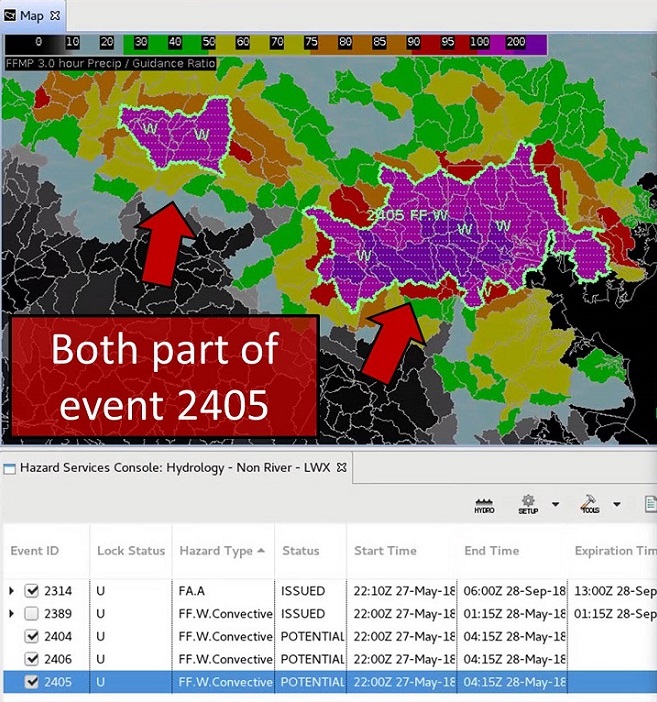
- If you have two polygons in one hazard separated by a significant distance you can try rerunning the recommender with a lower value of "Combine Hazards With" in order to recommend separate polygons.
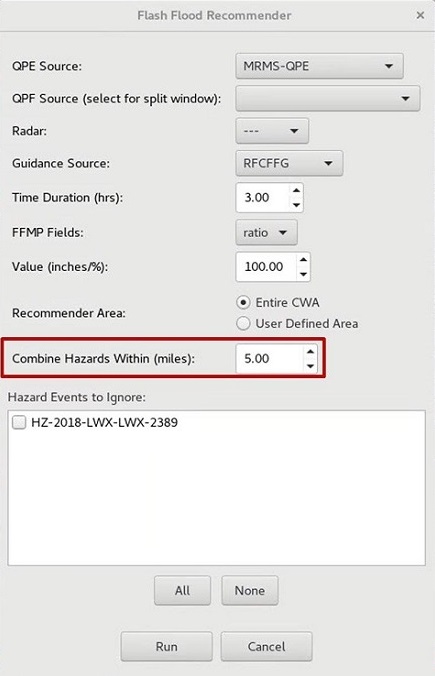
- Note that when the Combine Hazards Within was reduced to 5 miles in this example, the polygons in the previous step were split into separate hazards because they were more than 5 miles apart. Also note that if the same polygon is recommended a second time, the previous potential version will be replaced by the new event with a new event ID. Click "Close" in the results window.
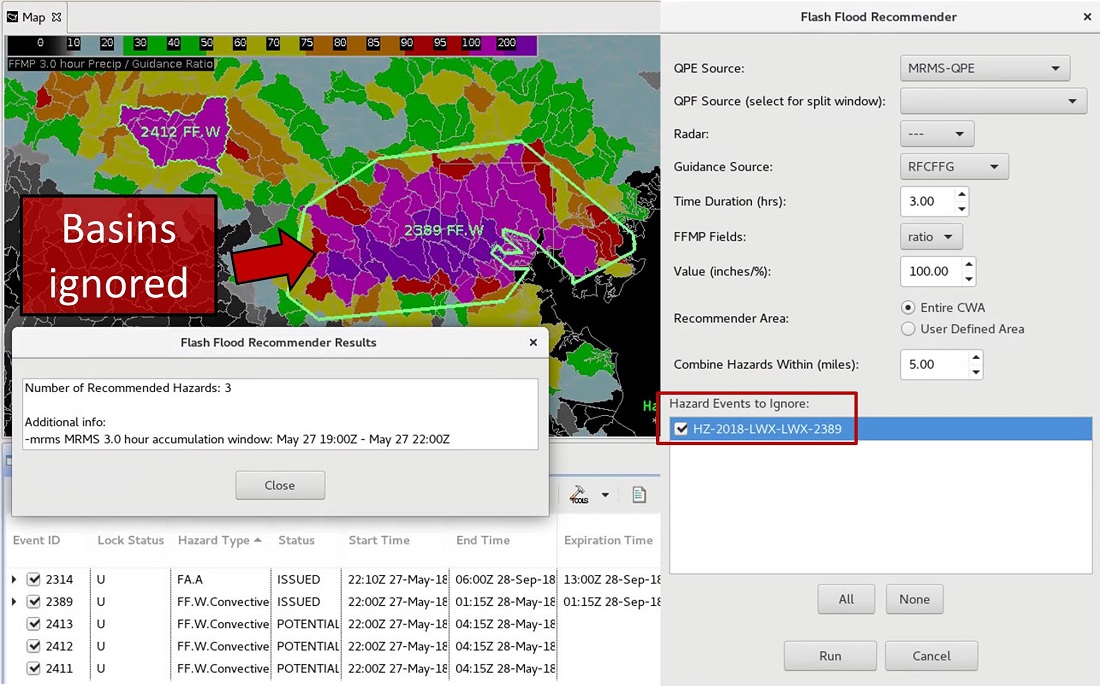
- You may have a polygon that overlaps an existing flash flood warning. If you have a flash flood warning already out, you can select the Hazard Events to Ignore checkbox.
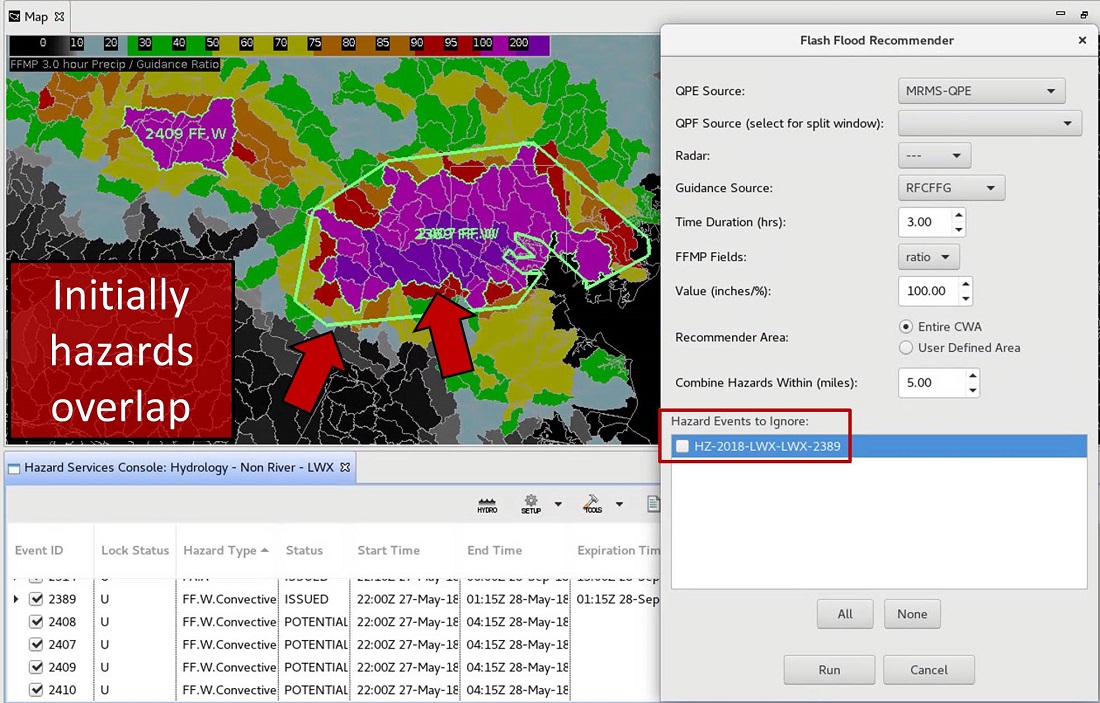
- Look for an instance where one hazard initially has more than one polygon. This is not allowed by policy and will be combined in the vertices reduction.
- In the following example you can see the basins inside hazard event 2389 were ignored by the recommender with the checkbox selected.
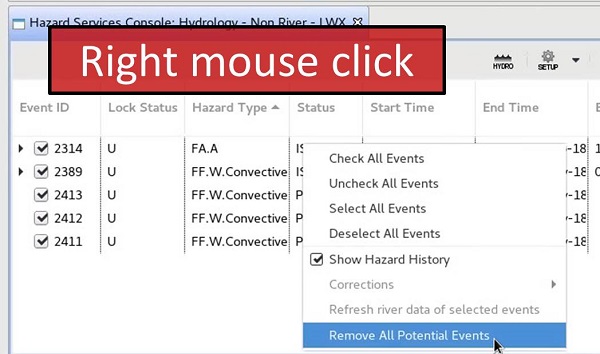
- If you want to remove all POTENTIAL events to clean up the Console, you can right click on the background in the Console and select "Remove All Potential Events".
- If you have a particular area you would like to run the recommender for you can select the "User Defined Area" checkbox and hold down the left mouse button on the map to draw out the area to run the recommender for. This can help prevent having too many recommended events. This feature is unique to the Flash Flood Recommender.
- The resulting recommendations are only for the user-defined area.
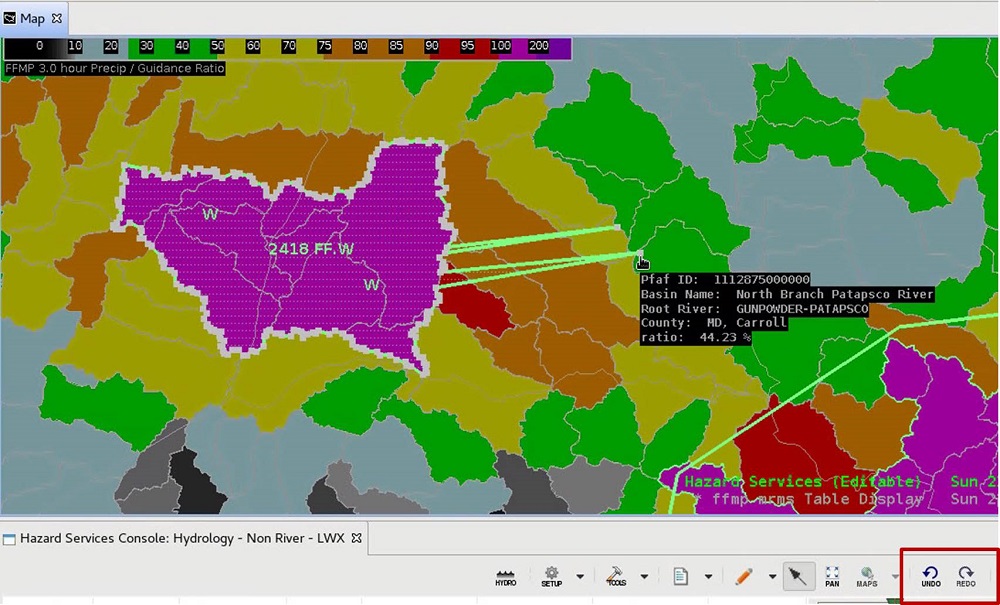
- Click on one of your high-resolution polygons and try to edit vertices. You will see that this is not realistic, and you will have to use the drawing tools to work with lots of vertices. Click on the Undo button to undo your futile vertices interaction.
- Click on the pencil tools icon and select Add To Polygon. Then click vertices to draw a box along the edge of the polygon to join the two shapes and simplify the edge.
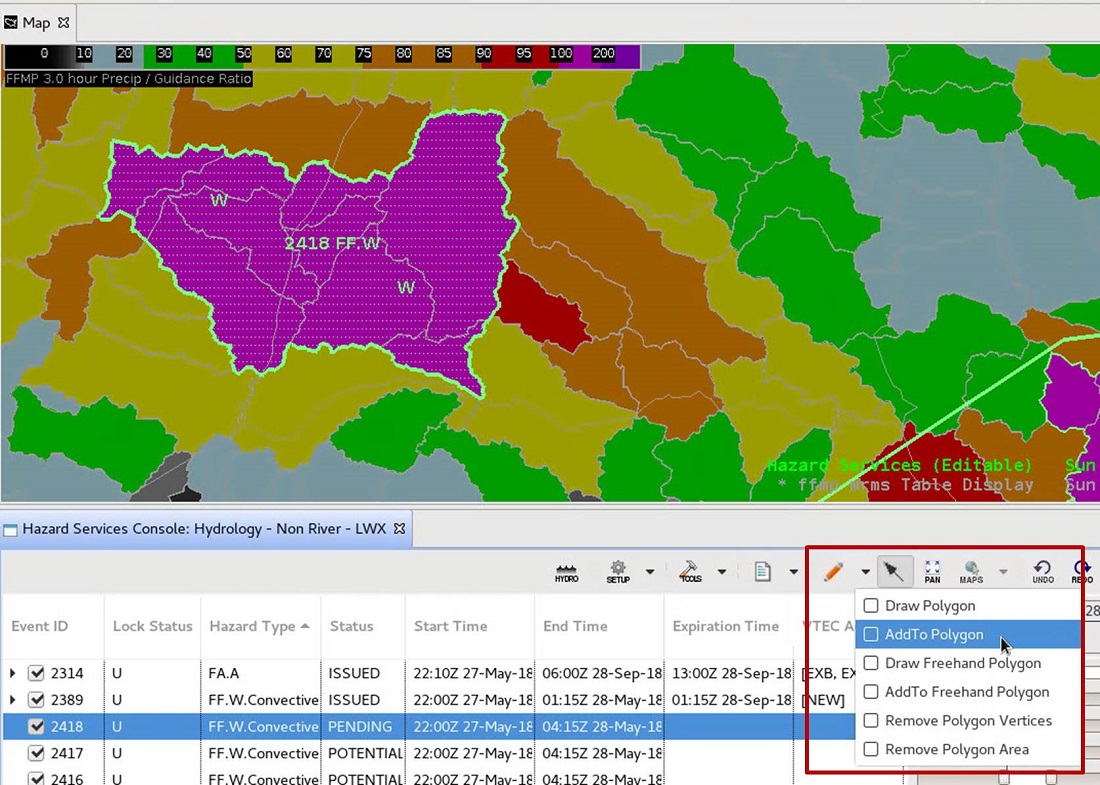
- Note the essence of the Add To Polygon is that it only uses a limited number of vertices in the polygon modification.
- In the pencil tool, select Add To Freehand Polygon.
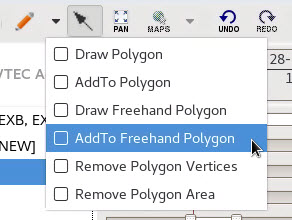
- Hold down the left mouse button to draw a high-resolution shape along the edge of the polygon to add a smooth edge with lots of vertices.
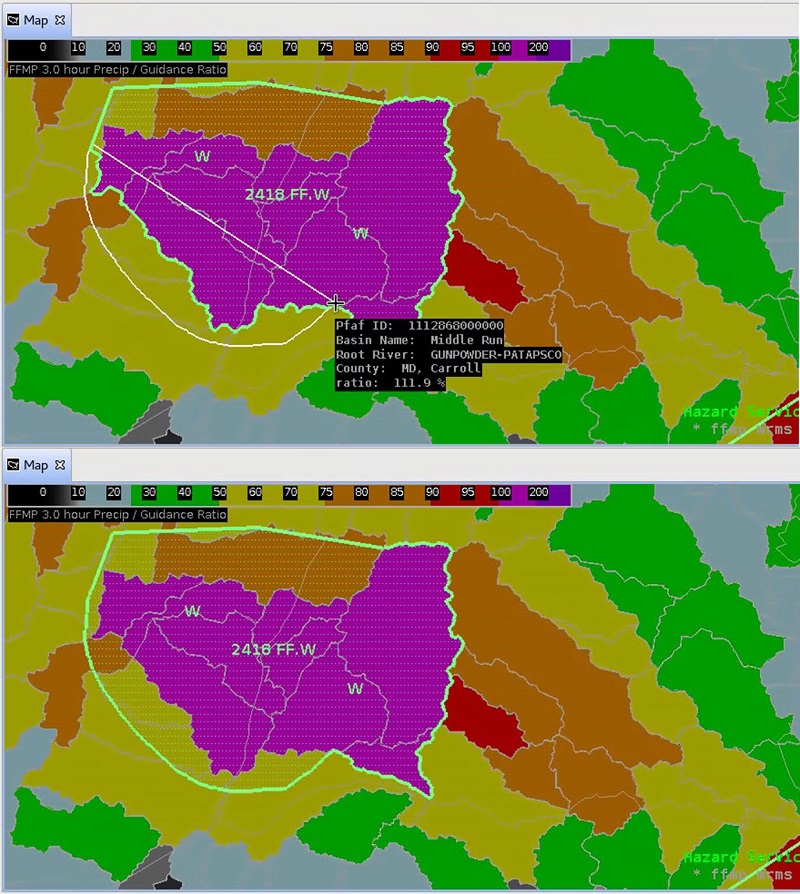
- Click on your recommended hazard and select "Update Hazard Hatched Area" in the HID to preview the vertices reduction to 20 vertices. In general it is usually time consuming to work with the high-resolution polygons, and the more work needs to be done after the vertices reduction step. Many times it is easier to just manually draw the polygon or work with low-resolution polygons.
- Modify your hazard event details in the HID and click on the "Preview" button.
- In the Product Editor modify your text in the Hazard Data Editor tab and click "Issue All".
- Then click "Issue" in the Live Active Product window.
- Your flash flood warning will be issued.
Creating a dambreak FF.W or FF.A using the “Dam/Levee Break Flood Recommender”
Note that this assumes that the dam/levee information has already been configured by the focal point. If the dam/levee has not been configured, you can't use the recommender, and you have to manually create a polygon and then select the FF.W.NonConvective flash flood warning hazard type.
- Click the Recommender icon from the Console and choose the “Dam/Levee Break Flood Recommender”. In later builds this is renamed Dam/Levee Break Flood.
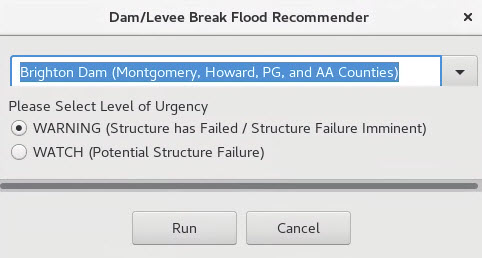
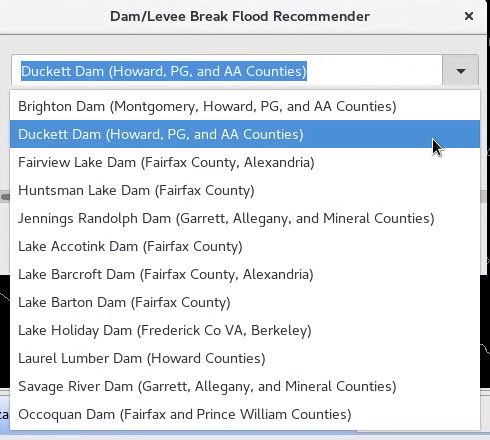
- From the Recommender dialog, choose the dam or levee from the drop-down, and select either the WATCH or WARNING radio button. Then click "Run".
NOTE: Only dams or levees with inundation polygons stored in the maps.daminundation table are available to run from the recommender.
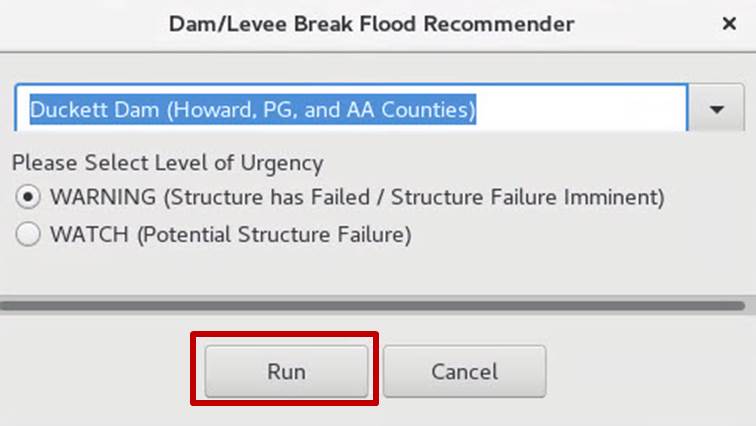
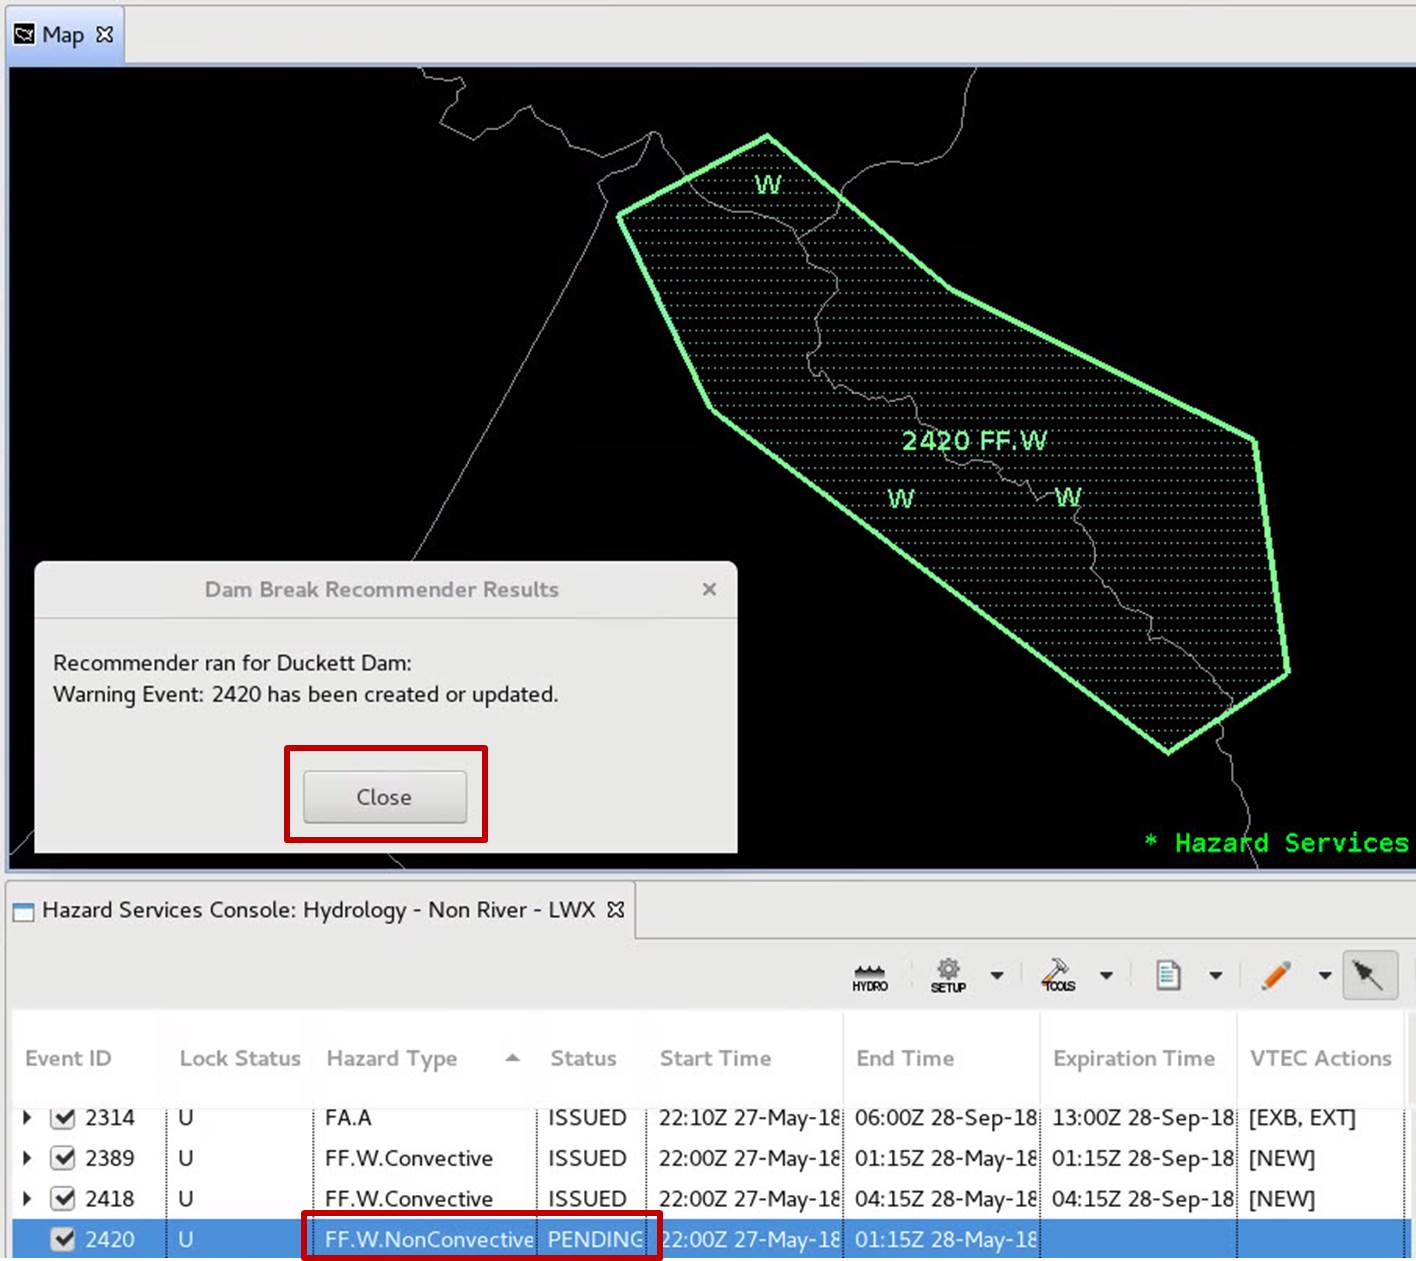
- Select your FF.W.NonConvective hazard from the Console or Spatial Display. Click "Close" on the results window.
- Configure the HID and click "Preview". Most of the dam break configuration is intended to be done by the focal point and will vary by office.
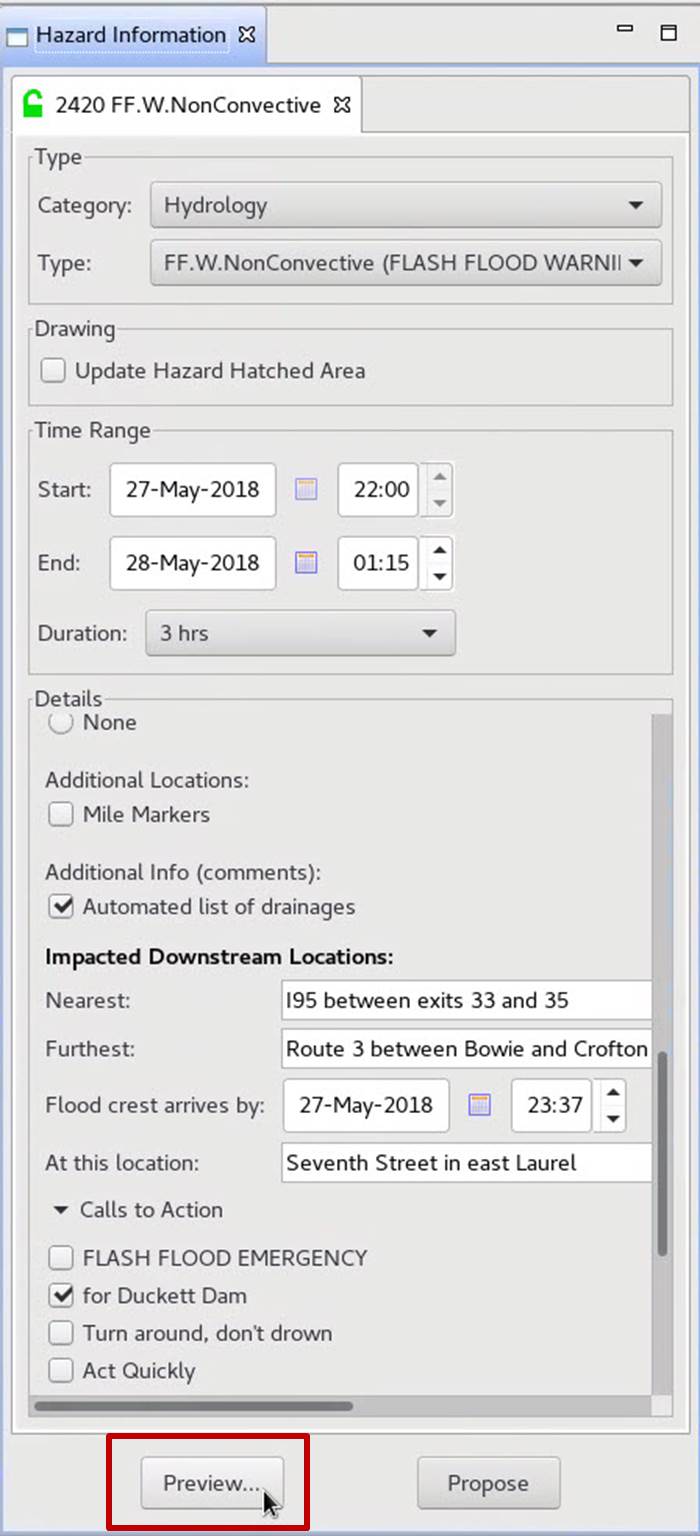
- Modify the text and click “Issue All” to issue the product.
- When the “Live Active Product” dialog comes up, click the "Issue" button.
- The console will update with the new non-convective flash flood warning.
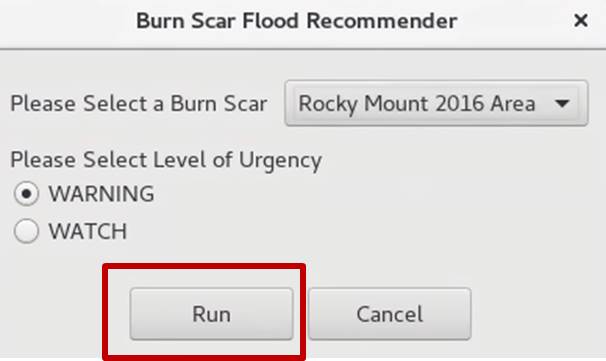
Creating a FF.W or FF.A using the “Burn Scar Recommender”
Note that this assumes that the burn scar has already been configured by the focal point. If the burn scar has not been configured, the recommender won't run, and you have to manually create a polygon and select the FF.W.Burnscar flash flood warning hazard type.
- Click the TOOLS icon from the Console and choose the “Burn Scar Flood Recommender”. In later builds the name is changing to "Burn Scar Flood".

- From the Recommender dialog, choose the burn scar from the drop-down menu, and select either the WARNING or WATCH radio button. Then click "Run".
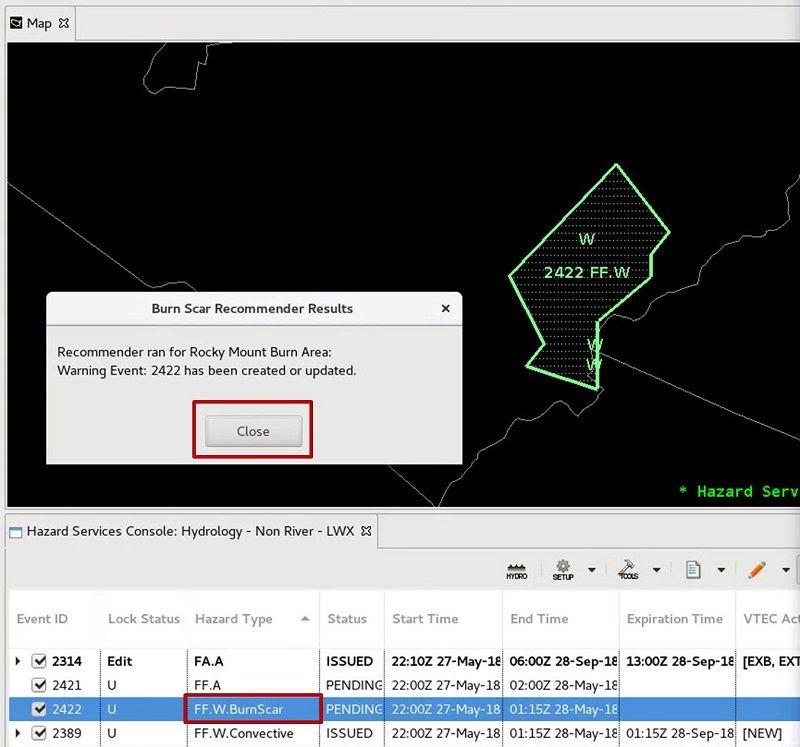
- Select the burnscar flash flood warning from the Console or the Spatial Display. Click "Close" on the results window.
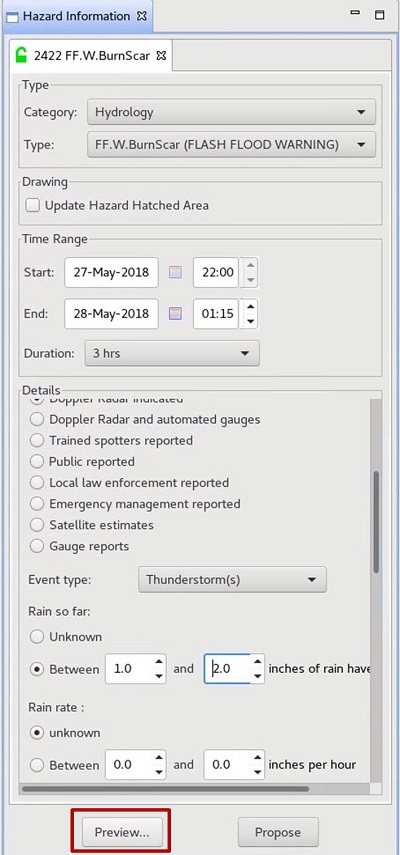
- Enter metadata into the HID and click "Preview".
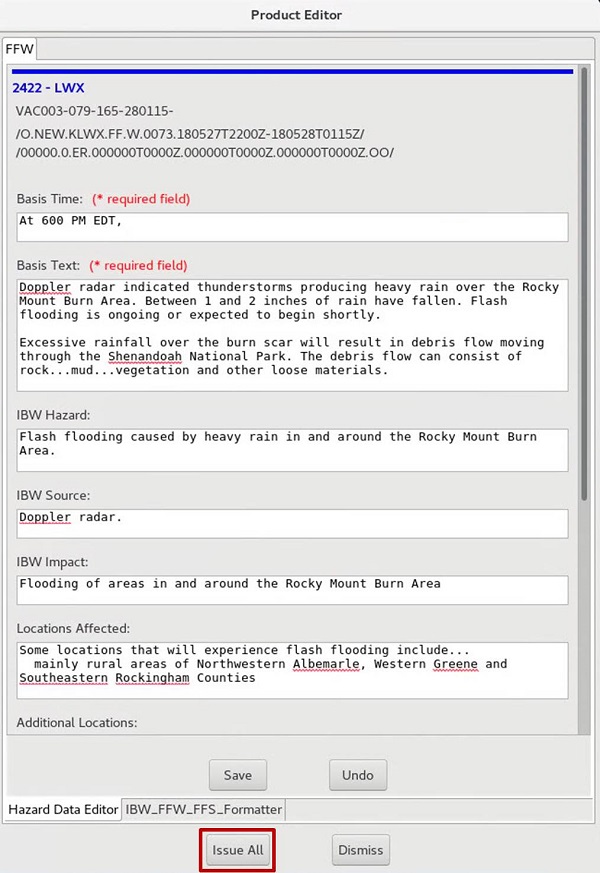
- Modify the text and click "Issue All" to issue the product.
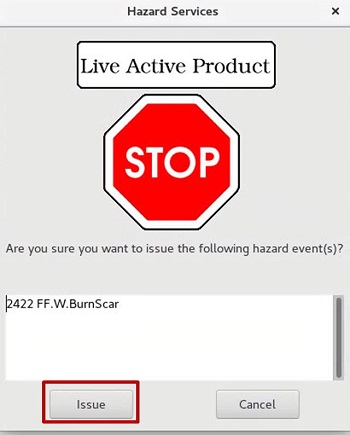
- When the “Live Active Product” dialog comes up, click the "Issue" button.
- The Console will contain the new burnscar flash flood warning.