


Upgrading All of an NPW Hazard to One or More Hazards - Hazard Services
Upgrading all of an NPW Hazard to One or More Hazards
Purpose:
To upgrade an NPW hazard completely to another hazard or to multiple hazards (e.g. advisory and warning)Tasks:
Setup
- In the GFE Perspective, ensure the Forecast Zones (optional XXX) map is loaded.
- Have Wind, ApparentT, etc. grids loaded with canned data, if possible.
- Launch Hazard Services with the NPW settings file.
Upgrade the entire watch to a warning
- Click linked jobsheet to first create and issue the High Wind Watch
- End the High Wind Watch
- Select the HW.A in the console or spatial editor (the console entry will be highlighted in blue).
- Right-click on the hazard in the console and select End This.
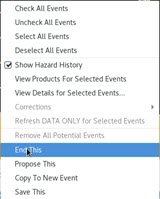
- In the HID, leave the reason for ending unchecked, and click Propose.
- Verify the watch is removed from the GFE Hazards grid
- Verify the watch is removed from the GFE Hazards grid
- Create the High Wind Warning
- Select Hazard Services Maps → Forecast Zones or Forecast Zones XXX.
- Highlight the desired time range in the GFE grid manager.
- Left-click on the zones that had been in the watch.
- Right-click to end the selection.
- In the HID, choose High Wind Warning (HW.W)
- Verify the valid times are correct, and select any additional CTAs and Impacts in the HID. Click Propose.
- Verify the grid appears correct in the GFE Grid Manager
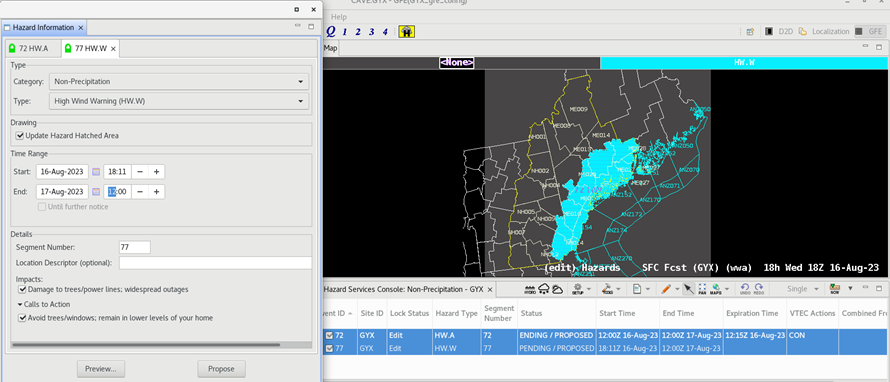
- Verify the grid appears correct in the GFE Grid Manager
- Click Preview to generate the NPW.
- If both hazard events had not been in the HID, they will get collected at this point.
- The resulting product should have one segment with both UPG and NEW VTEC lines.
- Click Issue--> Issue All
- Right-click on the warning in the console and select End This.
- In the HID, check the reason for ending and click Propose.
- Verify the warning is removed from the GFE Hazards grid
Convert some zones to a warning and some zones to an advisory
- Click linked jobsheet to first create and issue the High Wind Watch
- End the High Wind Watch
- Select the HW.A in the console or spatial editor (the console entry will be highlighted in blue).
- Right-click on the hazard in the console and select End This.
- In the HID, leave the reason for ending unchecked, and click Propose.
- Verify the watch is removed from the GFE Hazards grid
- Make some zones a Wind Advisory
- With the HID still displayed, select Hazard Services Maps → Forecast Zones or Forecast Zones XXX.
- Highlight the desired time range in the GFE grid manager.
- Left-click on the zones to be included in the WI.Y.
- Right-click to end the selection.
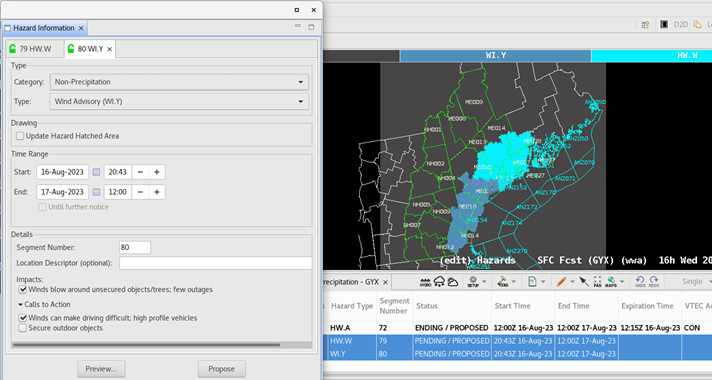
- In the HID, select Wind Advisory (WI.Y) as the Hazard Type.
- Adjust the valid time, as needed.
- Select any additional CTAs and Impacts in the HID.
- Click Propose.
- Ensure the GFE Hazards grid appears correct.
- Make the remaining zones a High Wind Warning
- Return to the Spatial Editor and left-click on the zones for the HW.W
- Right-click to end the selection.
- Select High Wind Warning (HW.W) as the Hazard Type.
- Adjust the valid times, as needed.
- Select any additional CTAs and Impacts in the HID.
- Click Propose.
- At this point, you should have a Hazards grid in GFE that is just the WI.Y and HW.W with no HW.A and no overlapping hazard areas.
- At this point, you should have a Hazards grid in GFE that is just the WI.Y and HW.W with no HW.A and no overlapping hazard areas.
- Issue
- Preview.
- Verify output for the 2 segments is in keeping with the GFE Wind, etc., grids and that each segment has an UPG and a NEW VTEC code.


- Issue All → Issue.
- Cancel the Wind Advisory and the High Wind Warning
- Click Shift and select the WI.Y and HW.W in the Hazard Services Console (they will both turn blue in the console).
- Right-click and select End 2 Selected Issued
.
- Click Yes on the popup box
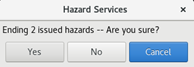
- Click Yes on the popup box
- The HID launches. Select an Ending Option on both tabs.
- Propose.
- Preview.
- Issue All → Issue.