


Burn Scar Watch Jobsheets - Hazard Services
BurnScar FFA Creation Jobsheets
Purpose:
Walk the forecaster through using the burnscar recommender and the hole-punch tool to create an overall FFA product that appropriately addresses the flood riskTasks:
Handling BurnScar FFAs
*All steps below are using Hazard Services loaded in the GFE perspective
Create a burnscar FFA for one burn area
Add additional burnscar to an existing burnscar hazard event
Create a burnscar FFAs for multiple burn areas at once
Creating Ad-hoc Burn Areas (freehand)
Add one or more burn scars to an existing areal flood watch
Add an Areal Flood Watch over existing burn scar FFA
Cancel the burn scar watch(es) while keeping the FA.A
Upgrade a burn scar watch to a warning while leaving the areal flood watch
Create a burnscar FFA for one burn area
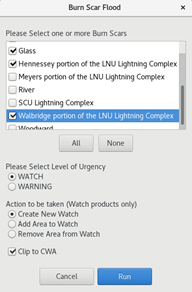
- Run the Burn Scar Recommender from the Tools menu

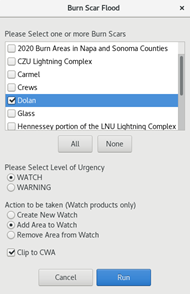
- Choose the burn scar you wish to create a flash flood watch for
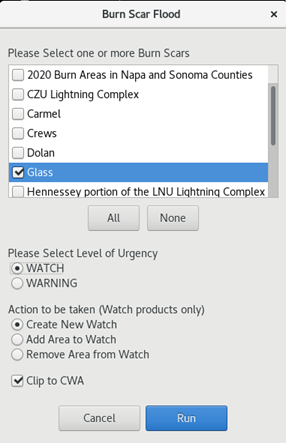
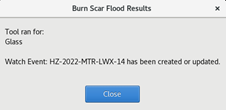
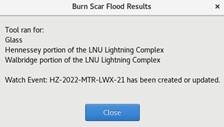
- Click Run. A verification window will appear and the HID will appear. Click Close on the verification window.
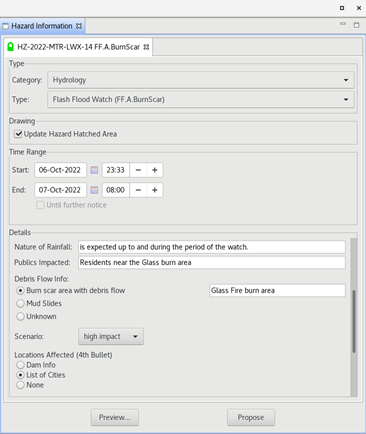
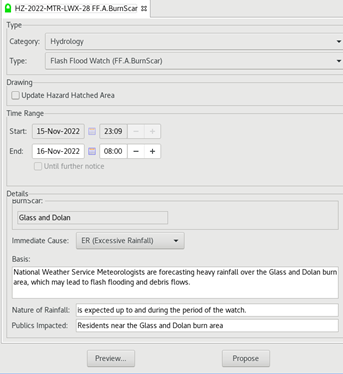
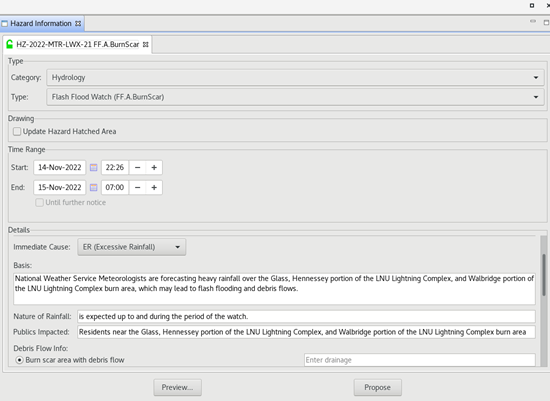
- Adjust the options accordingly and click Propose. The hazard will appear in your GFE Fcst database Hazards grid.
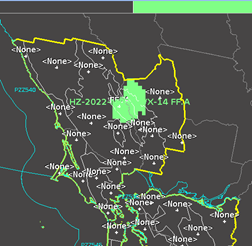
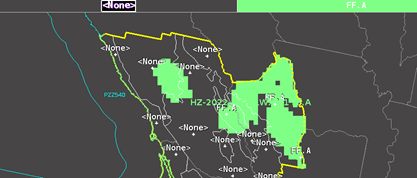
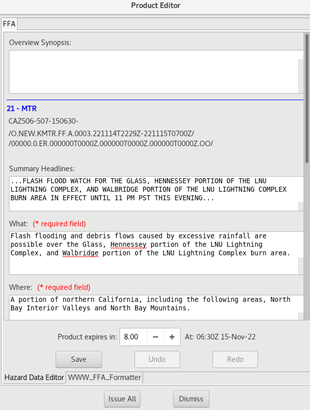
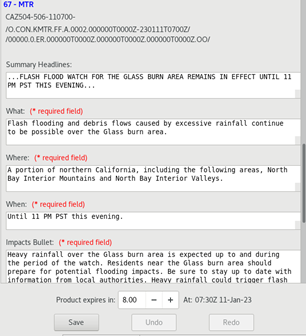
- Click Preview to view the FFA product
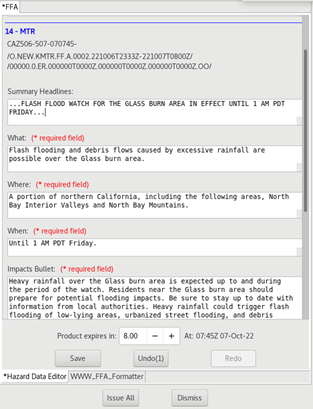
- Click Issue All to issue the single burn scar FFA
Add additional burn scar to an existing burn scar hazard event
Note: To keep things working well with Hazards Services and the resulting products, keep the burn scar hazard events confined to one zone or possibly adjacent zones. It becomes difficult to manage if far-flung burn scars are combined in one hazard event.
- Select the existing burn scar FFA from the console, then run the Burn Scar Recommender from the Tools menu
- Choose the burn scar(s) you wish to add to the existing FFA, making sure to choose Watch and Add Area to Watch
- Select Run.
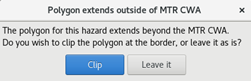
- If the selected burn area extends outside of the CWA, you will receive a warning. Clip should always be chosen.
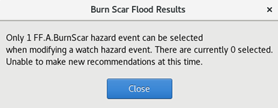
- If the existing burn scar hazard event was not first selected before running the Burn Scar Recommender, this message will appear. Select the hazard event to add this new burn area to and run the recommender again.
- If the selected burn area extends outside of the CWA, you will receive a warning. Clip should always be chosen.
- A verification window will appear and the HID will appear. Click Close on the verification window.

- Adjust the options accordingly and click Propose. The hazard will update in your GFE Fcst database Hazards grid.
- Click Preview to view the FFA product
- In this example, even though the 2 burn areas are not adjacent and do not share zones, because they are included in one hazard event, both burn areas are mentioned in both segments. In this case, it is likely better to have them as two separate hazard events. So the steps in part one would be followed for both scars.
- If the added burn area affects the same zones as the original burn area, the resulting FFA is just a CON. It is only when additional zones are added that an EXA occurs for the new zones.
- Click Issue All → Issue
Create a burnscar FFAs for multiple burn areas at once
Note: To keep things working well with Hazards Services and the resulting products, keep the burn scar hazard events confined to one zone or possibly adjacent zones. It becomes difficult to manage if far-flung burn scars are combined in one hazard event.
- Run the Burn Scar Recommender from the Tools menu
- Choose the burn scars you wish to create a flash flood watch for
- The ability to select multiple burn areas at once is controlled via an override of BurnScarFlood.py for ATAN 17 or 21.4.1 offices. Contact your local focal point if the recommender does not allow for the selection of multiple burn areas at once.
- The ability to select multiple burn areas at once is controlled via an override of BurnScarFlood.py for ATAN 17 or 21.4.1 offices. Contact your local focal point if the recommender does not allow for the selection of multiple burn areas at once.
- Select Run.
- If the selected burn area extends outside of the CWA, you will receive a warning. Clip should always be chosen.
- If the selected burn area extends outside of the CWA, you will receive a warning. Clip should always be chosen.
- A verification window will appear and the HID will appear. Click Close on the verification window.
- Adjust the options accordingly and click Propose. The hazard will update in your GFE Fcst database Hazards grid.
- Click Preview to view the FFA product
- Click Issue All → Issue
Creating Ad-hoc Burn Areas (Freehand)
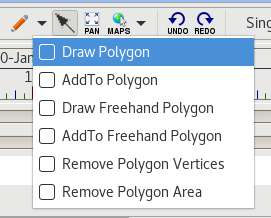
- Click the Pencil on the tool bar and choose Draw Polygon
- Draw your ad-hoc burn area as you would any regular areal flood hazard
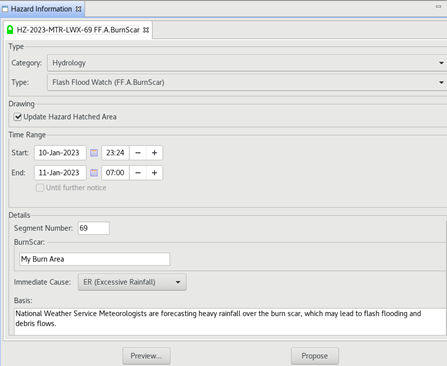
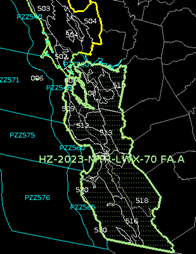
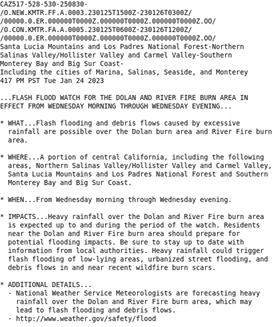
- The HID will appear. Choose FF.A.BurnScar as the hazard type, adjust valid time as needed, and ensure the hazard information is sufficient, making sure to add a name for the burn area, as shown.
- Click Propose. The hazard will update in your GFE Fcst database Hazards grid.

- Click Preview to view the FFA product
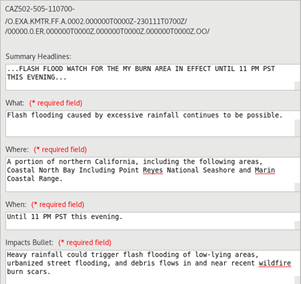
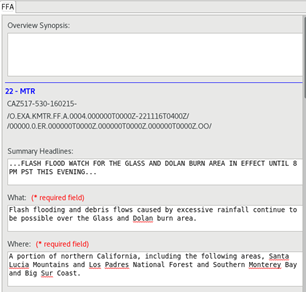
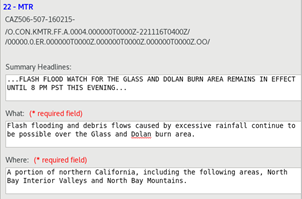
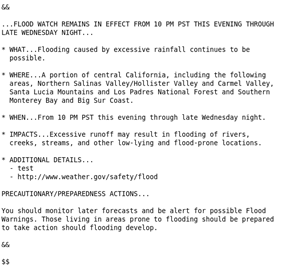
- If there are existing flood watch hazards in effect, burn scar or otherwise, those will be included in the resulting FFA, like what is shown above.
- If there are existing flood watch hazards in effect, burn scar or otherwise, those will be included in the resulting FFA, like what is shown above.
- Click Issue All → Issue
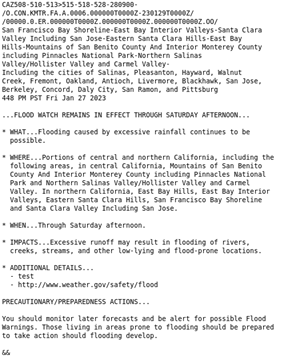
Add one or more burn scar watches with an existing areal flood watch
- Create, Propose and Issue an areal flood watch for multiple zones that also have configured burn scar areas
- If the areal and burn scar watches are needed at the same time, skip the issuance of the areal watch and proceed to step 2.
- If the areal and burn scar watches are needed at the same time, skip the issuance of the areal watch and proceed to step 2.
- Create one or more burn scar flash flood watches using the Burn Scar recommender, but do not propose or issue
- When the HID appears, adjust the valid time, impact and CTA choices as needed, but nothing else
- Follow same philosophy as the burn scar section to not combine discontinuous zones into one burn scar hazard event
- Select all flood watch hazards from the console and close any HIDs that appear

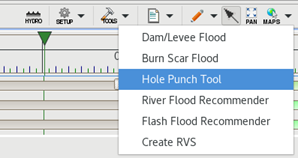
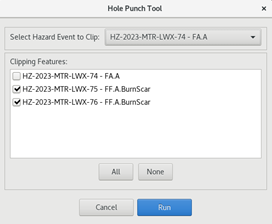
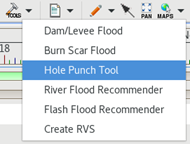
- From under the Tools menu, select Hole Punch Tool
- The window that appears will have the burn scar watch(es) selected and areal flood watch(es) deselected, as it should be, since the smaller scar watches are getting punched out of the larger overall areal watch
- Click Run and the bottom right corner of your CAVE will show the tool is running

- Select at least one of the flood watch hazard events and click Preview from the HID. All flood watch hazards will get picked up.
- In the resulting product, the zones that have both a burn scar watch and areal watch will have 2 sections in their segment, each with their own headline and separated by a &&
- Carefully QC the product and click Issue All → Issue
Add areal flood watch after burn scar watches are in effect
>
- Issue a burn scar flash flood watch with one or more burn areas
- Create an areal flood watch for an area that overlaps the burn scar FFAs, but do not issue or propose
- Select the burn scar and areal watches from the console and then choose Hole Punch Tool from the Tools menu

- If only one flood watch hazard event is selected in the console, this error will occur
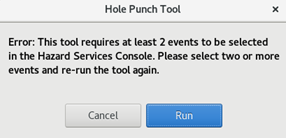
- If only one flood watch hazard event is selected in the console, this error will occur
- From the Hole Punch interface, make sure the areal watch is not selected and that the burn area watch(es) are selected. This should be the case by default.
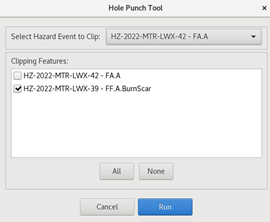
- If the larger areal watch is selected by mistake, this error will appear with the ID of the hazard event that needs to be unchecked
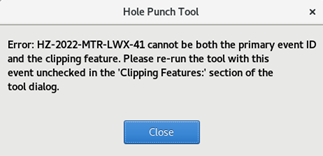
- If the larger areal watch is selected by mistake, this error will appear with the ID of the hazard event that needs to be unchecked
- Click Run. The tool may take several seconds to complete. While it is running, the following will appear in the bottom right corner.

- After the tool completes, click the Areal Flood Watch to bring up the HID and click Propose to write the grid to the GFE Hazard grid
- If the Areal Watch starts earlier or ends later than the burn scar watch, you will see an area with no hazard before/after where the burn scar watch exists since the Hole Punch Tool removes the area for all times, as shown below
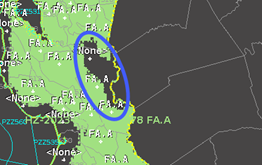
- If the Areal Watch starts earlier or ends later than the burn scar watch, you will see an area with no hazard before/after where the burn scar watch exists since the Hole Punch Tool removes the area for all times, as shown below
- Click Preview from the HID. All flood watch hazards will get picked up.
- In the resulting product, the zones that have both a burn scar watch and areal watch will have 2 sections in their segment, each with their own headline and separated by a &&


- Carefully QC the product and click Issue All → Issue
End Burn Scar watch(es) while leaving FA.A in effect
- Issue a concurrent burn scar and areal flood watch FFA, issuing the areal first or the scar(s) first
- From the Console, right-click on the burn scar watch and select End This
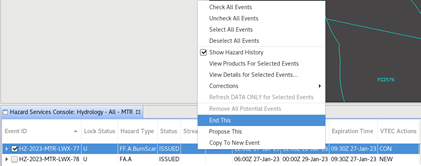
- In the HID that appears click Propose and then close the HID
- If there are multiple burn scar watches to be canceled, repeat steps 2 and 3 for each
- If the areal flood watch is what needs to be canceled while leaving the burn scar watch(es), after doing the End This on the areal watch, proceed to step 6.
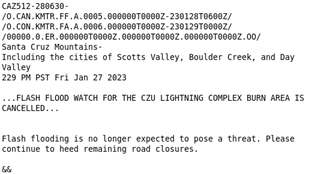
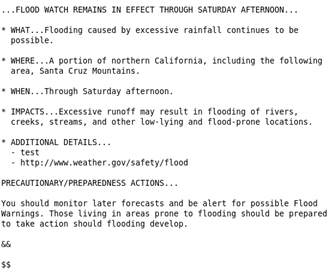
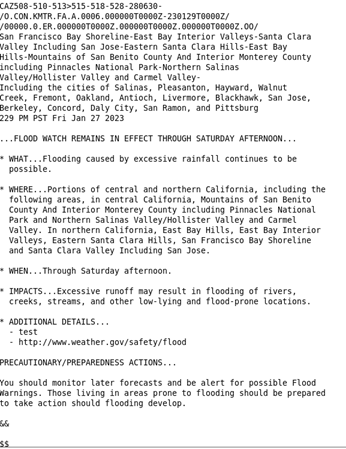
- Ending the burn scar watches will leave holes in the overall areal flood watch, as shown:

If it is desired to fill in the flood watch where the burn scar watch(es) had been punched out, continue to step 5. Otherwise, jump to step 6.- It may be desirable to fill in the areal watch for regional hazard viewers and to ensure GFE text formatters produce the intended results
- It may be desirable to fill in the areal watch for regional hazard viewers and to ensure GFE text formatters produce the intended results
- To fill in the missing area(s), select the areal flood watch from the console, and use the right mouse button to select the missing area(s), as shown in this jobsheet
- Click Preview from the HID. All flood watch hazards will get picked up.
- Carefully QC the product and click Issue All → Issue
Upgrade a burn scar watch to a warning while leaving the areal flood watch
- Issue a concurrent burn scar and areal flood watch FFA, issuing the areal first or the scar(s) first
- Click on one of the burn scar watches in the Console and in the HID, change the type to Flash Flood Warning
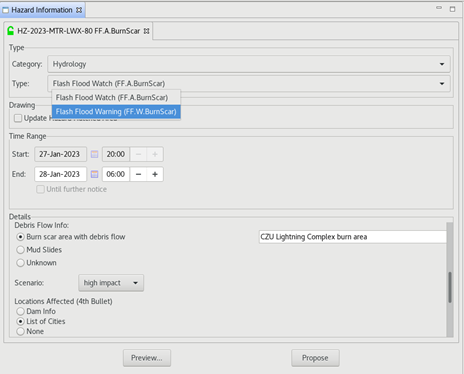
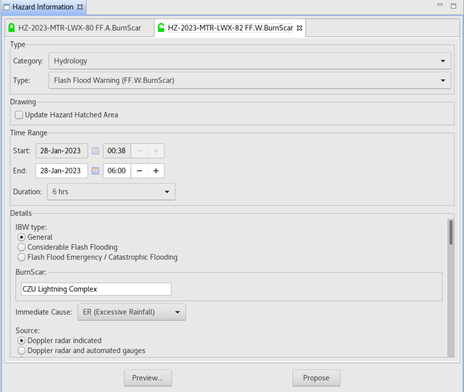
- In the new FFW HID, modify the options as needed
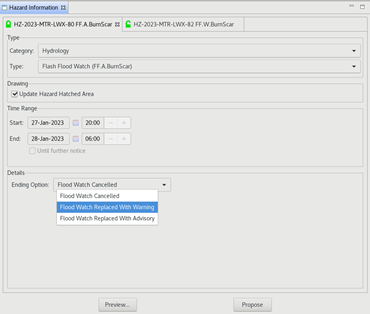
- Return to the FF.A.BurnScar tab and change the Ending Option to Flood Watch replace with Warning
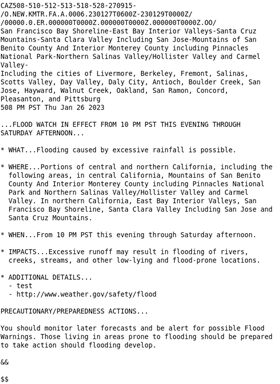
- Click Preview which will also pull in the areal flood watch. Edit the Product Editor fields as needed, especially the areal flood watch which may need to have previous text included.
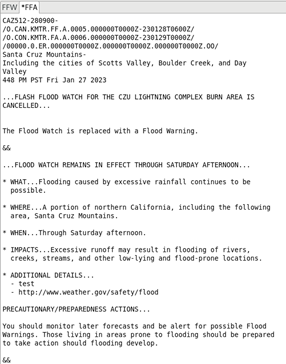
- Carefully QC the product and click Issue All → Issue to issue the FFW and updated FFA products
- If it is desired to fill in the hole in the areal flood watch left by upgrading the burn scar watch, follow the steps 4 and 5 outlined here and Propose to update the Hazard in GFE
- The FFA product does not need to be issued until the regularly scheduled update is needed