


Using the Zorro Tool to Create a Hazard - Hazard Services
Using the Zorro Tool to Create Hazard Events
Purpose:
This jobsheet uses the Zorro tool to create a hazard from a GFE edit areaTasks:
Using the Zorro Tool to create a hazard event
Setup
- Ensure the Zorro tool has been configured via the DescriptorDictionary.py file
- Have SnowAmt, IceAccum, Wx, etc. grids loaded with canned data, if possible.
- Launch Hazard Services with the NPW Settings file.
Creating a hazard event from a predefined edit area using the Zorro Tool
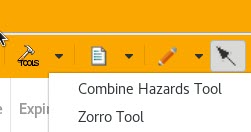
- From the Tools pull-down menu, select the Zorro Tool.
- It will launch and will look like this:

- It will launch and will look like this:
- Ensure Use Predefined Edit Area/Location Descriptor and Create Hazard from Edit Area are selected
- From the pull-down menu select one of the available predefined edit areas.
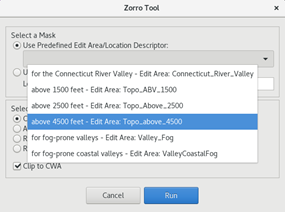
- Select Run.
- An undefined hazard will be created, as shown

- An undefined hazard will be created, as shown
- Select the undefined hazard from the Console (it will highlight blue) to activate the HID
-
Choose the hazard type (e.g. Dense Fog Advisory (FG.Y)) and adjust the time range and HID selections, as needed
-
Note that the location descriptor in the HID populated with the information from the Zorro tool
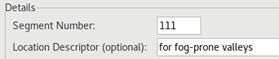
-
- Select Propose
- Verify a GFE Hazards grid populated over the edit area for the time range
- Click Preview
- Verify the correct Location Descriptor in the Summary Headline and What bullet:
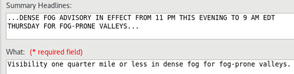
- Verify the correct Location Descriptor in the Summary Headline and What bullet:
- In the Product Editor, select Dismiss.
- In the Console, right click on the hazard event and select Delete This --> Yes.
Creating a hazard event using the active edit area in GFE
Method 1 - Use an existing edit area from the Edit Areas menu
- Click the Edit Areas menu in GFE to bring up the list of configured edit areas for your site and select one to load
- Run the Zorro Tool.
- On the Hazard Services toolbar, select the Zorro Tool from the Tools pull-down menu
- In the resulting Zorro Tool dialog box, enable Use Active Edit Area and Location Descriptor.
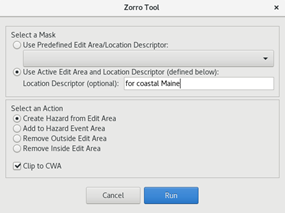
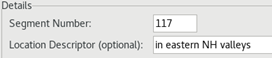
- Edit the Descriptor text field as shown. Do not forget the connector wording such as for, as appropriate.
- Click Run. An undefined hazard will be created.
- Select the undefined hazard from the Console (it will highlight blue) to activate the HID
-
Choose the Hazard type and adjust the time range, as needed
-
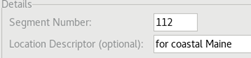
Note that the location descriptor in the HID populated with the information from the Zorro tool
-
- Select Propose
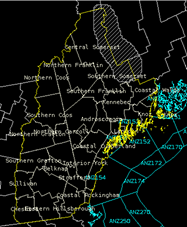
- Verify a GFE Hazards grid populated over the edit area
- Click Preview
- Verify the correct Location Descriptor in the Summary Headline and What bullet:
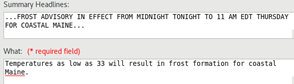
- Verify the correct Location Descriptor in the Summary Headline and What bullet:
- In the Product Editor, select Dismiss.
- In the Console, right click on the hazard event and select Delete This --> Yes.
Method 2 - hand draw an edit area
- Select the Draw Edit Area Tool
 icon on the GFE toolbar.
- Note the Draw Edit Area Tool icon is activated and drawing in Hazard Services is disabled.
- Draw a free-hand edit area on the Spatial Display.
- Run the Zorro Tool.
- On the Hazard Services toolbar, select the Zorro Tool from the Tools pull-down menu
- In the resulting Zorro Tool dialog box, enable Use Active Edit Area and Location Descriptor.
- Edit the Descriptor text field as shown. Do not forget the connector wording such as for, as appropriate.

- Select Run. An undefined hazard will be created.
- Select the undefined hazard from the Console (it will highlight blue) to activate the HID
-
Choose the Hazard type (e.g. Dense Smoke Advisory (SM.Y)) and adjust the time range, as needed

-
Note that the location descriptor in the HID populated with the information from the Zorro tool
-
- Select Propose
- Verify a GFE Hazards grid populated over the edit area for the correct time range
- Click Preview
- Verify the correct Location Descriptor in the Summary Headline and What bullet:
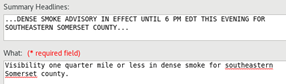
- Verify the correct Location Descriptor in the Summary Headline and What bullet:
- In the Product Editor, select Dismiss.
- In the Console, right click on the hazard event and select Delete This --> Yes.
Method 3 - use the query tool to create an edit area
- Select the Query Tool
 icon on the GFE toolbar.
 - The Edit Area and Query interface will appear. Choose an element and threshold from which to create a query.

- Click Convert To Location to ensure Hazard Services can handle the area
- Click Convert To Location to ensure Hazard Services can handle the area
- Once you have an edit area generated, run the Zorro Tool.
- On the Hazard Services toolbar, select the Zorro Tool from the Tools pull-down menu
- In the resulting Zorro Tool dialog box, enable Use Active Edit Area and Location Descriptor.
- Edit the Descriptor text field as shown. Do not forget the connector wording such as for, as appropriate.

- Select Run. An undefined hazard will be created.
- Select the undefined hazard from the Console (it will highlight blue) to activate the HID
-
Choose the Hazard type (e.g. Dense Fog Advisory (FG.Y)) and adjust the time range and HID selections, as needed
-
Note that the location descriptor in the HID populated with the information from the Zorro tool
-
- Select Propose
- Verify a GFE Hazards grid populated over the edit area for the correct time range
- Click Preview
- Verify the correct Location Descriptor in the Summary Headline and What bullet:
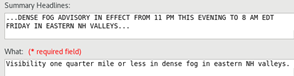
- Verify the correct Location Descriptor in the Summary Headline and What bullet:
- In the Product Editor, select Dismiss.
- In the Console, right click on the hazard event and select Delete This --> Yes.