


CON-COR-EXP-CAN VTEC Logic - Hazard Services
CON/COR/EXP/CAN VTEC Logic
Purpose:
This jobsheet will describe the particulars about VTEC messages, when they are used, and how to initiate the VTEC actions.Tasks:
AT-A-GLANCE:
-
What? Valid Time Event Code (VTEC) allow automated dissemination of critical weather information. The actions we will focus on are Cancel (CAN), Continue (CON), Expiration (EXP), and Correction (COR). Hazard Services streamlines certain VTEC behavior for issued short-fused hazard events. While some of the behavior is automatic, Hazard Services allows some flexibility with VTEC actions, even more so than WarnGen. This handy one pager over VTEC codes is available for forecasters to refresh on the format: https://www.weather.gov/media/vtec/VTEC_explanation_ver9.pdf
-
Note: Only products supported in Hazard Services and have VTEC messages in the text product can have follow up actions. Therefore products such as Special Weather Statements (SP.S) and Airport Weather Warnings (AW.W) cannot be modified after issuance.
-
Important to know: If you are working on an SVS/update to a hazard before the expiration period (> 5 minutes to product end time) and it crosses over to the expiration period (≤ 5 minutes to product end time), you will lose previous work and be forced to issue an EXP instead.
Part A: Continue (CON)
CON VTEC actions are the default for hazard events before the expiration period. Selecting the event in the Hazard Services Console before 5 minutes until the end of the event will automatically bring up the CON selections in the HID.
-
Make sure your AWIPS is in practice mode.
-
Begin by issuing a short-fused convective warning. Either a Tornado Warning (TO.W) or Severe Thunderstorm Warning (SV.W) can be issued for this jobsheet.
-
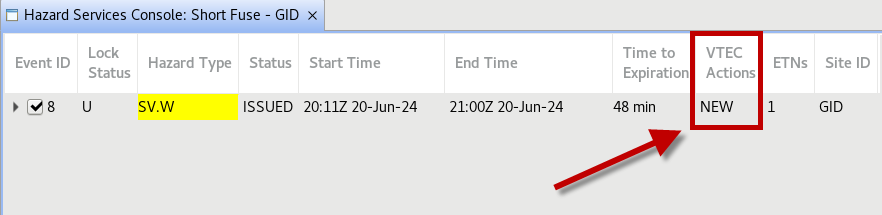
The VTEC action of the hazard event will be NEW in the console. Left click to select the event. The HID will populate with the options to update or modify the hazard event.
Select Preview to review the event.
-
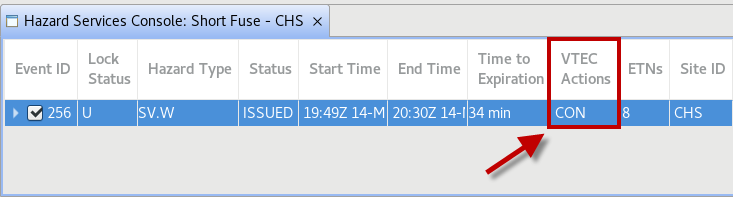
The VTEC action of the hazard event has changed to CON. The default behavior of Hazard Services is to CON and you may update the event with Severe Weather Statements (SVS) as many times as needed before the expiration period for the event (5 minutes before and 10 minutes after end time). Once you click Issue (1) to issue the hazard, notice the VTEC Actions field has updated to CON for the hazard event.
Part B: Correction (COR)
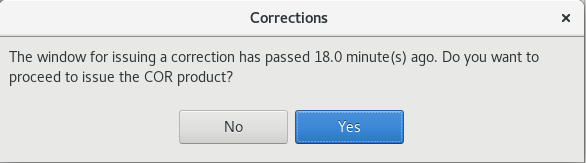
COR VTEC actions are manually initiated by a forecaster whenever corrections are needed to fix formatting or grammatical errors within the event product. You may issue a COR on a hazard event at any point of the valid warning time, however it is strongly encouraged to issue a COR within 10 minutes of the last product issuance and before the expiration period.
-
Make sure your AWIPS is in practice mode.
-
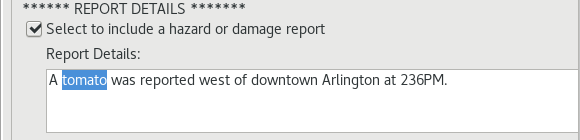
Begin by issuing a short-fused convective warning. Either a Tornado Warning (TO.W) or Severe Thunderstorm Warning (SV.W) can be issued. In the HID make sure to select to include a hazard report. Before issuing the warning, insert a typo somewhere in the report details. For example, you could insert “A tomato was reported…” in the report detail text instead of "A tornado was reported...". Issue the warning with the typo.
-
The product sent out has a typo and you want to correct it. Highlight the event row in the Console and right click.
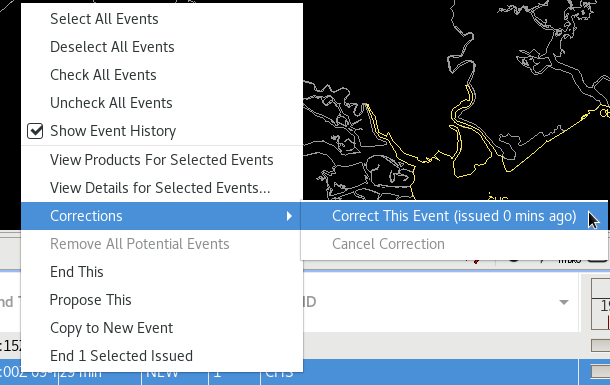
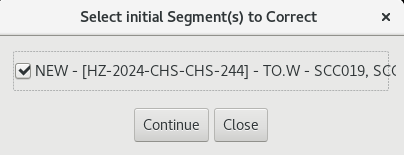
This will bring up a menu of options and actions you can perform, one of which is Corrections. Select to Correct This Event (Issued # mins ago). A popup box will appear with segments available to correct. Select the event you just issued with the typo.
After selecting the event, Hazard Services will be put in correction mode. A text banner at the bottom of the console will display.

NOTE: If the window for issuing a correction has passed, you will get a popup dialog box informing you of the missed time window.
-
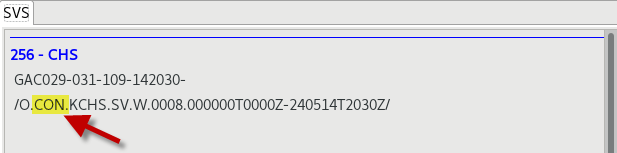
The HID will populate with the usual text as it would when you are starting a warning or issuing a severe weather statement (SVS). It is here that you will correct any text or product formatting errors in the originally issued product. Click Preview and make sure the VTEC of the event is COR.
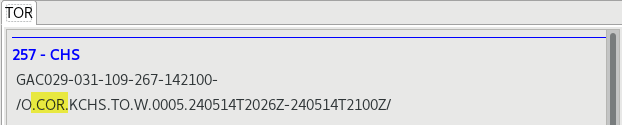
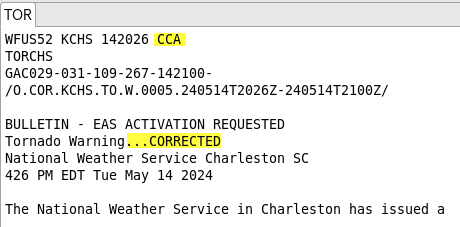
If you view the formatter tab, the header should include "CCA" and "...CORRECTED" in the product type.
An additional option is present in the Product Editor to Review Corrections.
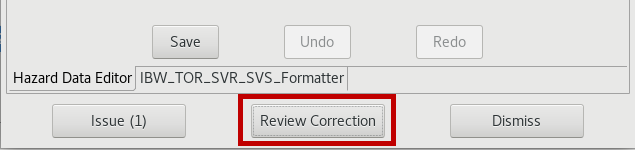
Selecting this option will bring up a comparison pop-up window that links the text that has been changed between the uncorrected and corrected events. The text lines that are different or corrected will be linked. On the right side of the comparisons window are icons/buttons to quickly jump to differences/changes in the text products.

-
Select Issue (1) to send out the corrected product.
Part C: Expiration (EXP)
EXP VTEC actions are the default when entering the ending period of a hazard event. The typical period is 5 minutes before to 10 minutes following the end time of the event; however, this behavior may differ depending on your site’s overrides. Selecting the event row in the Hazard Services Console in this period will open the HID for an EXP of the event. A more detailed jobsheet is available for exploring multiple situations forecasters may experience for expiring hazards.
-
Make sure your AWIPS is in practice mode.
-
If you have an active warning from the previous jobsheet steps you may use it for this section. If not, create a new short-fused convective event that is either a Tornado Warning (TO.W) or a Severe Thunderstorm Warning (SV.W).
-
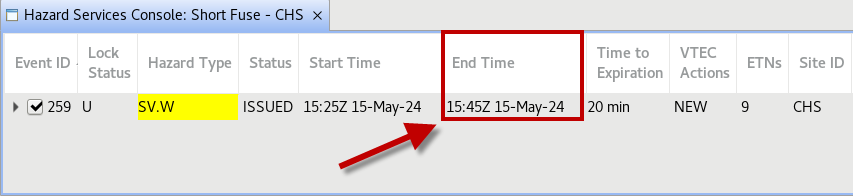
Take note of the end time of the hazard event.
-
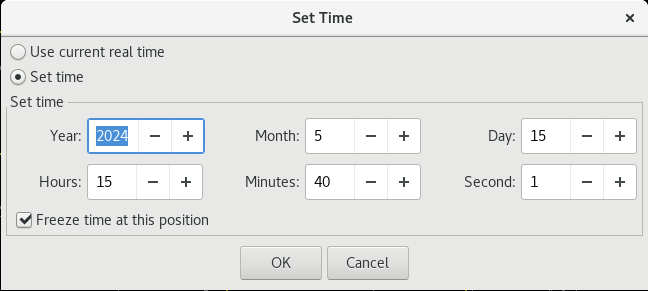
You may wait for the expiration period of the product, or more practically adjust the CAVE clock to a time 5 minutes before the end time of the event.
-
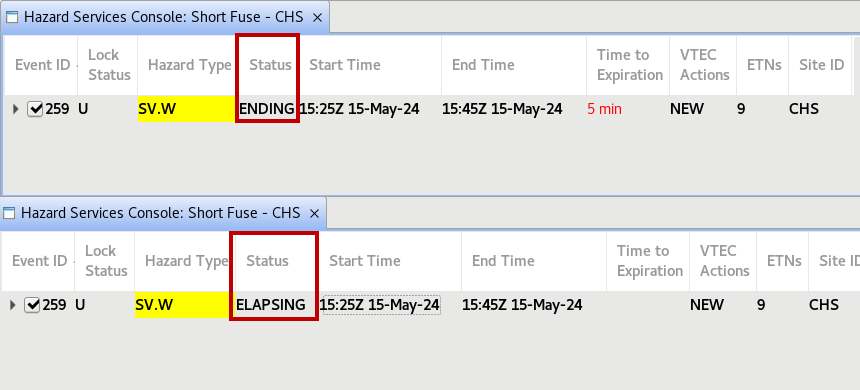
Once you have advanced the time you will notice that the status of the event has changed to Ending. NOTE: If you set the clock to a time between the ending time of the event to 10 minutes after the ending time of the event, the status will be Elapsing. Regardless of whether the event status is ending or elapsing, the default behavior at this time is to EXP the product. 10 minutes after the end time of the event, you will no longer be able to update the event with an EXP.
-
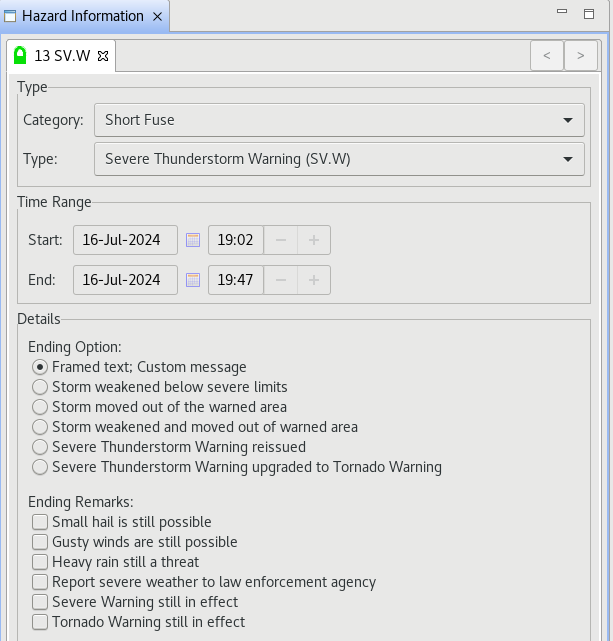
Highlight the hazard event in the Console. The HID should autogenerate the options to expire the event. This will be presented as radial buttons with Ending Options and Ending Remarks for the product. You may select options that are relevant for the situation, however we will use the first Ending Option and not select any Ending Remarks for this jobsheet. At the bottom of the HID select Preview.
-
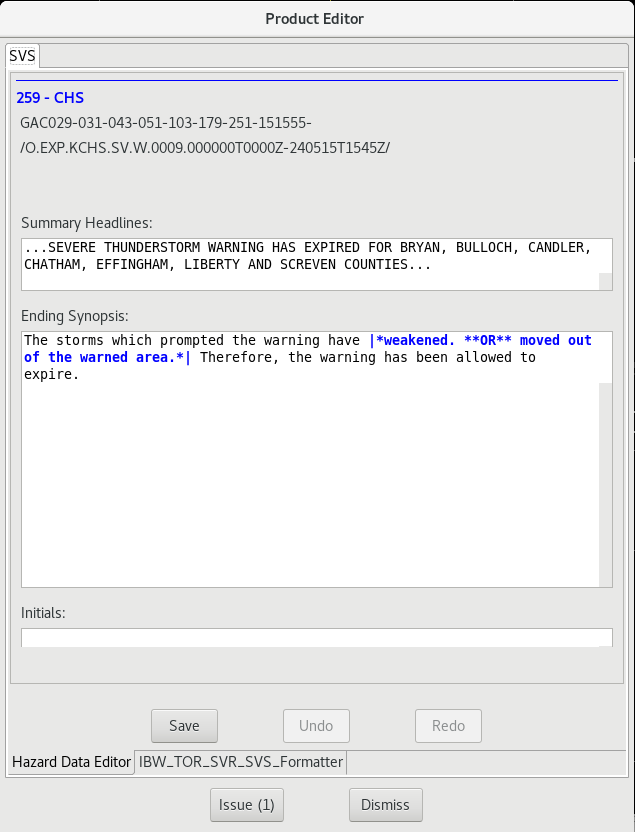
The Product Editor should show an EXP VTEC for the product in the header. When you choose the first ending option in the HID, the Ending Synopsis text will have framed text that you need to modify. Edit the text to say the storm has weakened by deleting the other framed text.
-
Select Issue (1) to send out the product expiration.
NOTE: Expiring and cancelling are two separate actions that have different messaging for the event. Cancelling will be covered in Part D. -
Lastly, if you are editing a hazard when the hazard enters its expiration period, you will lose your edits. If you are in the HID, the configuration will change from a CON configuration to an EXP configuration automatically once you reach 5 minutes to product end time.
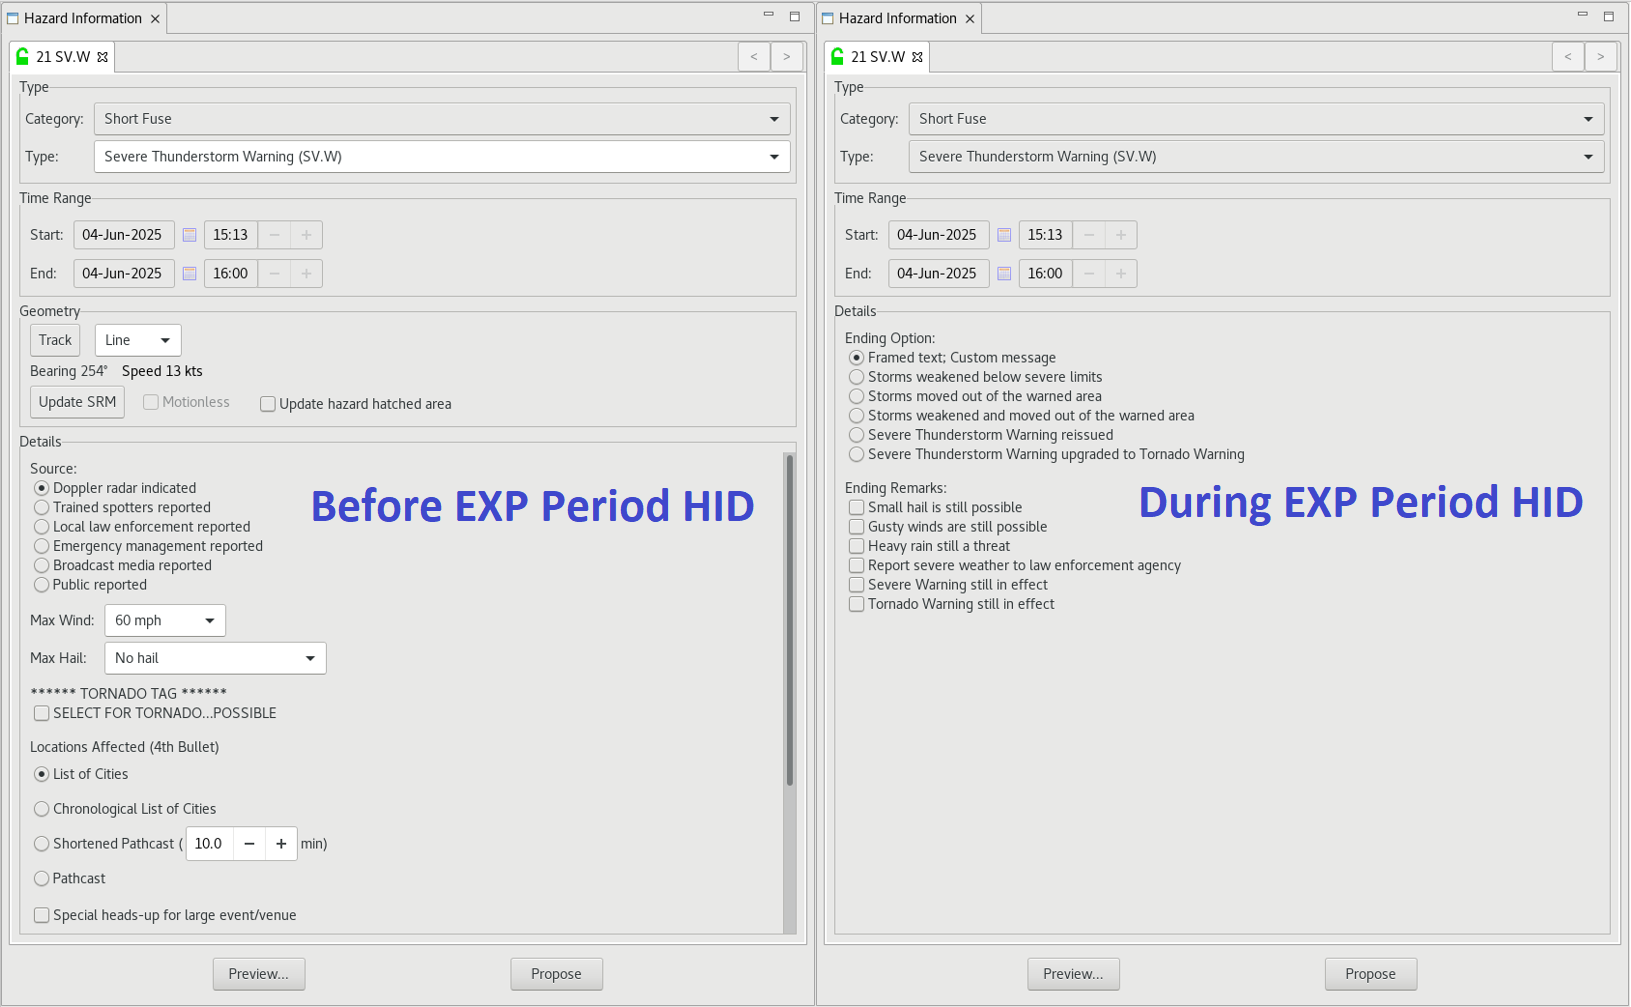
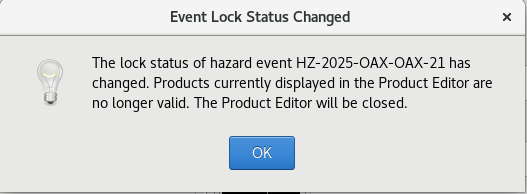
If you are making edits in the Product Editor, a pop-up warning will display stating that the product lock status has changed because it entered its expiration period and the Product Editor must close. You will then be forced to EXP the product following the steps above.
Part D: Cancel (CAN)
CAN VTEC actions are reserved for when the hazard event needs to be cancelled outside the normal lifecycle of a short-fused event. Such situations are when the hazards have left the warning polygon or completely diminished before the expiration time period of the event. This action is manually activated by a forecaster and should not be encountered otherwise in the event lifecycle.
-
Make sure your AWIPS is in practice mode.
-
Begin by issuing a short-fused convective warning. Either a Tornado Warning (TO.W) or Severe Thunderstorm Warning (SV.W) can be issued. CAN actions can be enacted at any period during the event prior to the expiration time period.
-
Left click to select the hazard event you just issued in the Hazard Services Console, then right click on the highlighted event. A menu should appear with an option to End This.
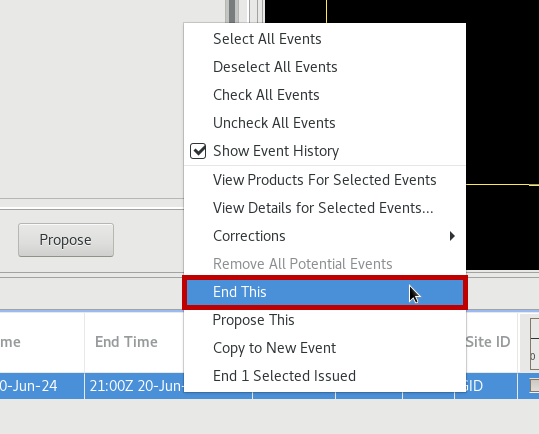
NOTE: You may also use the End # Selected Issued menu option to cancel multiple events at once. You would do this by first highlighting multiple events in the Console, then right clicking and selecting that option. For this jobsheet we will continue with the End This option. -
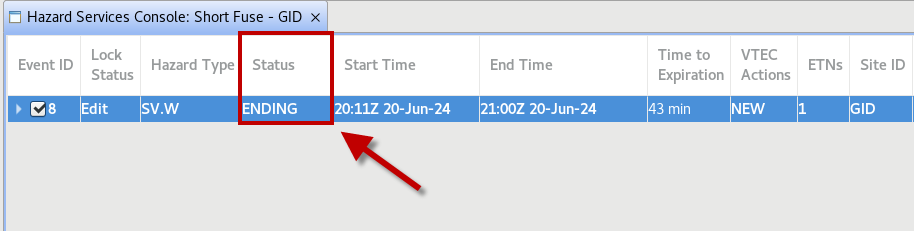
The status of the event will change to ENDING.
NOTE: If you change your mind, you may right click and select Revert This in the menu to undo the cancellation action, but we will proceed with the cancellation for this section. -
The HID should autogenerate with ending options for the event which should be similar to the expiration ending options.
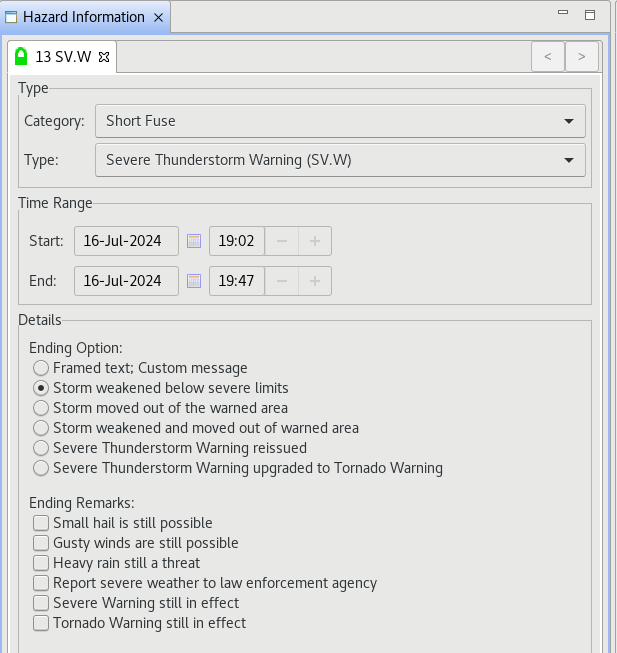
Select “Storm weakened below severe limits” if you are cancelling an SV.W, or “Storm weakened; No longer capable of producing a tornado” if you're cancelling a TO.W. Then click Preview. -
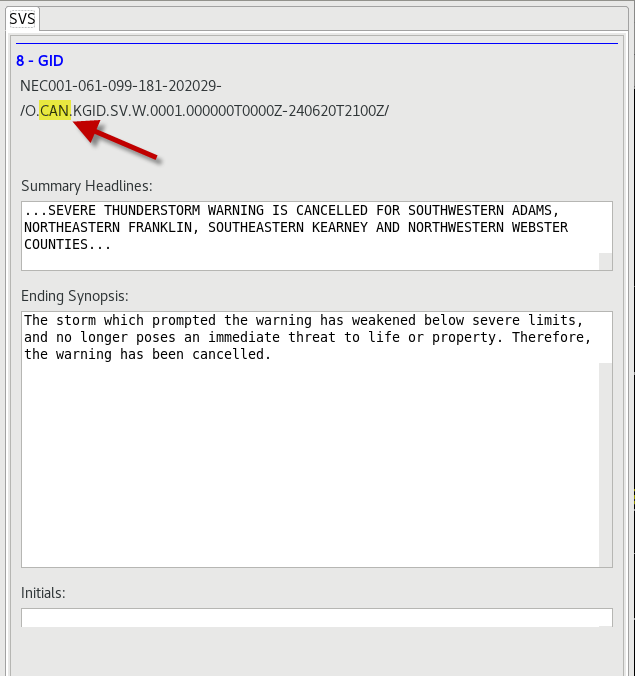
The Product Editor should have a CAN VTEC header with an Ending Synopsis for the event.
-
Select Issue (1) to send out the cancellation product.
Congratulations, you've learned how the various VTEC options work in Hazard Services!