


Creating a River Flood Event (20-30 min) - Hazard Services
Creating a River Flood Event: Completion Time ~ 20-30 min
Purpose:
In this jobsheet you will run the River Flood Recommender (RFR) to generate river flood watches, warnings, and advisories over the whole Hydrologic Service Area (HSA) and for a specific gauge. You will also use the RFR to generate a warning when the underlying observations or forecast data do not meet criteria (e.g. when a forecast is off). This jobsheet should be done with CAVE in practice mode after the local focal has configured Hazard Services and prepared fake forecast points in flood. Note: running CAVE in practice mode won't put RiverPro in practice mode (see your local hydro focal point).Tasks:
Running the River Flood Recommender (RFR) for the entire HSA
- Using the Open Perspective CAVE icon, load the Hydro perspective.
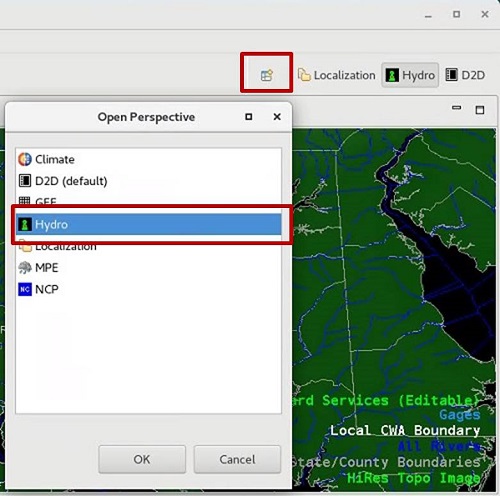
- To work efficiently with river flood events, you should use the Hydro Perspective. Everything will work in D2D, but you won’t see the river gauge icons and associated data.
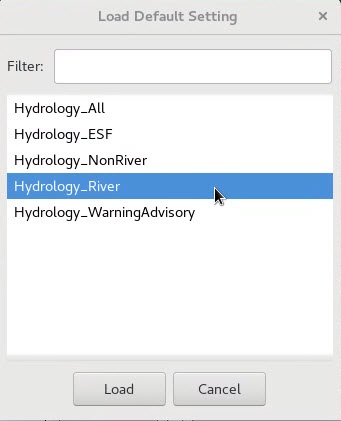
- Click on the SETUP icon and select Load Settings.

- To run the recommender, click on the TOOLS button in the console and choose “River Flood Recommender”.

- The River Flood Recommender runs using the latest observed and forecast stage values in the hydro database. In the baseline distribution of the software, the user may choose to recommend the following event Types:

- Watch: The maximum forecast stage is at or above flood stage and the time that the river/stream is forecast to rise above flood stage is beyond the hours time limit defined by the “Watch/Warning Cutoff Time(hours)” value.
- Warning: The observed or maximum forecast stage is at or above flood stage and the time that the river/stream is forecast to rise above flood stage is before the hour time limit defined by the “Watch/Warning Cutoff Time(hours)” value.
- Advisory: The river/stream is observed or forecast to rise above action stage, but not reach flood stage.
- All: All of the above.
- Some notes about the other options:
- Checking the “Include points below advisory” box will recommend HY.S flood advisory events for locations on the same river as a Watch/Warning/Advisory or recommend HY.S events for all locations in the HSA if no Watch/Warning/Advisory events are recommended. This will allow you to access the forecast point in the HID and modify the hazard type.
- The Flood Watch Stage/Flow Buffer allows the recommender to recommend a watch instead of an advisory if the stage value is within a certain percentage of the watch criteria (e.g. stage is within 5% of flood stage).
- The Recommender Run Type allows the recommender to recommend hazards or refresh existing hazards without recommending hazards.
- You can select individual forecast points or groups of points along a river in the Forecast Point Choices menu.
- In this example, choose “All” without checking the “Include points below advisory” and click “Run”.
- If no river points meet the criteria, then you’ll get a dialog box that says: “RiverFloodRecommender completed. No recommendations.”. Otherwise, a Results box will list all the recommended hazards, and you will need to click "Close".
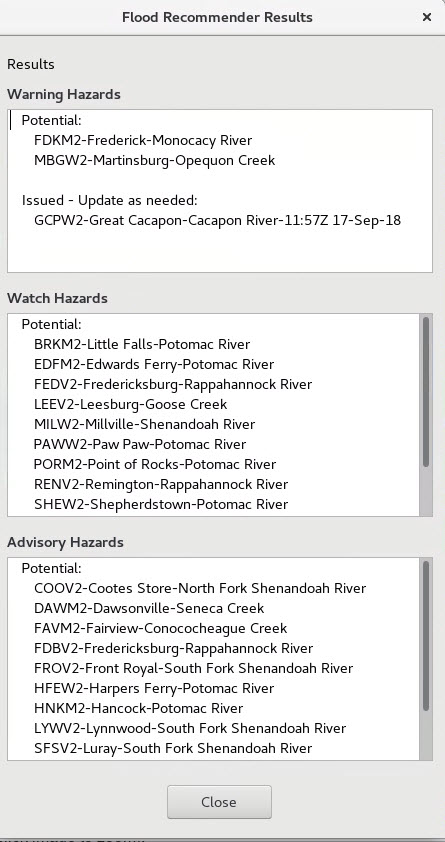
- If any gauges meet any of the above criteria, the events will populate the console with the POTENTIAL status. You may want to sort the console by Status (by left-clicking on the Status column header) in order to identify the recommended hazards. Additionally, the spatial display will update with polygons around the gauges. If the polygons don't appear, adjust your time window (using the selected time in the timeline) to overlap with the potential products.

- Click on the Group Name column header to sort by river. Note that you could also just run the recommender for a particular river, which would reduce the number of hazards in the Console.

- Select multiple events for one River in the Console by left-click them and using CTRL+left-click to select multiple rows. The selected events show up hatched in the Spatial Display and each hazard ID is listed separately in the HID. There is a show list >> at the top of the HID that you can use to see any hidden hazards. Note you can widen your HID to see all the tabs as well.

- Click on each tab in the HID to modify each event, click “Preview”. Don't worry about mixing hazard types in the selected set of events. Hazard Services will correctly group them by event in the Product
Editor. If criteria are met, a Product Staging Dialog will open with tabs for the various products (FLW, FFA, FLS) where the user can select Calls to Action for the product.

- Click on all the tabs and make any desired changes, and then click “Continue”.
- The Product Editor will launch with multiple tabs at the top for each product type. Each product type will default with the Hazard Data Editor tab selected on the bottom of the Product Editor. When in the Hazard Data Editor tab, you can modify text in any white box. VTEC is visible, but it is locked. Use the scroll bar to see the hazard information for each segment from the selected set of hazards.

- Click on the product tab to the right of the Hazard Data Editor tab to preview the product text.

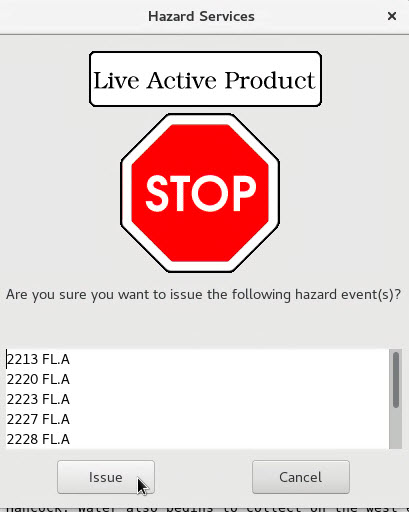
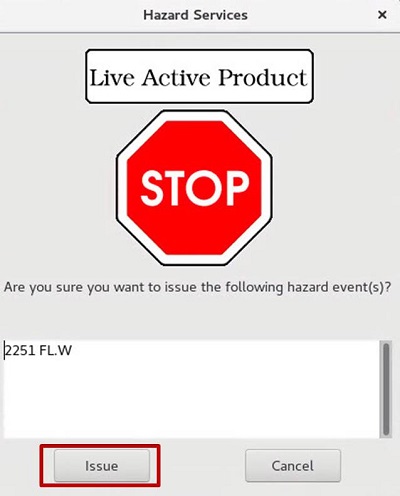
- Click on each of the product tabs at the top and make any desired changes. Then click “Issue All” to issue the products, and click “Issue” when the “Live Active Product” dialog opens.

- The events will be displayed as “ISSUED” in the console.

- To remove unwanted events created by the recommender, right-click in the console and select “Remove All Potential Events”. This is a handy way to clean up the Console and rerun the recommender.

Running the RFR for one location
- The user can run the RFR for one location at a time. Double left-click on the river gauge. When the gauge is selected, a red rectangle will surround the gauge. Choose a yellow or red-colored gauge to ensure you have something the meets advisory or watch/warning criteria.
- Hold down the right mouse button and select “Create Hazard” from the menu, and when the Flood Recommender comes up, click Run. The Flood Recommender is a smaller version of the one run from the TOOLS icon.

- Inspect the Flood Recommender Results window to identify the recommended type. The HID and Console will highlight with the recommended hazard. Click Close on the Flood Recommender Results window and click Preview in the HID.

- A Product Staging dialog will open with a tab for the product (FLW, FLS, FFA). Make any desired changes here and click “Continue”.

- In the Product Editor click “Issue All” to issue the product,

- Click “Issue” in the “Live Active Product” dialog. The event will be displayed as “ISSUED” in the console.

Creating an event not recommended by the RFR
- A watch, warning or advisory event can always be created, even when the underlying obs/forecast data do not support it (e.g. when forecasts are off). For this exercise we need to use a forecast point that is forecast to remain below action stage where no advisory, watch, or warning would be recommended. Contact your local hydro focal point if you can't locate one of these forecast points (try green triangle forecast points in the hydro perspective that are removed from flooding areas).
- The software can recommend a HY.S by default if the "Include points below advisory" is selected, and you can override the recommended Type in the HID:
- Double-click the gauge to select it and then hold down the right mouse button and select “Create Hazard” from the menu. In the Flood Recommender, make sure "Include points below advisory" is selected and click Run.

- The Flood Recommender results will say Statement Hazards if the forecast point is below action stage. Click Close, and in the HID change the type from HY.S to FL.Y. Click Preview.

- Click "Continue" in the Product Staging window.

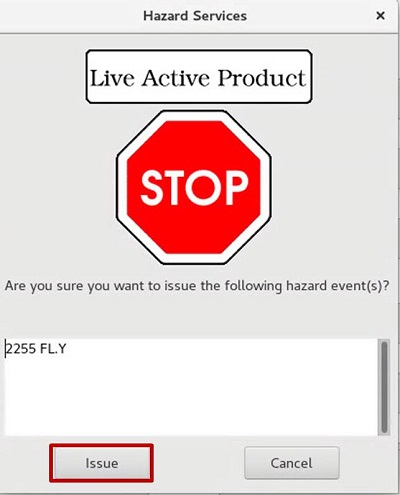
- Modify your text in the Product Editor, and click "Issue All".

- Click “Issue” when the “Live Active Product” dialog opens.
- Double-click the gauge to select it and then hold down the right mouse button and select “Create Hazard” from the menu. In the Flood Recommender, make sure "Include points below advisory" is selected and click Run.