


Using the Zorro Tool to Modify an Existing Hazard Event - Hazard Services
Modifying existing Hazard Events using the Zorro Tool
Purpose:
Use GFE edit areas to modify the area of existing Hazard Events via the Zorro toolTasks:
Using the Zorro Tool to modify a hazard event
***CAVEAT EMPTOR: Using the Zorro Tool to modify existing hazards can result in invalid geometries and interoperability issues with GFE (i.e. no Hazards grid update) so use with caution***
Remove an area from the Hazard Event using a predefined edit area
Remove outside of an area from the Hazard Event using a predefined edit area
Remove an area from the Hazard Event using an active edit area
Remove outside of an area from the Hazard Event using an active edit area
Add an area to a Hazard Event using a predefined edit area
Add an area to a Hazard Event using an active edit area
Setup
- Ensure the Zorro Tool has been configured via the DescriptorDictionary.py file
- Start GFE
- Have SnowAmt, IceAccum, Wind, T, etc. grids loaded with canned data, if possible
- Launch Hazard Services with either the NPW or Winter Settings file, depending on what is to be tested
Create a Hazard Event
- From the Hazard Services Console Maps pulldown, select Forecast Zones or Forecast Zones XXX
- Left click on several zones (the entire CWA is best for the Remove workflows and partial CWA is needed for Add to Existing workflows)
- Right click to end the selection
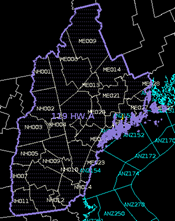
- In the HID, select Hazard Type High Wind Watch (HW.A)
- Verify the hazard start and end times and select any additional CTAs and Impacts in the HID
- Click Propose
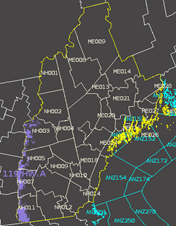
- Verify the HW.A appears in the GFE Hazards grid for the correct time frame and zones
- Click Preview
- Verify output is in keeping with GFE Wind, etc., grids
- Replace framing text if no GFE weather elements were populated
- Issue All → Issue
Remove an area from the Hazard Event using a predefined edit area
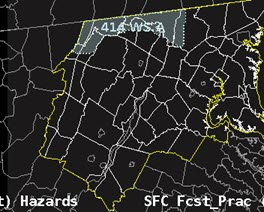
- Select the Hazard created above from the console (it will be checked and highlight blue)
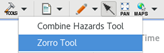
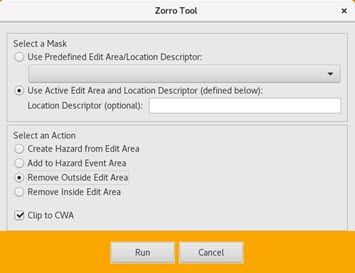
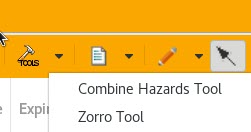
- From the Tools pull-down menu, select the Zorro Tool.
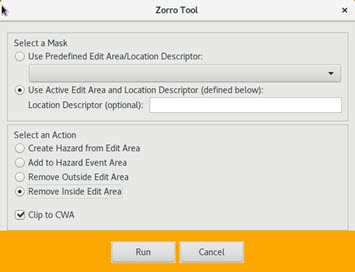
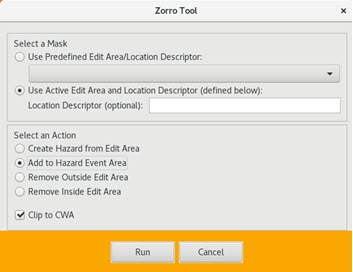
- It will launch and will look like this:
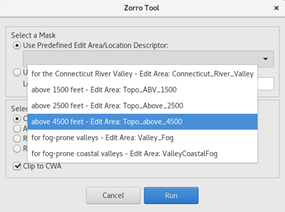
- Select Remove Inside Edit Area
- Ensure Use Predefined Edit Area/Location Descriptor is chosen and then from the pull-down menu select one of the available predefined edit areas, as shown.
- Select a predefined area that overlaps the area created in the HW.A from the previous section.
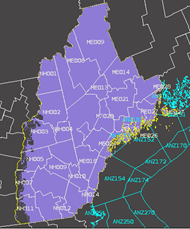
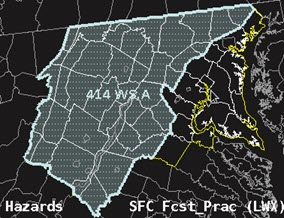
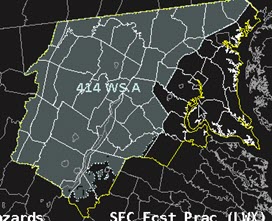
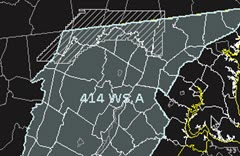
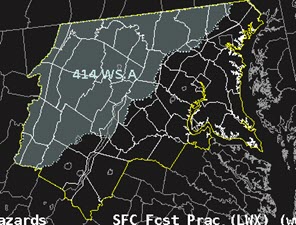
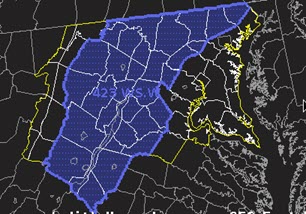
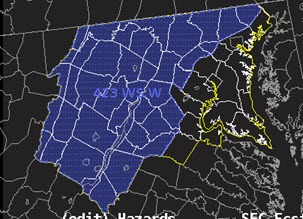
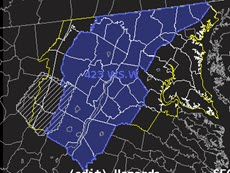
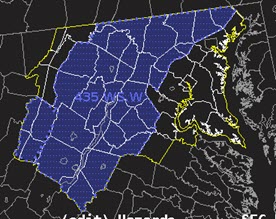
- Select Run. Note the Before and After.

- Select Propose
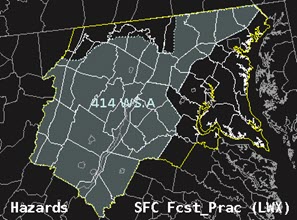
- Verify the GFE Hazards grid changes accordingly.
- Right Click on the Hazard Event in the Console and select Revert To Last Issued.
- Repeat steps 1 through 3
- On the Zorro Tool interface, this time select Remove Outside Edit Area
- Repeat steps 5 and 6.
- Select Run. Note the Before and After.
NOTE: For any modification of an existing Hazard Event, the descriptor will not be used in the WHERE bullet as the area may not match the defined edit area. The Descriptor is only used when using the Zorro Tool to Create a Hazard Event.
Remove an area from the Hazard Event using the active edit area in GFE
Setup
Follow the steps to Create a Hazard Event
Method 1 - hand draw an edit area
- Select the Draw Edit Area Tool
 icon on the GFE toolbar.
- Note the Draw Edit Area Tool icon is activated.
- Draw a free-hand edit area on the Spatial Display.

- Run the Zorro Tool.
- On the Hazard Services toolbar, select the Zorro Tool from the Tools pull-down menu
- In the resulting Zorro Tool dialog box, enable Use Active Edit Area and Location Descriptor and Remove Inside Edit Area
 .
.
- Select Run. Note the Before and After.

- Select Propose.
- Verify the GFE Hazards grid changes accordingly.
- Right Click on the Hazard Event in the Console and select Revert This to test other options, or Preview and Issue All-->Issue the resulting Hazard.
Method 2 - use the query tool to create an edit area
- Select the Query Tool
 icon on the GFE toolbar.
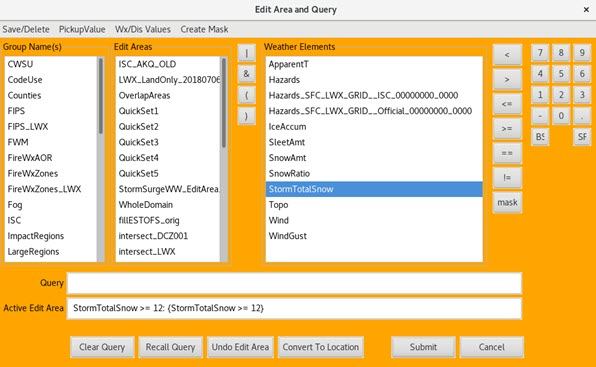
 - The Edit Area and Query interface will appear. Choose an element and threshold from which to create a query.
- Once you have an edit area generated and click Convert To Location, run the Zorro Tool.
- On the Hazard Services toolbar, select the Zorro Tool from the Tools pull-down menu
- In the resulting Zorro Tool dialog box, enable Use Active Edit Area and Location Descriptor and Remove Inside Edit Area.
- In the resulting Zorro Tool dialog box, enable Use Active Edit Area and Location Descriptor and Remove Inside Edit Area.
- Select Run. Note the Before and After.
- Select Propose.
- Verify the GFE Hazards grid changes accordingly.
- Right Click on the Hazard Event in the Console and select Revert This to test other options, or Preview and Issue All-->Issue the resulting Hazard.
Remove outside of an area from the Hazard Event using the active edit area in GFE
Setup
If you have the Hazard Event from above, continue. If not, follow the steps to Create a Hazard Event
Method 1 - hand draw an edit area
- Select the Draw Edit Area Tool icon on the GFE toolbar.
- Note the Draw Edit Area Tool icon is activated.
- Draw a free-hand edit area on the Spatial Display.
- Run the Zorro Tool.
- On the Hazard Services toolbar, select the Zorro Tool from the Tools pull-down menu
- In the resulting Zorro Tool dialog box, enable Use Active Edit Area and Location Descriptor and Remove Outside Edit Area.

- Select Run. Note the Before and After.

- Select Propose.
- Verify the GFE Hazards grid changes accordingly.
- Right Click on the Hazard Event in the Console and select Revert This to test other options, or Preview and Issue All-->Issue the resulting Hazard.
Method 2 - use the query tool to create an edit area
- Select the Query Tool icon on the GFE toolbar.
- The Edit Area and Query interface will appear. Choose an element and threshold from which to create a query.
- Once you have an edit area generated, click Convert To Location then run the Zorro Tool.
- On the Hazard Services toolbar, select the Zorro Tool from the Tools pull-down menu
- In the resulting Zorro Tool dialog box, enable Use Active Edit Area and Location Descriptor and Remove Outside Edit Area.
- In the resulting Zorro Tool dialog box, enable Use Active Edit Area and Location Descriptor and Remove Outside Edit Area.
- Select Run. Note the Before and After.

- Select Propose.
- Verify the GFE Hazards grid changes accordingly.
- Right Click on the Hazard Event in the Console and select Revert This to test other options, or Preview and Issue All-->Issue the resulting Hazard.
Add an area to an exiting Hazard Event using a predefined edit area
- If you have the Hazard Event from above, continue. If not, follow the steps to Create a Hazard Event for less than the entire CWA.
- Select the Hazard created above from the console (it will be checked and highlight blue)
- From the Tools pull-down menu, select the Zorro Tool.
- In the resulting Zorro Tool dialog box, select Add to Hazard Event Area
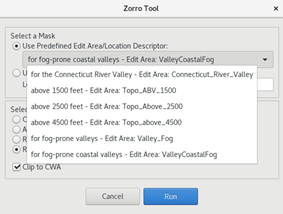
- Ensure Use Predefined Edit Area/Location Descriptor is chosen and then from the pull-down menu select one of the available predefined edit areas, as shown.
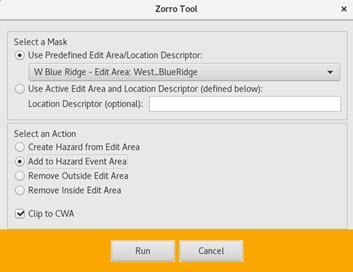
- Select a predefined area that will add area to the existing Hazard Event.
- Select Run.
- On the HID, click Propose. Note the Before and After.
- Right Click on the Hazard Event in the Console and select Revert This.
Add an area to an exiting Hazard Event using the active edit area
Setup
Follow the steps to Create a Hazard Event, if needed, for less than the entire CWA
Method 1 - hand draw an edit area
- Select the Draw Edit Area Tool icon on the GFE toolbar.
- Note the Draw Edit Area Tool icon is activated.
- Draw a free-hand edit area on the Spatial Display.
- Select the Hazard created above from the console (it will be checked and highlight blue)
- From the Tools pull-down menu, select the Zorro Tool.
- In the resulting Zorro Tool dialog box, select Add to Hazard Event Area
- Ensure Use Active Edit Area and Location Descriptor is chosen
- Select Run.
- On the HID, click Propose. Note the Before and After.

- Right Click on the Hazard Event in the Console and select Revert This or End This (if completing the jobsheet in order), or Preview and Issue All-->Issue the resulting Hazard.