


D2D Applications
WarnGen
This lesson provides some background information on WarnGen. While this lesson presents basic instructions, more details and examples are available in WES Exercise #6 (WarnGen).
These exercises are only to be completed on WES-2 Bridge and NOT a live AWIPS, to ensure no warnings are accidentally sent out.
Note: the WES-2 Bridge AWIPS Fundamentals case is currently being updated to support IBW, so if you access this page or any of the AWIPS Fundamentals WarnGen videos before the case is updated you will see slight different formatting.
Required WES Exercise #6 (WarnGen)
Setting Up the Main Display Panel Prior to Loading WarnGen
The primary tool in AWIPS for issuing short-term non-hydrological warnings and follow-up statements for things like severe thunderstorms, tornadoes, marine, dust, etc. is the application called WarnGen. Hydrological products are currently issued using Hazard Services which will be covered in a future course update. WarnGen proficiency is critical to support effective warning operations. Prior to using WarnGen, you should configure a map editor in the D-2D perspective to use in conjunction with WarnGen, ideally with a procedure (see RAC Procedures Download Page). WarnGen can be loaded within a procedure bundle or after the bundle is loaded. In the map editor, you want to load useful product(s), relevant maps, and the optimal number of frames prior to starting WarnGen.

Map Editor Tips
-
Keep the frame count at or below the default frame count of 12 (many use 6 frames). In WarnGen you are usually focused on the most recent data.
-
Load the phenomena-specific products (and maps) in the display panel used to generate the warning. For short-fuse severe convective-warnings, an ideal starting product is a 0.5 Z and SRM or V combination with Bunkers right/Bunkers left/0-6km shear vectors on top of cities, counties, and roads.
-
In general do not use an all tilts or four-panel products in the same display panel with WarnGen. It can be easy to lose track of WarnGen or storms requiring warnings outside of the current view when using all tilts or four-panel layouts. All tilts may not have enough time steps needed for tracking.
-
Reduce clutter and only load useful maps and products. Right click in the map editor and select Hide Legends to get rid of verbose text legends (or cycle using the Enter key on the keypad), leaving just the time stamp. You can also toggle off any overlays by clicking on their text legends, but hiding legends is more efficient.
-
In general, limit number of WarnGen displays on a workstation to one or maybe two in rare circumstances. Having multiple WarnGen windows can lead to confusion on what has been issued and at what step in the process the warning is in when analyzing data across multiple panes and multiple monitors. One WarnGen per monitor should suffice most of the time.
Starting WarnGen and Using the WarnGen GUI

The WarnGen application can be used with any D2D standard map editor and can be run on multiple displays simultaneously. The yellow button that launches WarnGen is located in the upper right-hand side of the D2D perspective in CAVE.
Once WarnGen is started, the "Drag me to storm" WarnGen storm centroid marker appears in the center of the main display panel (see map editor image above), and the WarnGen GUI will appear in a separate window. You will configure WarnGen for a particular type of warning before you track the storm and then "Create Text" in the last step. To get an idea of how WarnGen is used for issuing severe thunderstorm and tornado warnings, here is a list of the general steps involved after loading WarnGen on a CAVE editor with appropriate radar data:
WDTD 10 Steps to Issue Severe Thunderstorm/Tornado Warnings and Statements
- Select the warning product type
- Check the duration and potentially change
- Place the "Drag me to storm" point or line on the threat to be tracked
- Track the threat and check your storm motion
- Create and/or trim the warning polygon (use Track button and Warned Hatched Area button)
- Select the source (basis) and any corresponding tags like a considerable tornado tag
- Select the hazards/intensity and calls-to-action
- Create text, quality control, and send the product
- Hit restart to deselect the warning and start the "Drag me to storm" over
- Write down the warning information (ETN, type, expiration, etc.) on your tracking sheet
While the layout of the main WarnGen GUI is relatively intuitive, there are lots of options and product-specific behavior that require context-specific practice to master. The rest of this page will introduce a comprehensive overview of functionality that you are not expected to memorize. This can be a good reference as you learn the nuances of WarnGen. Because the interface is customized at every site, expect to see some differences in the interface from the images used below.
The jobsheets at the bottom of the page and the WES exercises focus on relatively simple proficiency of issuing a warning and a follow-up statement. Creating effective warnings will be addressed in later parts of the Radar and Applications Course (RAC) including the workshop primer and RAC workshop. More training on effective warnings is also provided in the Warning Operations Course (WOC).

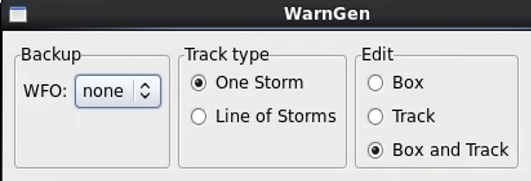
Backup: Use this to select service backup sites when backing up an office.
Track type: Use this to select the single storm tracking (dot tool) and line of storms tracking (line tool).
Edit box: Sets the editable properties of the box and track with default box and track. This is not commonly changed.

Redraw Box on Screen from: Use these buttons and toggle to preview polygon area characteristics associated with tracking changes and clipping rules.
- Track: In most severe weather circumstances you want your polygon to be redrawn based off changes with your manual tracking of the threat. You must click on the track button after you are done tracking a storm for the polygon to be redrawn from your track.
- Warned/Hatched Area: This button is commonly used to preview the polygon clipping rules that will be applied prior to sending the warning, so the forecaster can then make edits if appropriate. Polygons are automatically clipped to less than 20 vertices based off the county warning area and locally-configured polygon and county overlap thresholds tuned to local county sizes. The polygon area % values are typically 0-5%, and the area square mile thresholds are typically 0-15 square miles. There are also marine/land overlap settings (e.g. 5 miles overlap) that allow land or marine products to extend slightly beyond their native land or marine areas.
Counties included in the warning are annotated with a W overlay (see image below). The hatched areas indicate valid areas under the clipping rules (assuming the Warned Area Visible checkbox is selected as is the default). The clipping rules and polygon simplification are enforced when you click on the "Create Text" button. Right clicking on a county can in some instances be used to add or remove the county and corresponding W and hatching when allowed, but you should always click on the Warned/Hatched Area button to preview changes to determine if further modification is needed.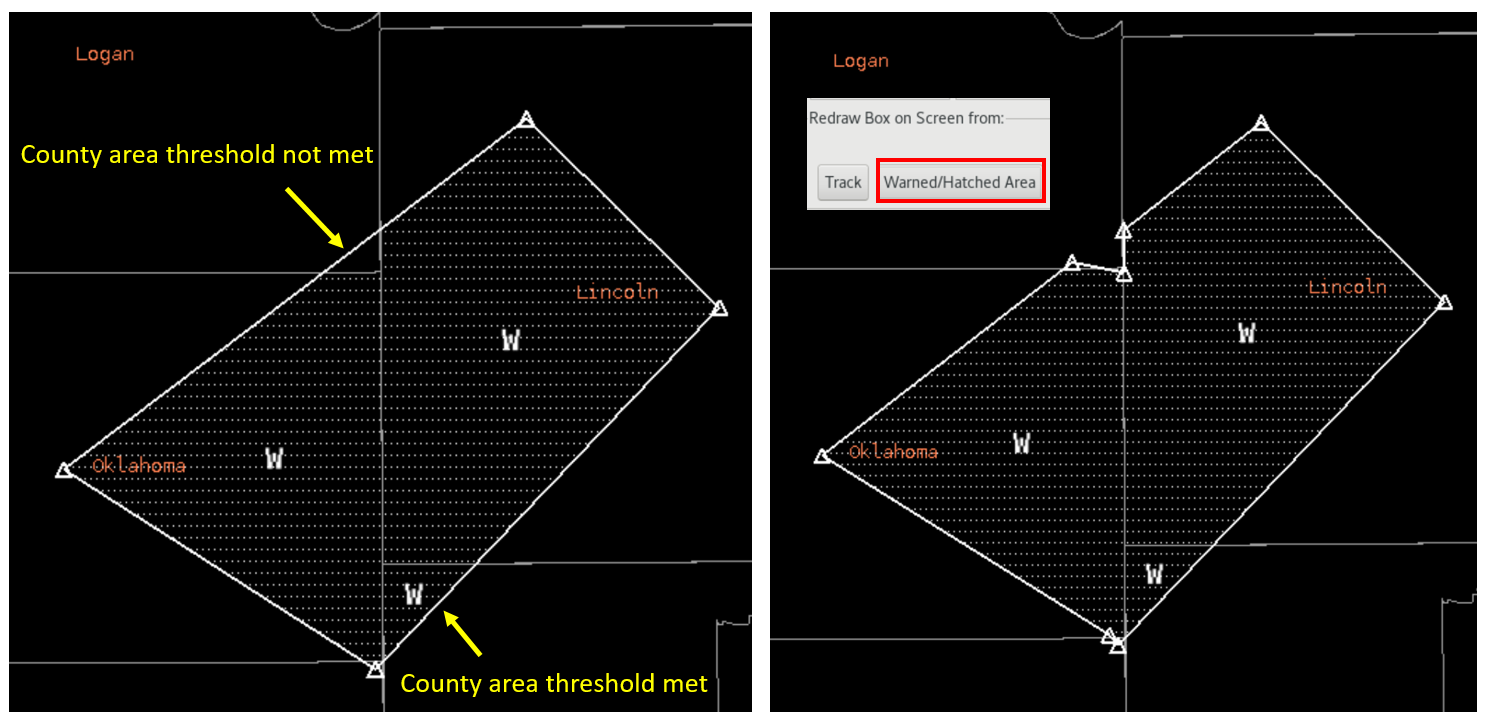 (click to zoom image)
- Dam Break Threat Area: Your office can create preset threat areas for things like airport weather warnings where you can select pre-configured polygons for some warnings. Note while dam breaks are facilitated by Hazard Services, this button is still used in WarnGen in a generic sense to access pre-configured polygons. See your local WarnGen focal point for more information on whether you have any preset threat areas.
- Warned Area Visible: This checkbox (default is on) hatches the area inside the polygon. Paying close attention to your hatched area is very important to understand when your partial county area clipping thresholds have been met.
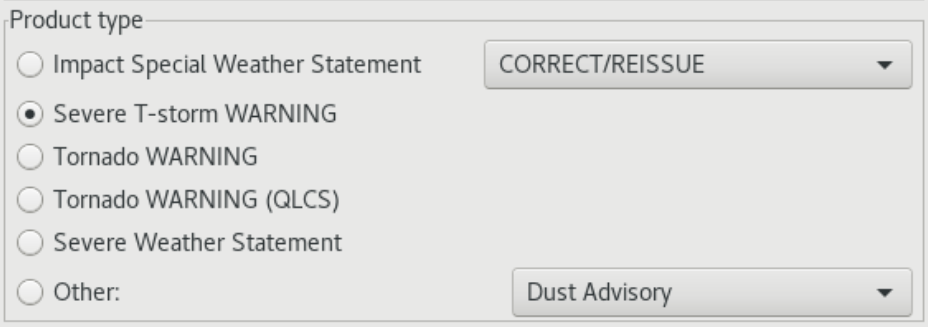
Product Type: For the most part, WarnGen is product-type driven which is fundamentally different from other applications like Hazard Services which is threat area-driven (covered later). Selecting product type is usually one of the very first steps, before dragging the dot or line to the storm and tracking. The product type list is configured locally to include the most frequent used products at that site in the main WarnGen GUI. The general workflow for severe weather is to issue new warnings or text corrections of new warnings by selecting the warning product type (e.g. Severe T-storm WARNING).
Severe weather statements are used to follow up the content of severe thunderstorm and tornado warnings with new information on location/expected threat/timing/reports, but severe weather statements cannot be used to increase the area of a warning. Clipping will snap it back on you. Severe weather statements should be issued multiple times during the warning when there is new information to pass along. With each update the threat should be tracked to provide a new location/timing, and the polygon should be trimmed back. New warnings should be drafted 10min before the warning expires and issued to ensure adequate lead time for areas downstream as well as no drop off in coverage.
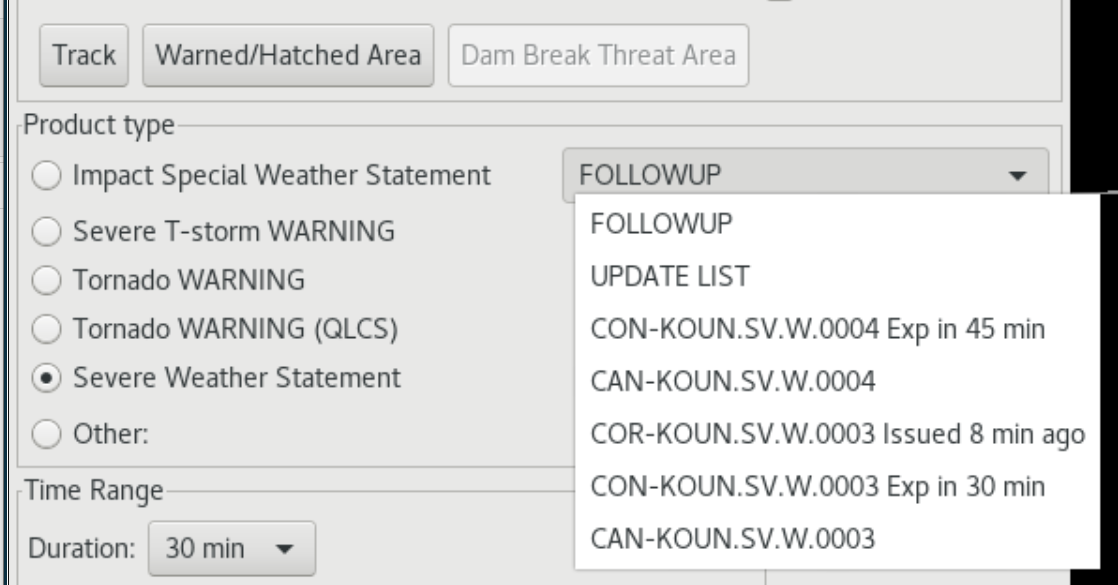
The "Other:" radio button product type at the bottom of the Product type section allows you to enter the submenu to select less commonly-used products not on the main GUI. The pullout menu in the upper right is where the user selects different VTEC actions (see image below) allowed for following up the selected product type. The VTEC actions are organized by product type and Event Tracking Number (ETN), so the forecaster must keep track of their warnings, ETNs, and when warnings expire.
- VTEC Actions
- CON - The continue option is only available until 5 minutes prior to the warning expiring, then it disappears. CON is facilitated using a severe weather statement. If you trim back your polygon to no longer include a county and continue another, you will receive a CON segment and CAN segment in your warning.
- CAN - The cancel option is only available until 10 minutes prior to the warning expiring, then it disappears.
- COR - The correction option is only available in the first 10 minutes after the warning is issued and is intended for correcting typos, not major changes to the warning. Vertices are locked with a COR. Significant changes to area or content is supposed to be facilitated using the appropriate follow-on statement.
- EXP - The expire option is only available to the severe weather statement starting 10 minutes prior to a severe/tornado warning expiring and up to 10min after the warning has expired. Use this to inform when the threat has weakened or moved out of the area when a CAN has not been issued.
- EXT - This is not available for severe and tornado though some offices may be in transition to using Hazard Services and might have this set up for hydro. The option for flash flood and areal flood products to reissue the same polygon (vertices locked) as an extension in time with the same VTEC information is available after the warning is issued until 5 min before warning expires.
- NEW - New warning option appears 20 min prior to warning expiring and persists for 30 min after warning expires in case the polygon is to be reused (uncommon).
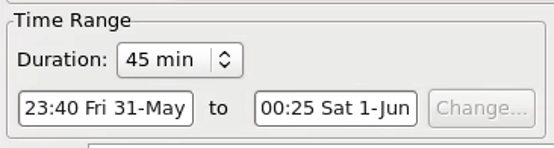
Time Range: WarnGen is duration driven where the timing of the warning is determined from the duration choice of the forecaster. The start and end times are updated automatically when the Create Text button is pressed, and the start time only is updated when the warning is issued. The first guess start and end times for the duration selected update every minute in the WarnGen GUI, but the actual end time will be rounded to the nearest 15 minute interval when you hit the Create Text button.
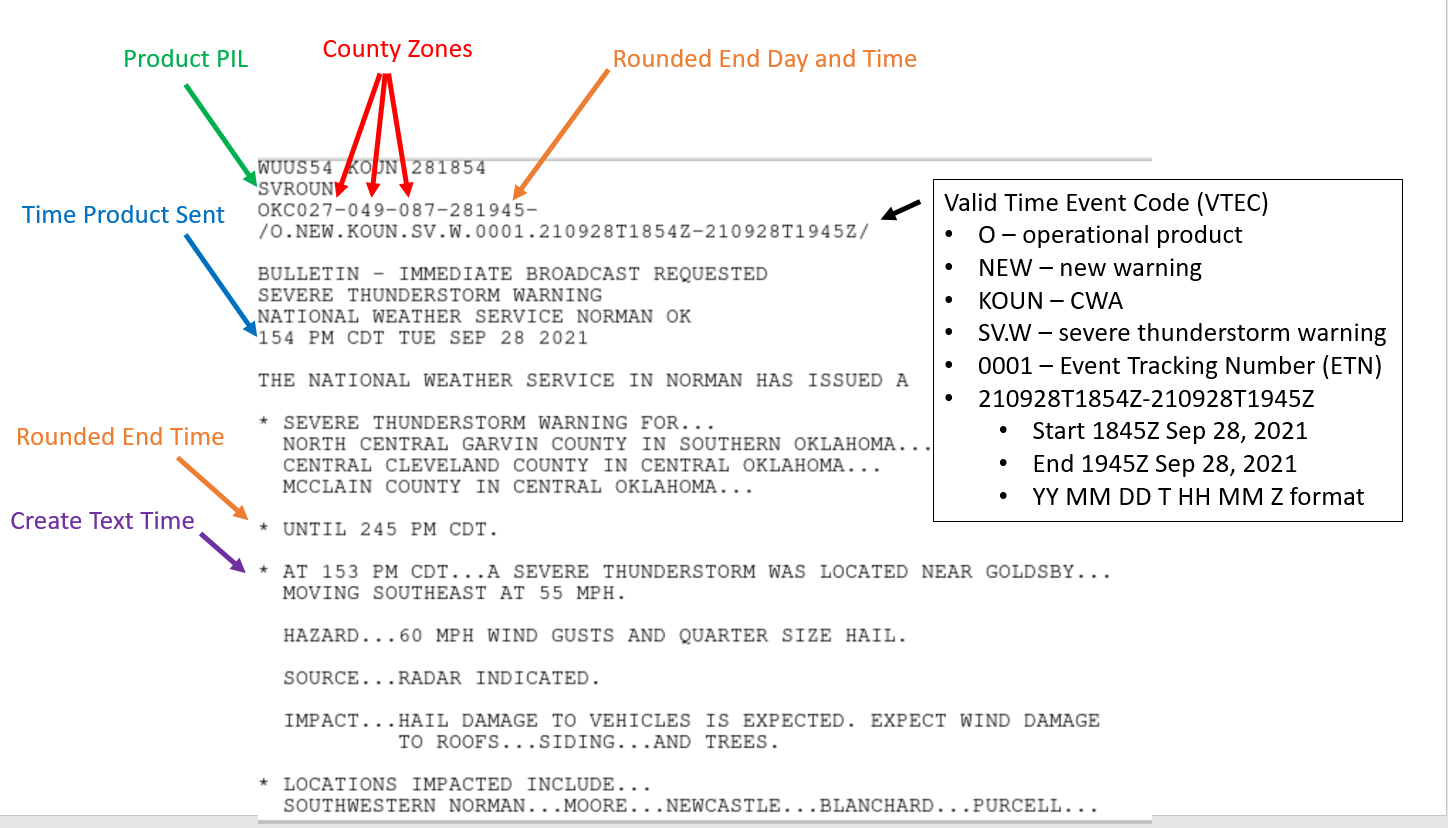
The official start time of the product in the VTEC header and top of the warning is when the warning is sent (see image below) while the time in the basis bullet comes from when the Create Text button was pushed. This allows you to begin drafting a warning and then quickly issue it, though you need to pay careful attention to the details of your areas and times to make sure they are consistent as well as valid. The rounded end times are not updated when the sent button is pushed, so it is not a good idea to enter the warning text and keep that open for a long period of time before sending.
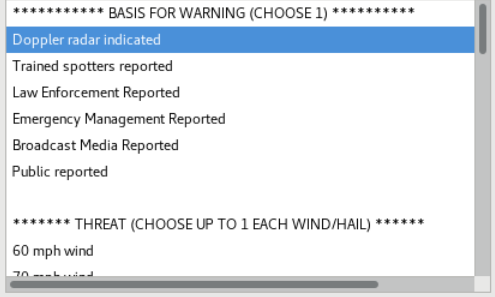
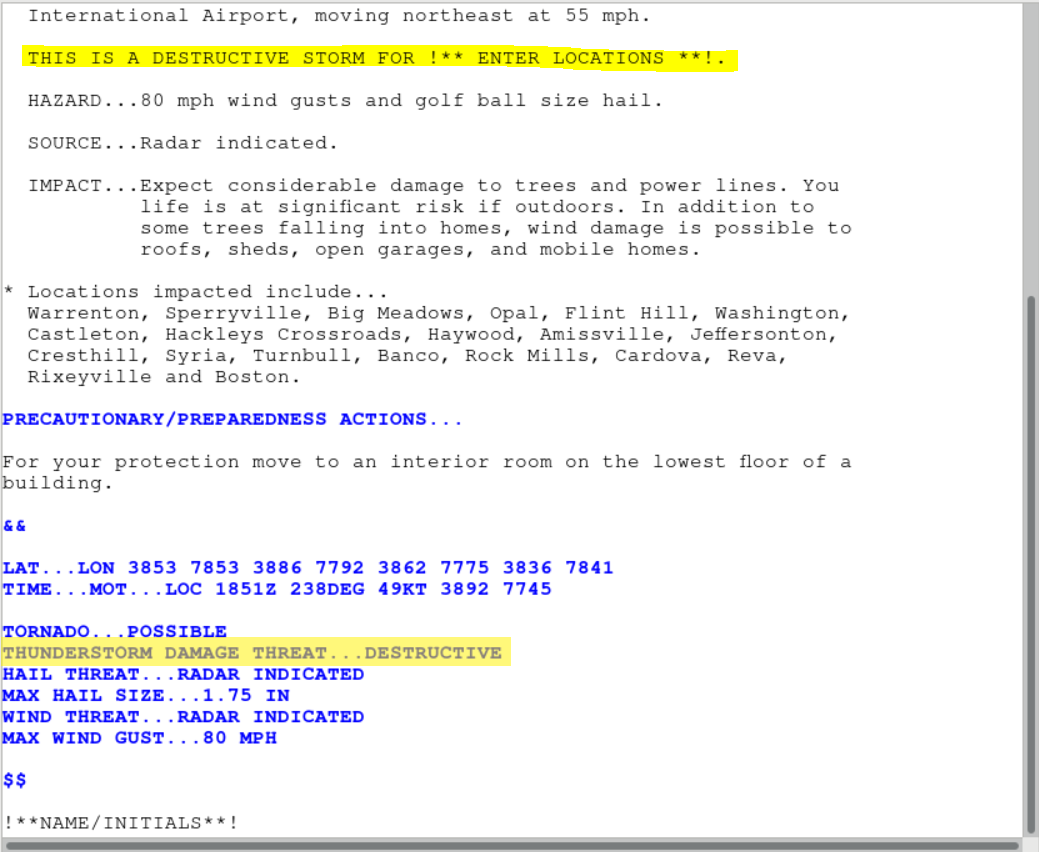
Main WarnGen Content Selection Window (with scrollbar): Most of the details of the warning such as basis (e.g. radar or spotter indicated), threat (e.g. golf ball hail), additional reports, locations impacted, and calls to action are selected in the main section on the bottom of the WarnGen GUI with a scroll bar. Selections such as additional reports will include framed text with !** and **! to identify where text needs to be replaced before the warning can be issued.

The THREAT selections for hail size and wind speed will trigger unique IMPACT sections of severe thunderstorm warnings. The hail threat has no impact on tornado warning IMPACT statements (note there is no wind threat option for tornado warnings).
Hail
- 7/8"
- IMPACT...!**YOU DID NOT SELECT ANY SEVERE WIND OR HAIL THREATS.
PLEASE CLOSE THIS WINDOW AND RE-GENERATE THIS WARNING!**!
- IMPACT...!**YOU DID NOT SELECT ANY SEVERE WIND OR HAIL THREATS.
- 1-1.25"
- IMPACT...Damage to vehicles is expected.
- 1.5-2.5"
- IMPACT...People and animals outdoors will be injured. Expect
damage to roofs...siding...windows...and vehicles.
- IMPACT...People and animals outdoors will be injured. Expect
- 2.75-4"
- IMPACT...People and animals outdoors will be severely injured.
Expect shattered windows...extensive damage to roofs...
siding...and vehicles.
- IMPACT...People and animals outdoors will be severely injured.
Wind
- 60mph
- IMPACT...Expect damage to roofs...siding...and trees.
- 70mph
- IMPACT...Expect considerable tree damage. Damage is likely to
mobile homes...roofs...and outbuildings.
- IMPACT...Expect considerable tree damage. Damage is likely to
- 80mph
- IMPACT...Flying debris will be dangerous to those caught without
shelter. Mobile homes will be heavily damaged. Expect
considerable damage to roofs...windows...and vehicles.
Extensive tree damage and power outages are likely.
- IMPACT...Flying debris will be dangerous to those caught without
- 90mph
- IMPACT...You are in a life-threatening situation. Flying debris
may be deadly to those caught without shelter. Mobile
homes will be heavily damaged or destroyed. Homes and
businesses will have substantial roof and window damage.
Expect extensive tree damage and power outages.
- IMPACT...You are in a life-threatening situation. Flying debris
- 100mph
- IMPACT...You are in a life-threatening situation. Flying debris
may be deadly to those caught without shelter. Mobile
homes will be destroyed. Expect considerable damage to
homes and businesses. Expect extensive tree damage and
power outages.
- IMPACT...You are in a life-threatening situation. Flying debris
Tornado
- IMPACT...Flying debris will be dangerous to those caught without
shelter. Mobile homes will be damaged or destroyed.
Damage to roofs...windows...and vehicles will occur. Tree
damage is likely (Base Tag). - IMPACT...You are in a life-threatening situation. Flying debris
may be deadly to those caught without shelter. Mobile
homes will be destroyed. Considerable damage to homes...
businesses...and vehicles is likely and complete
destruction is possible (Considerable/Catastrophic Tags). - IMPACT...Expect damage to mobile homes...roofs...and vehicles.
(Landspout/Very Weak Tornado)
The hail and wind threats also will trigger:
- "max hail size" IBW tags
- "max wind gust" IBW tags
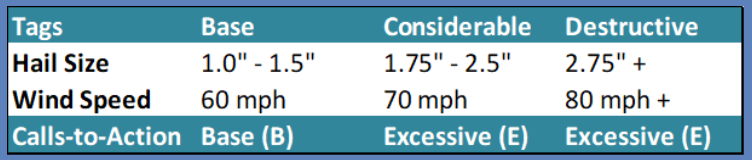
- considerable "thunderstorm damage threat" tags for hail 1.75"-2.5" and wind 70mph
- destructive "thunderstorm damage threat" tags for hail 2.75"+ and wind 80mph+
Note: The tornado possible option in a severe thunderstorm warning will also trigger a "tornado" tag (e.g. TORNADO...POSSIBLE).
Base (B) and excessive (E) Calls To Action (CTA) are also chosen in the main WarnGen entry window to supplement messaging. Here is a summary of the potential CTAs for severe at the forecaster's discretion along with the impact statements generated automatically by WarnGen.

Instructions: The instructions section provides some tips on what can be done in WarnGen in the current state.

Create Text, Restart, Close: The Create Text is the very last step in the process for WarnGen. All product specification in the GUI and all polygon edits need to be completed before pressing Create Text. Clicking Create Text will launch a text editor if the Text Workstation is loaded. The Restart button will clear the display and restore the Drag me to storm dot. Restarting WarnGen after sending the warning or when WarnGen has a rare unusual problem is a best practice to ensure a clean start of a new product while avoiding accidentally updating the last product sent. The Close button will close the WarnGen window and make the application not in the editable state. After using the Close button you can make WarnGen editable by middle clicking on the WarnGen text legend or right clicking on the WarnGen text legend and selecting Editable. Once WarnGen is editable it will always pop up when the CAVE editor containing the editable WarnGen is clicked.
WarnGen Workflow Tips
The basic workflow in WarnGen is to enter the metadata for the warning in the WarnGen GUI first, then track your storm and adjust the polygon, and lastly to click Create Text. More WarnGen philosophy is provided in the convective storms topic and at the RAC workshop, but here are some general WarnGen workflow tips for future reference:
- Tornado Overtaking Severe Warnings - Tornado warnings generally cover tornado and large hail threat while attempting to limit false alarm area unless there is a large separation between the two and separate but slightly overlapping severe thunderstorm and tornado warning polygons are possible. When issuing a tornado warning over a severe thunderstorm warning, the severe thunderstorm warning is not canceled because that can cause confusion and mixed messaging. The severe thunderstorm warning is typically allowed to expire and not reissued if the area is covered by the tornado warning.
- Polygon Areas Adjustment - The default polygon in WarnGen is intended to be modified by the forecaster to anticipate uncertainty in threat movement and include or exclude cities. Large polygons can unnecessarily warn those who don't have a significant threat, and small polygons can cause areas to not be warned or require sliver warnings to cover threats that move outside the polygon (remember polygons can never be increased in size). Good polygons start with identifying the current threat area and extending that based off tracking and forecaster experience. The Bunkers right and left motion vectors can be useful in anticipating deviate motion of the threat area for right and left moving supercells. More training on this is provided in the RAC course including the primer and workshop.
- One Storm Tracking - Start dragging your dot to the trackable threat on the most recent frame. Then step back 3-4 frames from the last frame of the loop before moving the dot. WarnGen creates a linear estimate from the last two positions modified and using more frames provides better motions. Moving the dot on successive frames tends to generate erratic storm motions. Click the Track button to preview the track and click on Warned/Hatched Area to preview clipping, then trim accordingly. Watch out for clipping counties and cities not likely to experience significant threat.
- Line Storm Tracking - Start dragging the line to the trackable threat on the most recent frame. Then add extra vertices (middle click on line or right click and Add Vertex) to allow fitting the line to the threat. When you have the shape fit to the feature on the most recent frame, then step back 3-4 frames and drag the line tool by grabbing the line (not the vertices) with a left click and hold and dropping it on the best fit location for the feature being tracked. Avoid the urge to tweak the vertices on the older frames of data as that will not likely fit on the most recent frame. Step through the loop and ensure you end on the threat on the most recent frame and that you are roughly tracking the line. If you need to further adjust the line tool location, do so very carefully and sparingly on the most recent frame or 3-4 frames ago. Click the Track button and then Warned/Hatched Area button to preview the track and clipping and trim accordingly. Watch for clipping counties and make sure to extend the threat back behind the line to cover threats behind the leading edge.
- Duration Choice - Severe thunderstorms are typically configured to default to 45min and tornado warnings to 30min. Consider going with longer warnings (e.g. 60min severe and 45min tornado) with persistent high confidence events where you are consciously trying to provide more lead time. Longer warnings can lead to more false alarm area and polygon update problems if storms do not behave as forecasted or your tracking is not good. Shorter warnings are ideal for low confidence events where you can manage more frequent updates or events like a storm leaving a CWA border.
- Add/Remove Vertices - Middle click on the polygon to add vertices and fit the shape of the threat better or right click and hold and select Add Vertex. Right click and hold on vertices and select Delete Vertex to remove a vertex.
- Hide Legends - Right click on the background and select Hide Legends (or cycle legends using the Enter key on the keypad) to get rid of verbose overlays if they are cluttering your display.
- Additional Reports - Use the Additional Reports option in WarnGen to add reports in a standard location. Manually type in the time of the report in that section of framed text along with the specifics of the report and location. Note that the time of the report many times is different than the time you hit Create Text and the corresponding basis statement lead in phrase. Ensure the language accurately reflects the time of the WarnGen tracking and the report separately if they are not the same time.
- Tip of the Arrow - WarnGen shows where the threat being tracked will be at the end of the warning using an arrow at the end of the track. A little extra polygon buffer at the end of the track is provided with the Track button to account for some degree of motion uncertainty. When you have accurately tracked the leading edge of the threat and the storm is well behaved, you can trim the end of the polygon closer to the tip of the arrow. If there is significant threat ahead of what is tracked (e.g. large hail preceding a tornado being tracked), then you should factor where that would be at the end of the warning beyond the tip of the arrow.
- Clipping
- WarnGen is constrained by policy to reduce polygons to 20 vertices and clip to county warning area borders. It also supports local-offices to configure how much polygon area overlap with a county will trigger inclusion in the automatic clipping logic. There are both area percentage thresholds (typically 0-5%) and fixed area thresholds (typically 0-15 square miles) that can be used in different combinations to improve the clipping in small and large-county CWAs. While storm-based warnings is theoretically intended to be agnostic toward geopolitical borders, county inclusion can unfortunately cause confusion in messaging warning products and sometimes undesired responses. For instance, some emergency managers still key off the county inclusion and not the polygon for sounding tornado sirens. Therefore, it is a general best practice to avoid clipping counties on the edges of the warnings where the threat is much less likely, particularly when impacting large metro populations.
- Low Area Thresholds and Removing Counties
- If your office has configured a low threshold, then any slight overlap can trigger county inclusion. To watch for including too many counties you should pay attention to the Ws indicating counties being included in the warning as well as the hatched area indicating the local clipping logic. It is also important to read your list of counties in the warning before sending the warning. Once you have identified a county you want to exclude, you can manually adjust your vertices (moving or adding/removing) until the W and hatching disappears from the county, or you can right click on the county to remove the county/hatching/W and then preview the clipping with the Warned/Hatched Area button.
- Higher Area Thresholds and Adding Counties
- If your office has configured larger thresholds for county overlap then some combination of area percentage (typically 1-5%) or area (1-15 square miles) will prevent county inclusion in areas you wish to include. If you need to include a county that is failing to be included because the area overlap is below the local clipping threshold, then your only recourse is to adjust your vertices (moving or adding/removing) to increase the area in that county until the hatching and W triggers.
- Marine Extension Area Thresholds
- WarnGen allows offices to specify the distance polygons can extend beyond complex coastlines (e.g 5 miles), and it allows the minimum distance between two vertices to be set to simplify the vertices reduction. The configuration works for both land and marine products. Polygon simplification is tough along complex county borders and marine areas, and mitigating undesirable clipping is typically facilitated by adjusting/adding/removing vertices and previewing the clipping logic using the Warned/Hatched Area button by trial and error.
- Impact Based Warning (IBW) Philosophy
- Severe thunderstorm warnings
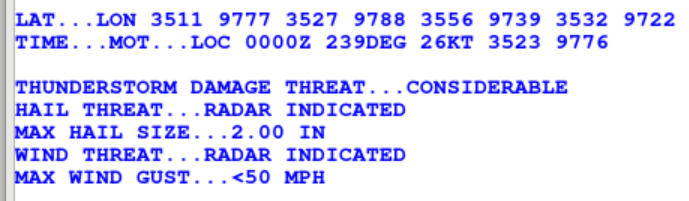
- The IBW tags for severe thunderstorms are derived from the forecaster-selected threat intensities, source (radar indicated or an observed basis), and whether the tornado possible tag is selected:
- TORNADO...POSSIBLE tag - select in WarnGen GUI if tornado likelihood is increasing but is still below threshold for issuing a tornado warning
- THUNDERSTORM DAMAGE THREAT tag - CONSIDERABLE or CATASTROPHIC based on the user-selected threat intensities
- HAIL THREAT tag - RADAR INDICATED or OBSERVED based on the basis selection and the "Select for Observed Wind" or "Select for Observed Hail" option
- MAX HAIL SIZE tag - comes from the user-selected hail size
- WIND THREAT tag - RADAR INDICATED or OBSERVED
- MAX WIND GUST tag - comes from the user-selected wind speed
- Tip - Most IBW tags flow from the selections, but the one thing the forecaster needs to manually select is when there was either observed hail or observed wind:
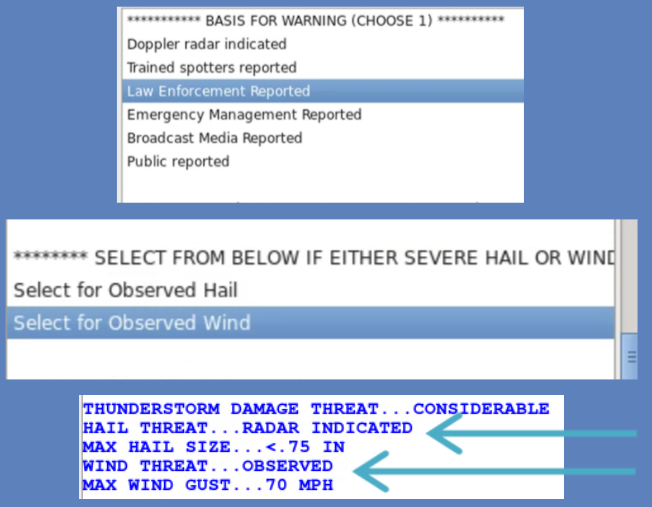
- The IBW tags for severe thunderstorms are derived from the forecaster-selected threat intensities, source (radar indicated or an observed basis), and whether the tornado possible tag is selected:
- Tornado warnings
- The IBW tags for tornado warnings are derived from the forecaster-selected damage threat, source, and max hail size selected:
- TORNADO - RADAR INDICATED or OBSERVED from forecaster selected basis
- TORNADO DAMAGE THREAT - CONSIDERABLE or CATASTROPHIC from forecaster selected choice
- The IBW tags for considerable tornado and catastrophic (A.K.A. tornado emergency) tornado are manually selected by the forecaster unlike severe thunderstorm warnings that follow from the forecaster-specified intensity thresholds.
- MAX HAIL SIZE - from forecaster selected hail size
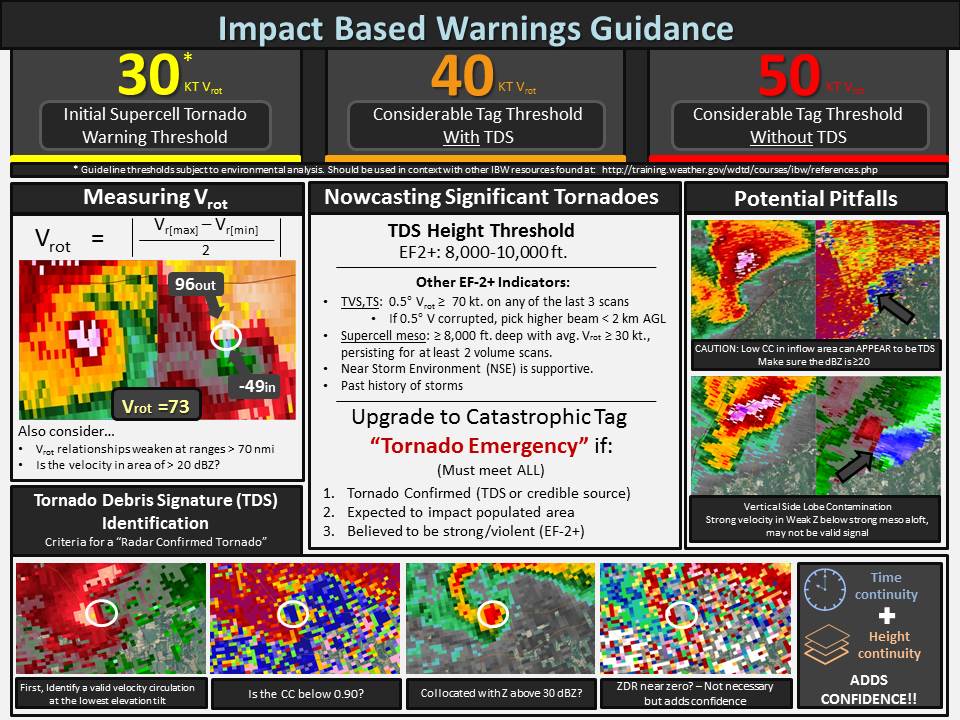
- There is a special basis for tornado warnings when a Tornado Debris Signature (TDS) is observed which can confirm a tornado in the absence of tornado reports.
- WDTD recommends strongly considering issuing tornado warnings with rotation velocities of 30kts or greater in environments favorable for tornadoes when the Significant Tornado Parameter is >0. An upgrade to considerable is appropriate when rotational velocities exceed 50kts or 40kts with a TDS.
- The IBW tags for tornado warnings are derived from the forecaster-selected damage threat, source, and max hail size selected:
- Severe thunderstorm warnings
- Trimming Cities
- The cities in the list should follow from the polygon. To remove isolated cities not in the track, the polygon should not intersect the WarnGenloc map file. You can load WarnGenlocl from the map menu if you can't understand why a city is or is not included. If you have too many cities in large urban areas, trimming the city list to well known cities is appropriate.
- Limiting Counties
- Large numbers of counties should be avoided in warnings in order to limit false alarm area and be able to effectively follow up warnings with observations and information relevant for the area covered. This is more of a problem for large wind-driven events. One strategy is to break up large areas of the line into slightly overlapping segments. Too many polygons can be difficult to maintain, so there is a happy medium that is dependent on many things including workload.
- Pathcast
- The option in WarnGen to include detailed time of arrival using pathcast is difficult to use effectively because the timing of the point tracked with nuances in areas of cities and how people interpret this information. WDTD recommends this not be used by default, and if you choose to use it, pay particular close attention to the tracking and timing details.
WarnGen can be used to quickly issue warnings and follow-up statements in the time pressure of warning operations, and developing proficiency takes experience. While there are many things to potentially consider when making storm-based warning polygons, it is important to recognize that ultimately warning decisions need to be executed quickly. As you initially develop proficiency for warning operations, start with the basic principles of being able to relatively quickly track a storm and issue updates. You can improve polygonology over time, but you don't want to spend too much time on small details that can put you behind a busy warning shift. The proficiency for this initial training on WarnGen will be relatively simple warning creation and follow ups. Much more training is provided later in the RAC training and primer/workshop, so adjust your expectations accordingly.
Note: WES-2 Bridge is currently being updated on field machines to support IBW severe format warnings, so some of the labels may be slightly different in the jobsheets and WES videos until this is done.
This task demonstrates the basic steps of starting WarnGen in the D-2D perspective and creating a severe thunderstorm warning. Other WarnGen exercises are also available for use on your local WES machine using WES Exercise #6 (WarnGen).
NOTE: This task is only to be completed on WES-2 Bridge and not a live AWIPS, to ensure no warnings are accidentally sent out.
Some of the content in this job sheet is also covered in AFUN Video 6.1 (click for link).
View Jobsheet
This task demonstrates the basic steps of issuing a severe weather statement follow up to the severe thunderstorm generated in the previous task. This task is only designed for the WES-2 Bridge workstation and not a live AWIPS, to prevent accidental submission. Other WarnGen exercises are also available for use on your local WES machine using WES Exercise #6 (WarnGen).
Some of the content in this job sheet is also covered in AFUN Video 6.2 (click for link).
View Jobsheet