Loading an All Tilts Product into the Main Display Panel - OCLO
- 01- CAVE Fundamentals
- Setting the Time Match Basis of a Product
- Loading and Toggling Radar Graphic Overlay Products
- Overlaying CAPE on a Base Reflectivity Product
- Overlaying a Surface Plot on a Base Reflectivity Product
- Overlaying Model Image on Radar and Satellite
- Transferring Screen Products Between the Main Display Pane and Side Panes
- Loading, Arranging, Renaming, and Unloading Additional Map Editors
- Zooming In or Out of a Product View
- Panning a Zoomed-In Image in the Main Display Panel
- Switching the Color Table for a Radar Image Product
- Editing the Current Color Table
- Unload a Map Overlay
- Loading a Map Overlay
- Changing a Map's Display Characteristics
- Loading the Alphanumeric Information for a VWP Product
- Using the AFOS Browser to Load an Area Forecast Discussion
- Move and Adjust Width of AlertViz
- Launch Text Section Log and Display Detailed View
- Loading and Using the AWIPS Data Monitor
- Blinking a Range of Data Values
- Printing the Contents of the Main Display Panel
- Creating a Screen Capture of the Main Display Panel
- Saving/Loading Editor and Perspective Displays
- 02- D2D Fundamentals
- Create a New Procedure
- Opening an Existing Procedure
- Load a Product from the Product Inventory
- Clearing a Product from the Main Display Panel
- Manually Toggling and Looping Single Elevation Angle Products in Time
- Create an Image Combination and Toggle Between the Images
- Use Panel Combo Rotate and All Panel Sample on Dual Pol
- 03- D2D Radar
- Load Radar Products for Single Radar and Radar/MRMS Mosaics
- Toggling Product Displays
- Viewing Radar Cursor Readout Information
- Loading Products into Four-Panel Displays
- Submit an OTR for a Three Hour Precip (THP) Product
- Build a New Request in the RMR GUI
- Managing Active Requests in the RMR GUI
- Loading an All Tilts Product into the Main Display Panel
- Load a VWP Hodograph
- Load a Vertical Reflectivity Cross-Section Image Product Using the Volume Browser
- Load a Horizontal Reflectivity Cross-Section Image Product Using the Volume Browser
- 04- D2D Satellite
- 05- D2D Upper Air
- Load NSHARP into your CAVE Display
- Change NSHARP Configurations
- Cycling Through the Tables
- Toggling Display Insets
- Toggling Graphs and Statistics
- Interact with the Inventory in the D2D Skewt Standard Screen Configuration and Use Keyboard Shortcuts
- Configuring a Sounding and Hodograph Display
- Changing the Parcel Lifting Method
- Display Multiple Active Soundings
- 06- D2D Tools
- 07- D2D Applications
- Issue A New Severe Thunderstorm Warning
- Follow Up a Severe Thunderstorm Warning with a Severe Weather Statement
- Loading an FFMP Basin Trend Graph and Downstream Basin Trace
- Assessing QPE, Ratio, and Diff
- Closing the FFMP Table
- Loading the FFMP Basin Table
- Loading a SCAN Storm Cells Table
- Interacting with the SCAN Storm Cells Table
- Launching the MESO and TVS Tables
- Closing the SCAN Cell Table
Purpose:
This task covers loading an All Tilts product in the main display panel and the two methods for navigating through those products.Tasks:
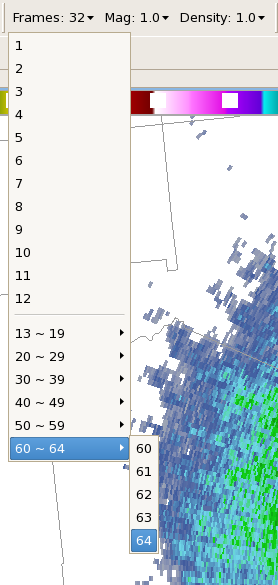
- From the Frames pull-down menu, select 64.
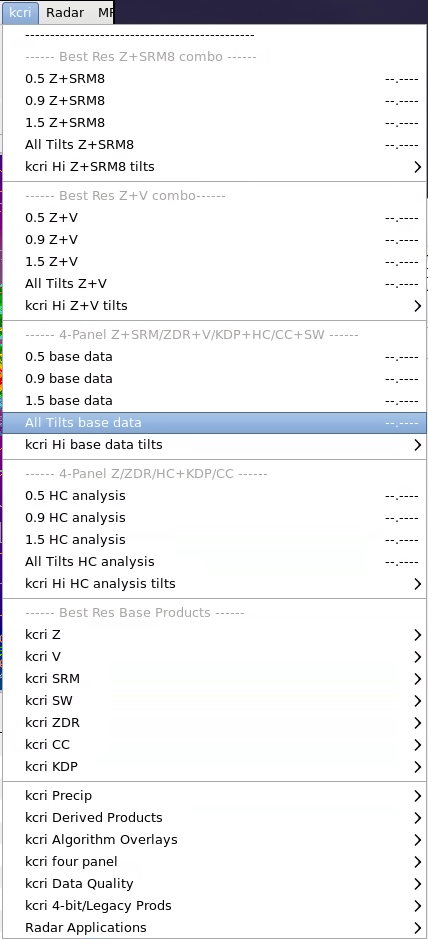
- From one of your dedicated radar menus (e.g., kddc), select All Tilts base data.
- Step forward and backward through time using one of the following methods:
- Method 1: Using the keyboard directional arrows to step through frames (preferred method).
- After loading an all tilts product, use the four directional arrows on the keyboard to navigate through product loop.
- Constant Volume Scan Viewing: The UP-ARROW and DOWN-ARROW keys advance to the next highest or lowest elevation angle available in the current volume scan, respectively.
- Constant Elevation Angle Viewing: The RIGHT-ARROW and LEFT-ARROW keys will advance to the next or previous image available for the current elevation angle, respectively.
- Pressing "CTRL" with either the LEFT-ARROW or RIGHT-ARROW at the same time will take you to the oldest or most recent product in the all tilts display, respectively.
- Method 2: Using the Toolbar buttons to step through frames
- After loading an all tilts product, the “<” and “>”buttons in the toolbar moves the frame forward and backward.
- To determine frame order, the highest elevation angle in the latest volume scan is the most recent product while the lowest elevation angle in the oldest volume scan is the oldest product. While viewing the lowest elevation angle of a given volume scan, the next oldest product is the highest elevation angle of the previous volume scan.
- Left-clicking the “|<<” or “>>|” buttons in the toolbar will take you to the oldest or most recent product in the all tilts display, respectively.
- Method 1: Using the keyboard directional arrows to step through frames (preferred method).
- Task Complete!