


Configuring a Sounding and Hodograph Display - OCLO
Purpose:
This task covers the different ways you can configure NSHARP. In this task, we will focus on the “Parameters Selection” and “Data Display Configuration” options only.Tasks:
Assumptions:
- A RAOB or a point model sounding is loaded in NSHARP.
- In the NSHARP control buttons window: left-click on the Configure button and then left-click the Parameters Selection button to launch the NSHARP Parameters Selection GUI.
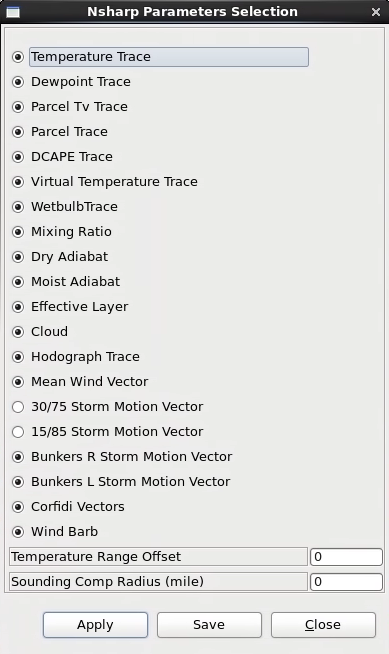
- In the NSHARP Parameters Selection GUI: left-click on the text or radio button for each of the following parameters: Mixing Ratio, Moist Adiabat, and Cloud.
- When you toggle on/off parameters in the GUI, the display will automatically update to reflect those changes.
- In the Temperature Range Offset entry, type in -20 and left-click the Apply button.
- Notice the SkewT shift to display colder temperatures (can be handy with colder soundings).
- In the Temperature Range Offset entry, type in 0 and left-click the Apply button to restore the default temperature axis.
- In the Sounding Comp Radius (mile) entry, type in 50 and left-click the Apply button to allow soundings from different sources to load together when they are within 50 miles of each other.
- Left-click the Apply button and then the Close buttons on both the Nsharp Parameters Selection and Nsharp Configuration windows.
- From the Tools menu, select Points.
- Left-click and hold on a point and drag the point to near the location of the RAOB (within 50 miles).
- From the Volume menu, select Browser.
- In the Volume Browsers GUI, left-click on the menu just to the right of the Tools menu (e.g. “Plan view” if the previous use was Plan view) and select Sounding.
- Under Sources: from the Volume menu select RAP40.
- Under Fields: from the Thermo menu select Sounding.
- Under Planes: from the Points menu, select D2D Points, then select your sounding point (e.g., “Sounding A”).
- Swap the pane containing your RAOB, so the RAOB is displayed in the main panel before loading the Volume Browser sounding.
- Left-click on the Load button at the bottom of the Volume Browser GUI.
- Compare the two sounding sources
- In the NSHARP window, left-click on the CompSrc() button.
- This is a handy way to compare model intializations with observed RAOBs.
- If you try to use a point outside 50 miles, there will be no comparison overlay between the two soundings.
- In the NSHARP window, left-click on the CompSrc().
- This will toggle the CompSrc() off. This is essential for allowing the configurations in the next step.
- In the NSHARP window, left-click on the CompSrc() button.
- In the NSHARP window, left-click on the Configure button.
- In the NSHARP Configuration GUI (launched from the Configure button), left-click on the Data Display Configuration button.
- Left-click on the drop-down menu in the top-left corner of the GUI, then left-click on the Virtual Temp option.
- Change the Color, Width, and Style of the Virtual Temp line by left-clicking over a color/width/style option.
- The settings will be applied for the rest of the CAVE session. They are only permanently saved to your account if you save the settings with the Save button.
- Left-click the Apply button (do not Save) to view your changes in the Skew-T display.
- Select the Close buttons in the Nsharp Data Display window and Nsharp Configuration window.
- Revert to the original Color, Width, and Style of the Virtual Temp line by making color/width/style selections (should be red, dashed, medium thickness) in the Nsharp Data Display, and left-click the Apply button.
- Alternatively, restart CAVE when done to revert to original settings
- Task Complete!