


Blinking a Range of Data Values - OCLO
Purpose:
This task demonstrates how to select a range of values from an image product’s color table and make those colors blink.Tasks:
Assumptions:
- You have an image product loaded in the main display panel.
- Right-click and hold on the name of the image product in the product legend and select Change blinking and select the image to blink.
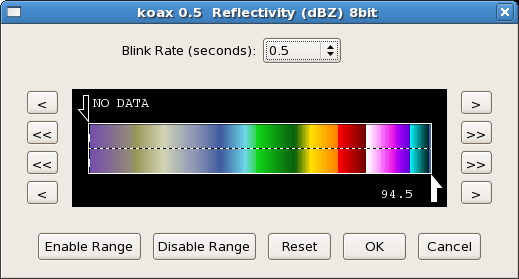
- Pick a range of values to edit by positioning half-arrows using one of the following methods:
- The arrow at the top should be at the lower end (i.e., left side) of the range, while the arrow at the bottom should be at the higher end (i.e., right side) of the range.
- The data values that correspond to the location of each half-arrow appear next to the arrow. Use this information when setting up your range of values.
- Method 1:
- Left-click and hold on an arrow and drag the arrow to the desired location in the color table scale. Repeat for the other arrow.
- Method 2:
- There are four buttons that control each arrow: “<”, “<<”, “>>”, and “>”.
- The “<” and “>” buttons move the arrows on small increments in each direction.
- The “<<” and “>>” buttons are supposed to move the arrows in larger increments, but in 16.2.2 they act the same as the “>” and “<” buttons.
- The top two buttons on each side control the position of the top arrow while the bottom two buttons on each side control the position of the bottom arrow.
- Use the arrow buttons for one of the half-arrows to incrementally adjust its position. Repeat for the other arrow.
- Left-click on Enable Range button to start blinking the range of values.
- Stop blinking the range of values by left-clicking the Disable Range button.
- To save current settings, left-click on the OK button.
- To cancel recent changes, left-click on the Cancel button.
- Task Complete!