This job sheet for all VLab users illustrates some of the steps necessary for adding and removing members, assigning member roles, defining teams, assuming responsibility for posted content, creating pages and adding web content to those pages, making pages public or private, using staging, and using polls.
Tasks:
Log in to the VLab VLCS and access your local VLab community
Identify the primary way to access administrative tools
Demonstrate the basic workflow for creating web content
Demonstrate the use of forms and polls
Access your VLab community using either of the following methods:
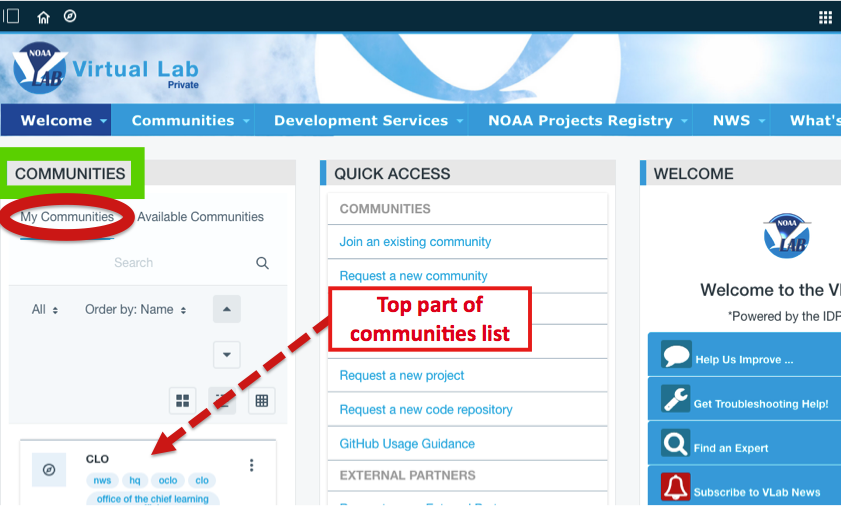
Select the community's name from the list that appears upon clicking the "My Communities" tab (red oval) under the "Communities" portlet (green rectangle) on the left side of the main VLab Landing Page:
Alternatively, you can select the community's name from the page that appears when clicking the dial-shaped "Select Community" icon (yellow circle) on the left side of the Control Menu bar (shown enlarged immediately below):
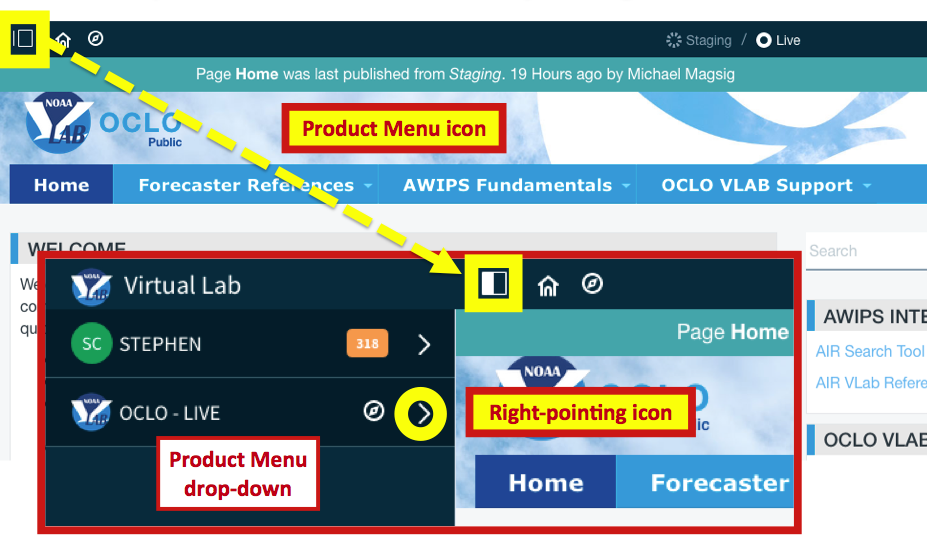
VLab's rectangular Product Menu icon (inside yellow square, below) provides access to the tools used by community owners to manage community content and membership; it also provides access to the tools needed by both community owners and community members for account management. Click on the icon to open the product menu drop-down; the left side of the icon turns white when the drop-down menu appears:
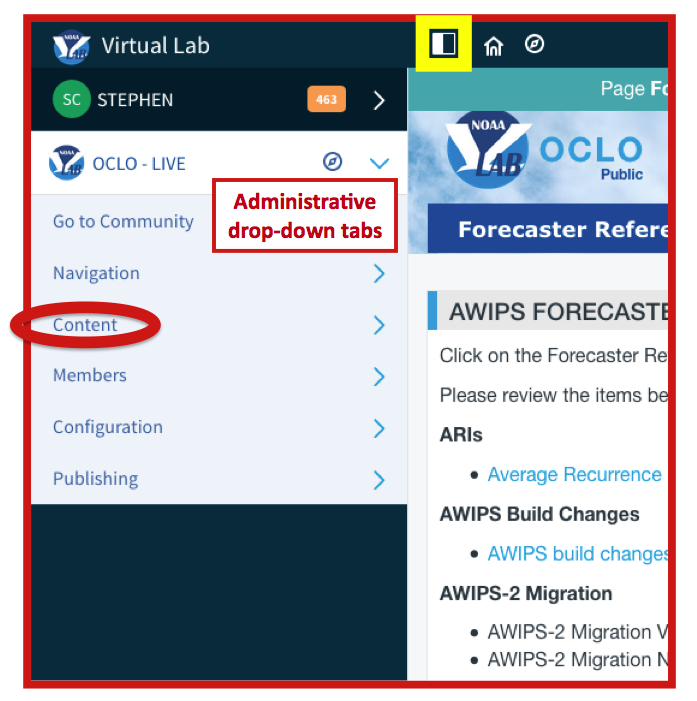
Once the Product Menu drop-down appears, click the right-pointing "angle" icon to the right of the community's name (circled in yellow in the previous screen capture). This action turns the icon into a downward-pointing angle, and opens the administrative drop-down tabs shown below. Select the "Content" tab (red oval):
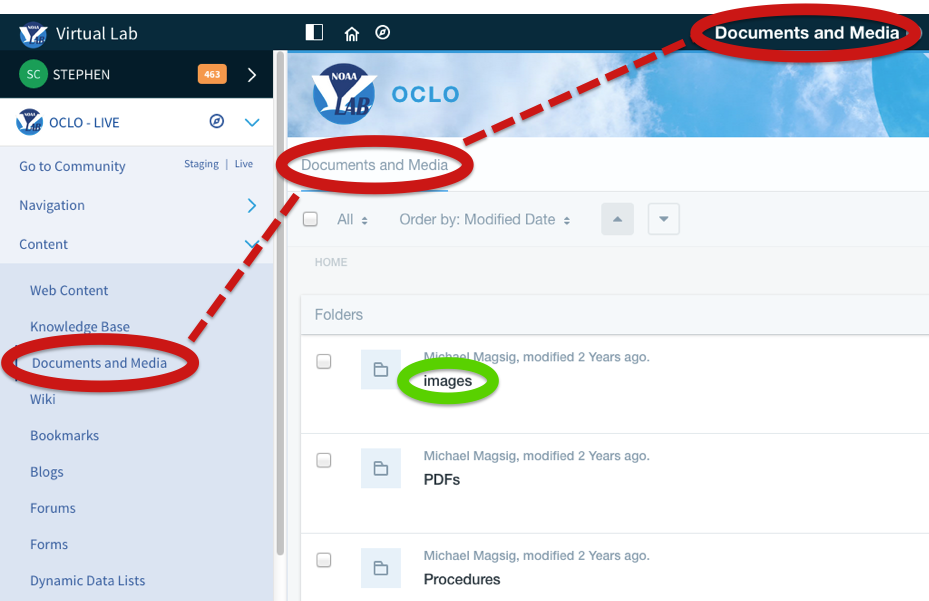
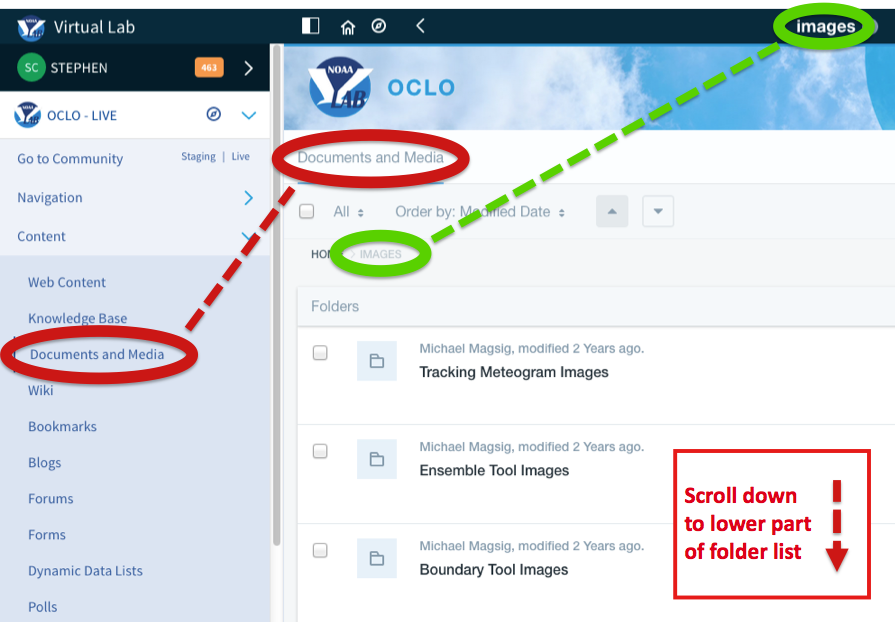
Under "Content," select "Documents and Media." Note that once this selection has been made, the label "Documents and Media" also appears above the list of folders in the center of the page, and also on the right end of the dark blue Control Menu bar (red ovals). In the folder list, select the first one, "Images" (green oval):
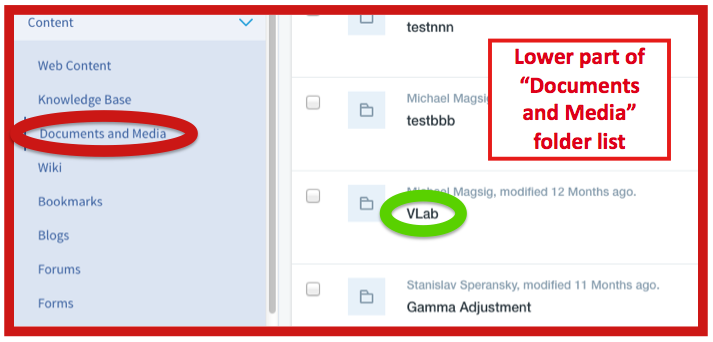
The "Images" folder itself contains sub-folders. Once the"Images" folder has been selected, the folder name appears at the top of the list of the folders sub-folders (green oval); the folder name also appears on the right end of the Control Menu bar, replacing the main folder name, "Documents and Media." For space reasons, the images shown thus far have included only the top part of the folders list. Scroll down to the bottom of the folder list using the slide bar on the far right side of the list (not shown):
Select the "VLab" sub-folder (green oval below):
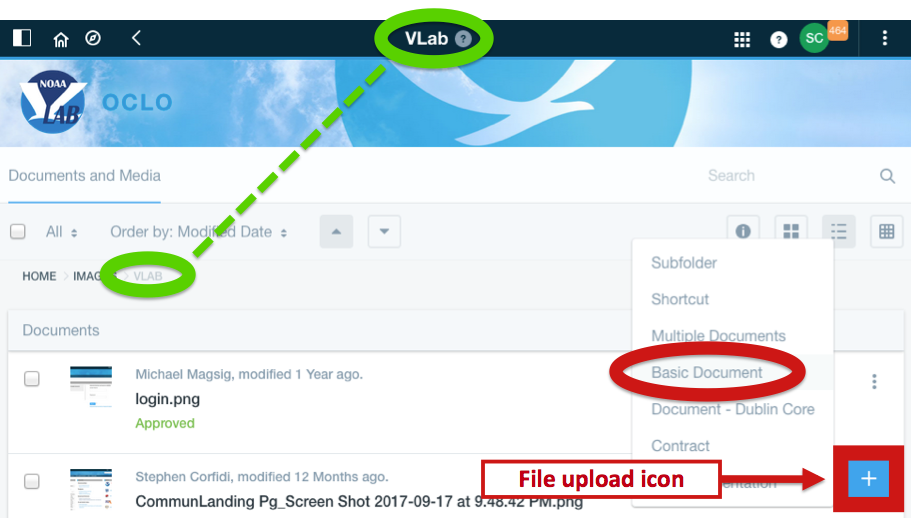
Once you are in the "VLab" sub-folder, note that the name "VLab" replaces "Images" on the right end of the Control Menu bar (green oval); the sub-folder name "VLab" also appears at the top of the file list. In the listing, select the file "CommunLanding Pg_Screen Shot" by clicking on the small check box, here marked with a green "x" mark. If you decide that this file is not the one you seek and realize that the correct one is located in another folder, use the "Back arrow" icon --- found on the Control Menu bar and circled here in yellow --- to move "back" or "up" through the folder tree to the correct location.
It is worth pausing briefly to demonstrate the uploading of files from one's own computer or another location into VLab for use in the creation of VLab web content. Here we'll upload an image file to the "VLab" sub-folder (green ovals) in the "Images" folder. To begin, click the file upload icon. The file upload icon is the "Plus" sign located in a blue square in the lower right corner of a folder's file listing (outlined here in red). If your folder contains many files, you will have to scroll to the bottom of the list to reach the upload icon. To select a single file for upload, select the "Basic Document" option (red oval) in the pop-up box that appears upon clicking the file upload icon:
Clicking the file upload icon opens the file upload page. Only the top part of that page is shown here; note that the page is titled "New Document" on the dark blue Control Menu bar. Clicking "Browse" (red oval) opens a separate file selection interface, outlined here in red, that you may use to navigate to a file located on your own computer or elsewhere.
To complete you upload, scroll to the bottom of the upload page and click the blue "Publish" button; it is this action that actually uploads the file to VLab:
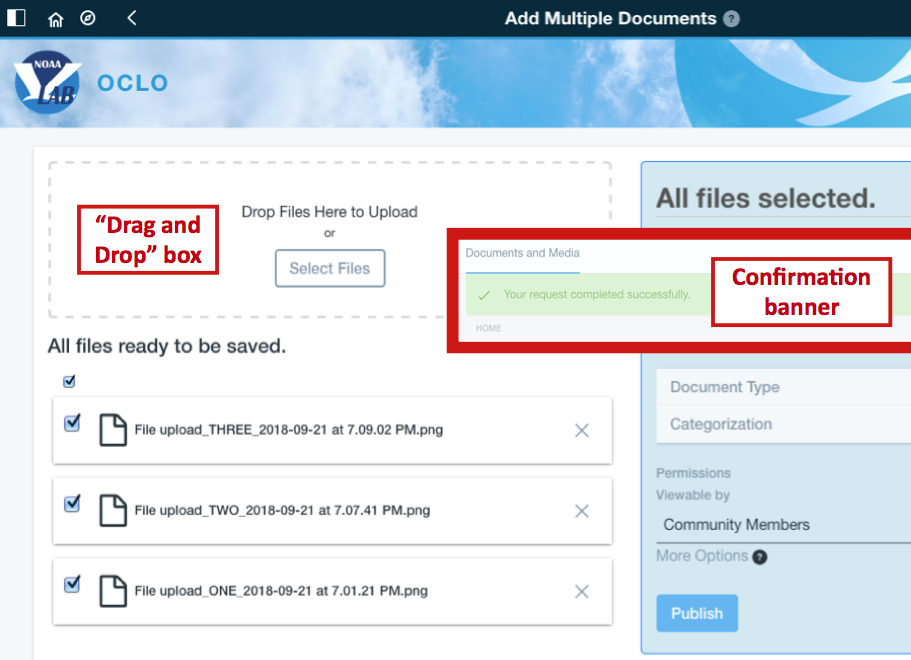
If you want to upload multiple files (instead of a single one) from the same location, select "Multiple Documents" instead of "Basic Document" in the file upload drop-down box (recall step #8). This option displays the "Add Multiple Documents" page shown here. The "Add Multiple Documents" page allows you to select multiple files from a folder on your own computer or elsewhere. Alternatively, the page may be used to "Drag and drop" selected files for upload (see dashed box in top left part of illustration). To complete the operation, click the "Publish" button at the bottom of the page. In all cases, when files have been successfully uploaded to VLab, a green-bannered confirmation message will appear across the top of the page. Part of an upload confirmation message appears in the inset outlined in red below:
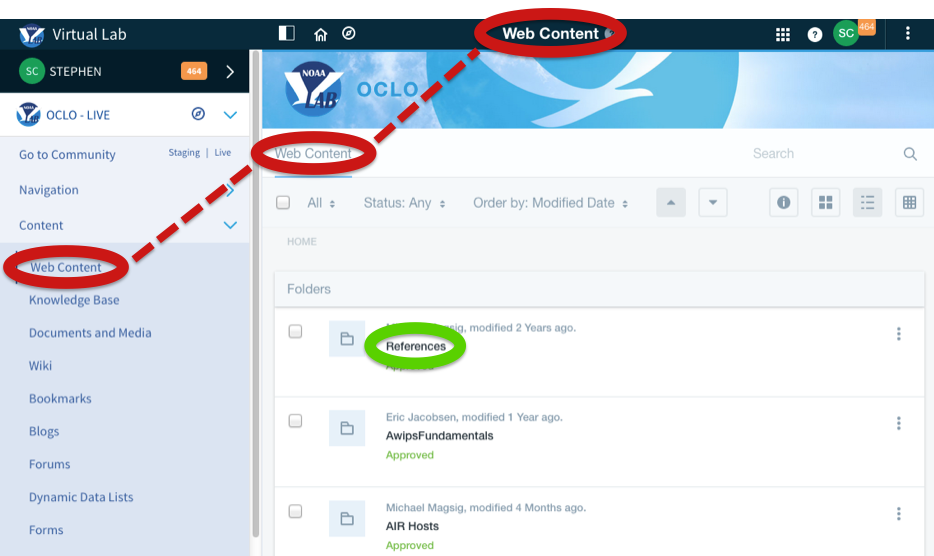
Now we'll access a piece of web content for editing. To do so, select "Web Content" instead of "Documents and Media" under "Content" from the Product Menu drop-down on the left side of the page. Next, select the "References" folder (green oval).
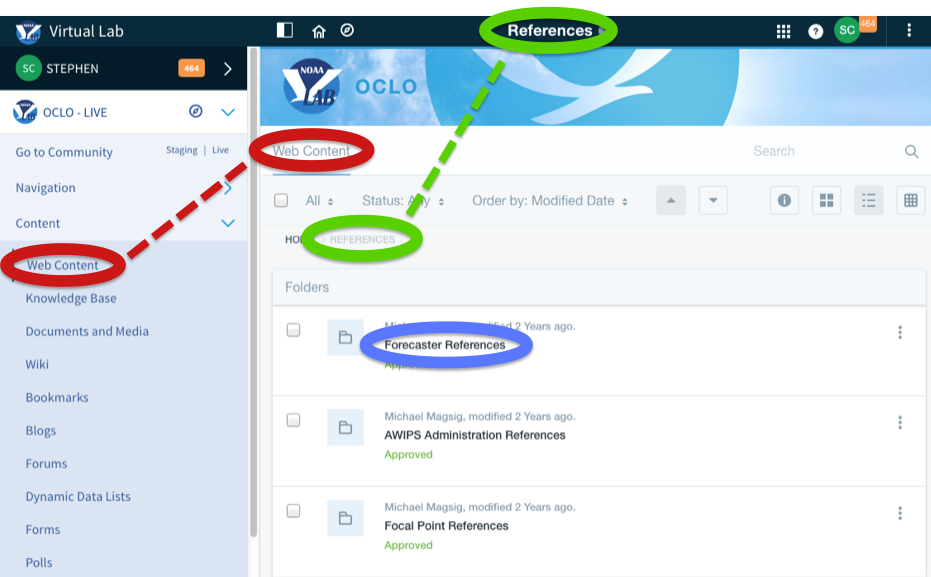
In the "References" folder, select the "Forecaster References" sub-folder (blue oval):
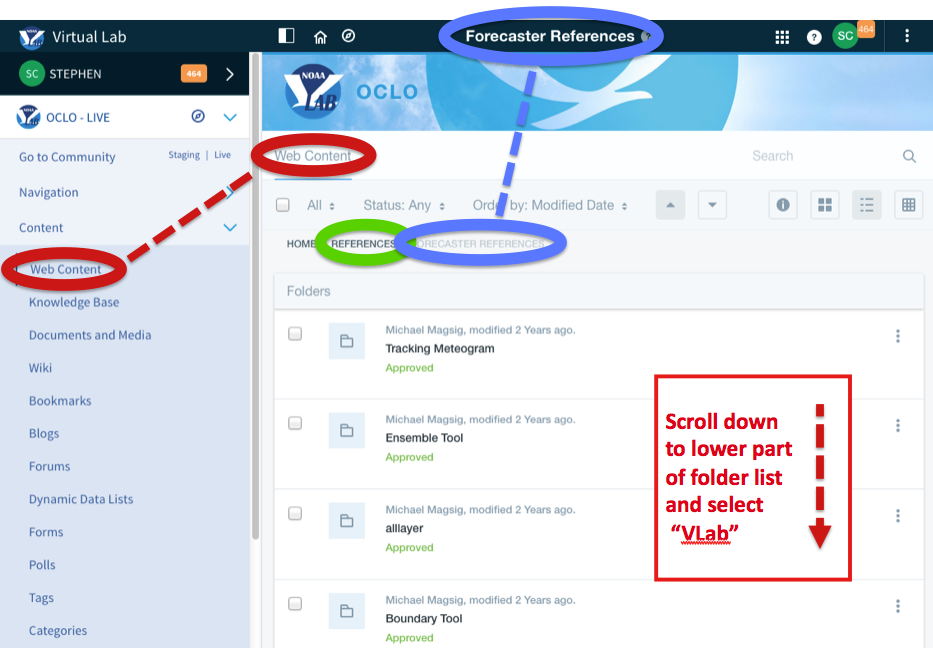
Once in the "Forecaster References" sub-folder, scroll down the list to the "VLab" sub-sub-folder using the scroll bar at far right (not shown):
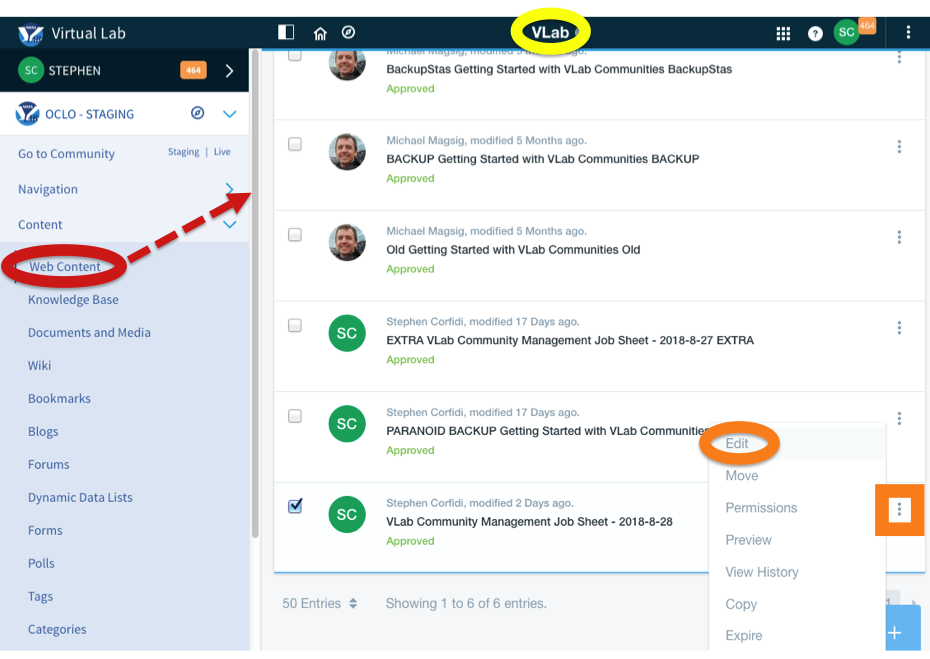
In the "VLab" folder (yellow ovals), scroll down to the bottom of the listings and select "VLab Community Management job sheet":
Select the "VLab Community Management job sheet" web content file for editing by either clicking the file name, or by clicking the check box to the left of the file name. Next, click on the three-dot (ellipsis) icon to the right of the file name (orange square); this opens the small drop-down list shown in the lower right part of the image below; in the listing, select "Edit" (orange oval):
Here is the web content we want to edit, the "VLab Community Management Job Sheet" file. Note that the file name appears both on the Control Menu bar (in orange oval), and at the top of the editing area (orange rectangle). When the web content editor opens, it displays the top or first part of your web content file, allowing you to edit the Title, Summary, and Purpose of the content.
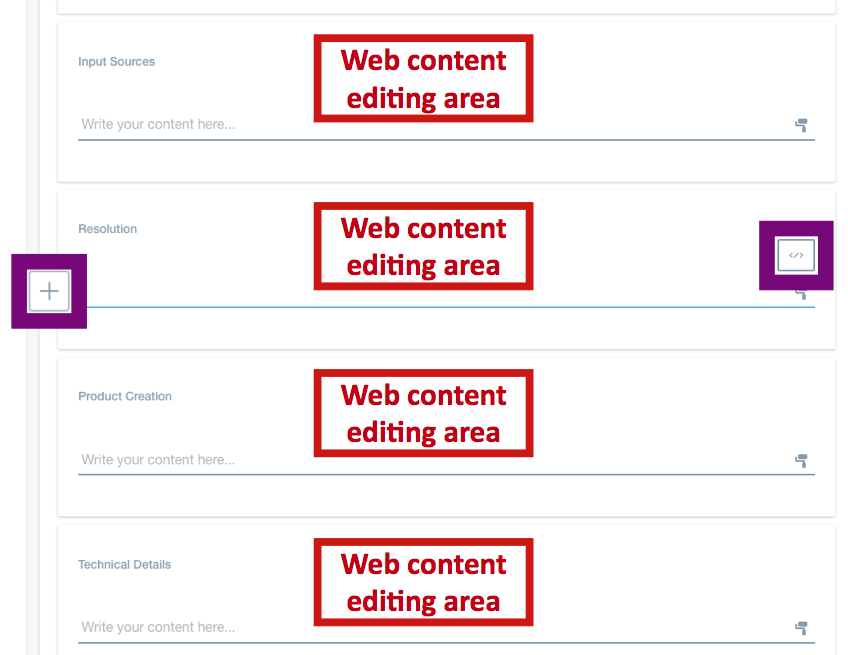
Scroll down below the Title, Summary, and Purpose areas to reach the actual content editing areas; multiple editing areas exist and are delimited by embedded "editing windows;" four are shown below. Clicking within a web content edit area will display two icons here outlined in purple: The "Add"(+) on the left side of the edit area, and the "Sideways S" icon on the right; we'll look at these more closely in the next few steps.
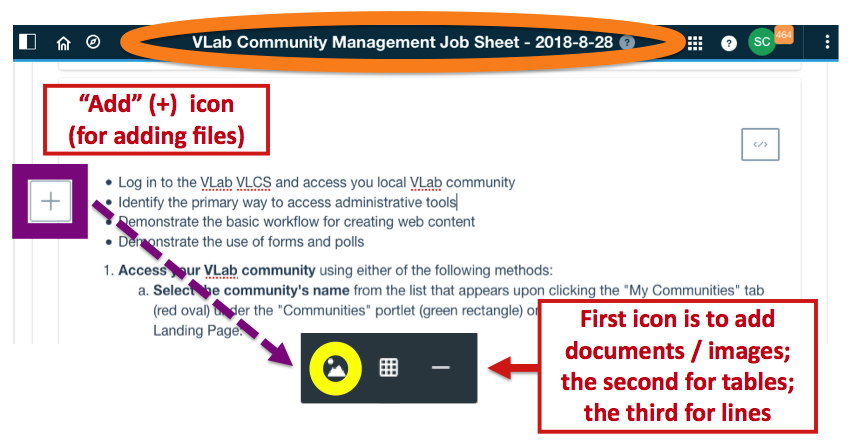
Here we have returned to the "VLab Community Management Job Sheet" file. Text already has been added to the editing area, some of which is in bullet form. The editing area has been clicked, displaying both the "Add" (+) and "Sideways S" icons. Clicking on the "Add" icon (in purple square) opens the black file addition box, shown here at the bottom of the illustration. The box contains three icons. The first icon, circled here in yellow, is for adding document and media files. Clicking that icon opens a file selection page (not shown) that lets the user browse their VLab folders for the addition of such files. The second black box icon is for the addition of tables, while the third is for the addition of lines to separate different sections of one's web content.
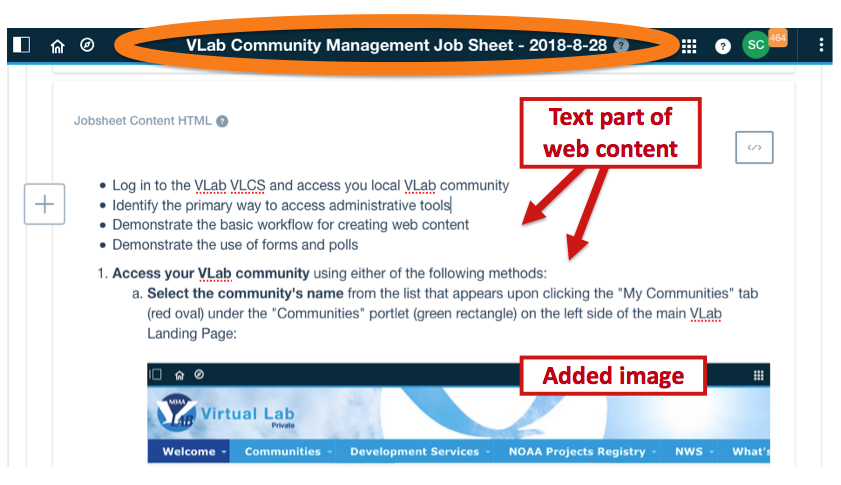
Using the first icon in the black file addition box shown in the previous step, we added an image file immediately below the textual part of our web content; the image shows the top part of VLab's main landing page. Double-clicking on the image displays a pop-up box (not shown) to left-, center-, or right-justify the image; the image here has been center-justified:
Now we'll edit the textual part of the web content. Recall that VLab employs an "in-line" WYSIWYG (What You See Is What You Get) text editor that displays the editing tools as you highlight text for editing. This saves you from having to scroll to the very top of your content to access the editing tools. Here we have highlighted the word "polls" to display the black WYSIWYG editor tool bar. The tool bar disappears once you have completed your editing action.
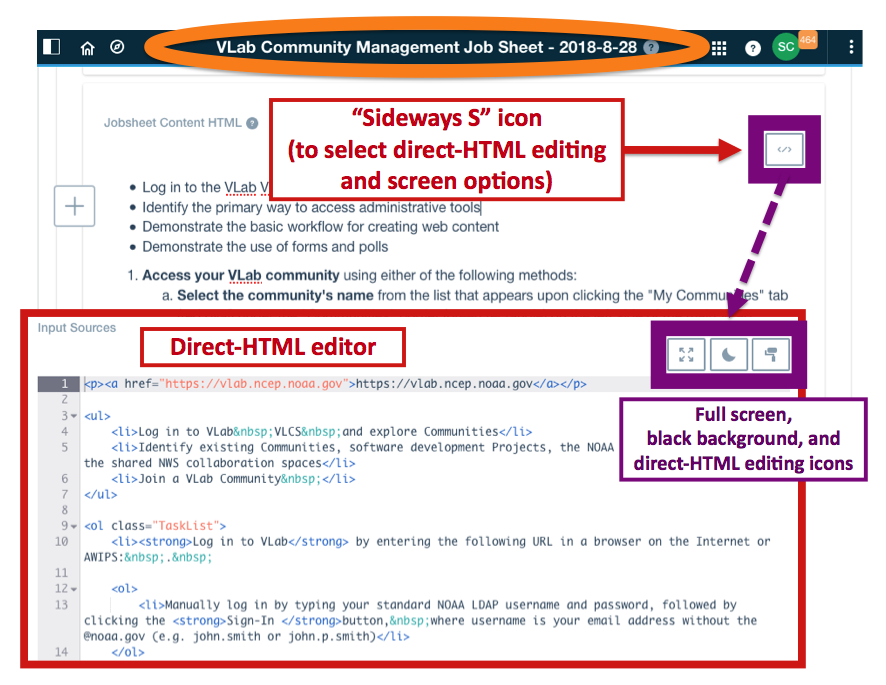
The second icon that appears upon clicking on VLab's web content editing area is the "Sideways S" icon. This icon appears on the right side of the page and is here outlined in purple. Clicking the "Sideways S" icon switches the user from the WYSIWYG editor to direct-HTML editing. The red-outlined inset in lower part of the image below shows the text part of our web content as it appears when in direct-HTML editing mode. The "Paint roller" icon in the upper right corner of the inset signifies that you are in HTML editing mode; the other two icons are used to select full-screen and / or black-background screen options, respectively, while in HTML mode.
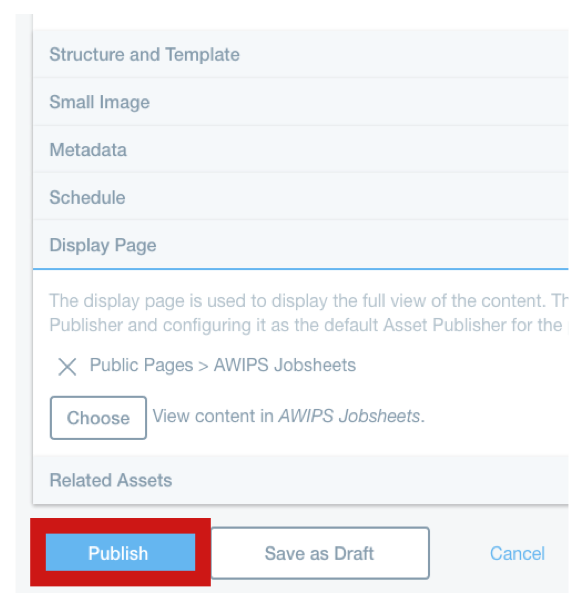
Be sure to save your work often while editing. You can save your web content file temporarily clicking the "Save as Draft" button, found by scrolling down to the bottom of your web content editing area. But a better idea is to frequently click the "Publish" button located immediately to the left of the "Save as Draft" button and outlined in red below. If for some reason you decide not to save your work, simply click the "Cancel" button located to the left of the "Save as Draft" button:
Recall that VLab web content is not tied directly to a specific VLab page; in other words, a static URL is not assigned for each piece of VLab web content. Because of this, display pages are used to display web content in VLab. A display page is any VLab page that contains an Asset Publisher portlet that has been configured to display web content associated with the page. In the next few steps we will add an Asset Publisher portlet to a page, and configure it to display web content.
To add an Asset Publisher portlet, first go to the page where you wish to place the web content and make certain that the edit controls are "on." The "Eye" icon ( ) --- located in the middle of the Control Menu bar (see yellow oval below) --- appears without a slash when the edit controls are "on." If the icon has a slash through it, click on the icon to toggle the controls "on" (and remove the slash).
Next, click the "Add" or "+" icon (outlined here in yellow) on the right end of the Control Menu bar; this opens the drop-down box outlined in red on the right side of the illustration. Under "Applications" and "Content Management" (green ovals) in the drop-down, select "Asset Publisher." Finally, click the word "Add" (outlined in blue rectangle) that appears when you mouse-over the label "Asset Publisher" in the drop-down list. This action will place the Asset Publisher portlet in the upper-left corner of the page. You can subsequently "click and drag" the portlet to another location on the page if you wish. Alternatively, you can "click and drag" the nine-dot Asset Publisher icon from the drop-down list to place the portlet anywhere on your page.
Once you have placed the Asset Publisher portlet on your page, mouse-over the right end of the gray portlet bar to display the three-dot or ellipsis icon (outlined here in red rectangle); click the icon to reveal the options drop-down box, and select "Configuration" (red oval); this opens the Asset Publisher - Configuration page shown in the next step.
Here is the top part of the Asset Publisher - Configuration page. Under the "Asset Selection" tab (red box, upper left), locate the "Source" section (red oval) and, within that, the "Scope" sub-section (green oval). Under "Scope," click the "Select" button (green box). This opens the a small drop-down box that is used to identify where you want the portlet to search for content. Content can be searched across all of VLab ("Global" option), or the search can be restricted to a particular community or specific page. Next, also under "Source," select the type of assets that you want the portlet to collect and display by clicking within the "Asset Type" area (blue oval). This will reveal the blue-outlined menu of asset types (only the top part of which is shown here) from which your selection(s) can be made:
Next, scroll down through the Asset Publisher - Configuration page to the "Filter" section (labeled in thick red oval) using the slide bar on the far right side of the page. Click in the "Filter" area to activate the data entry tabs that enable you to set up filters that you might want the Asset Publisher to consider when collecting content for display. As seen here, the filter area turns green when activated. Here, we have set the Asset Publisher to only display items that have been associated with the indicated tags (thin red oval):
Continue scrolling down through the Asset Publisher - Configuration page to the Custom User Attributes and Ordering and Grouping sections. Both of these sections operate in a straight-forward manner to help organize and arrange the content displayed in your portlet. After you are satisfied with those settings, go back to the top of the Asset Publisher - Configuration page and select the "Display Settings" tab. This tab, located immediately to the right of "Asset Selection" (see top of illustration in step 26), opens a separate sub-page of selection options, the top part of which is shown here in the green-outlined inset. These options enable you to configure the portlet's display settings and to select the metadata you want to be displayed by the portlet (top green arrow). Slide the "Set the Default Asset Publisher for This Page" bar to the "YES" position (bottom green arrow). The page is now configured to be a display page; that is, it will display web content associated with the page. Finally, at the bottom of the Asset Publisher - Configuration page, click "Save" (blue rectangle, lower left) to save your Asset Publisher configuration settings.
The final step is linking your web content to the display page we have just created. When editing your web content, scroll down and click the "Display Page" tab near the bottom of the web content editing area. Next, click "Chose;" this opens the page selection window shown in the next step.
Select the page that contains your configured Asset Publisher; here we have chosen the page "VLab Community Management." This page is located in the "VLab" sub-folder within the folders "Misc" and "Forecaster References." Click "Done" (outlined in blue at bottom of page) when your page selection has been made, and then click "Publish" at the bottom of the web content editor (bottom left corner of illustration in previous step); your display page and web content are now linked.
It is often useful to link to web content that has been tied to a given VLab display page. To do so, your URL must be patterned as shown in the illustration below. The first part of the URL is simply the URL of your community; the example here points to the private ("group") pages of the WDTD Community (red underlining below). The second part of the URL consists of the dash (-) symbol (green underlining). The last part consists of the URL title of the web content piece to which you want to link; in the example below, the URL title is "mesh-tracks" (dark-blue underlining):
If you are not certain of the URL title for a particular piece of web content, the title easily may be found by selecting "Content" and then "Web Content" in the Product Menu drop-down. Recall that the drop-down appears on the left side of the page upon clicking the Product Menu icon ( ) on the Control Menu bar; the icon here is outlined in yellow. Selecting "Web Content" opens a listing of your community's web content; the top part of such a listing for the "VLab" sub-folder of the OCLO Community is shown below. Using the indicated icon on the right side of the listing --- highlighted here in dark blue --- select the "Descriptive mode" option to display the listing in tabular form. The URL title of each piece of web content then appears, appropriately, in the "URL Title" column (green rectangle). For example, the URL title of the first piece of web content in this folder is "getting-started-with-vlab-communiti-3;" it is this title that should be inserted as the last part of the web content - display page URL link shown in the previous step.
We'll now look at some of the steps involved in assigning community member roles and permissions. To assign member roles to an individual, first select "Members," then "Community Memberships" (yellow and red ovals, respectively, below) from the Product Menu drop-down. This opens the "Community Memberships" listing, only the top part of which is shown here. Click the check box to the left of the person's name, then click the three-dot or ellipsis icon( )on the right side of the screen; this opens a small pop-up box, enlarged and outlined here in green. In the pop-up, select "Assign Community Roles."
Once the "Assign Community Roles" page appears, the top part of which is shown here, use the scroll bar (far right) and check boxes (left) to toggle "on" or "off" selected member roles. Multiple individuals also can be selected to assign the same set of roles to more than one person. When satisfied with your role assignments, click the "Done" button at the bottom of the page.
Member permissions are used to control what community members --- and those beyond the community --- may do with the community's pages, portlets, and content. To maximize control yet maintain flexibility, permissions must be assigned separately for pages, portlets, and content. For example, to make a piece of web content viewable by the public, the "Guest" role must be set to have “View” permissions for the page, portlet, and web content. Here we'll look at page permissions.
To modify page permissions, first navigate to the page whose permission you wish to modify by locating it under the "Navigation" option (yellow oval) in the Product Menu drop-down. Here we will work with the "Extra VLab Community Management" page (green oval) in the "VLab" sub-directory. Click the three-dot or ellipsis icon() to the right of the community name, and then select "Configure Page" from the small drop-down box that subsequently appears (enlarged and outlined in red).
Next, once the "Extra VLab Community Management" page's configure page is open, click the three-dot or ellipsis icon () on the right end of the Control Menu bar, and then select "Permissions" from the resulting drop-down menu:
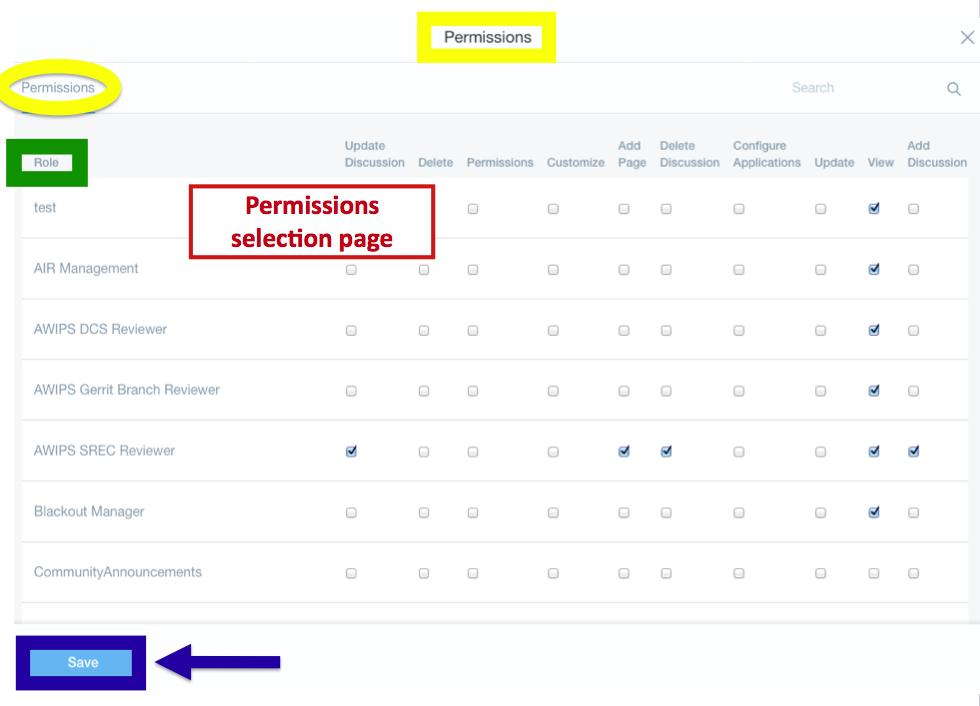
On the Permissions selection page that subsequently appears --- only the top part of which is shown here --- locate the particular role (listed alphabetically under green rectangle in left-most column) for which you wish to change page permissions, and toggle the check boxes "on" or "off" for the appropriate permissions. When you are finished, scroll to the bottom of the page and click the "Save" button.
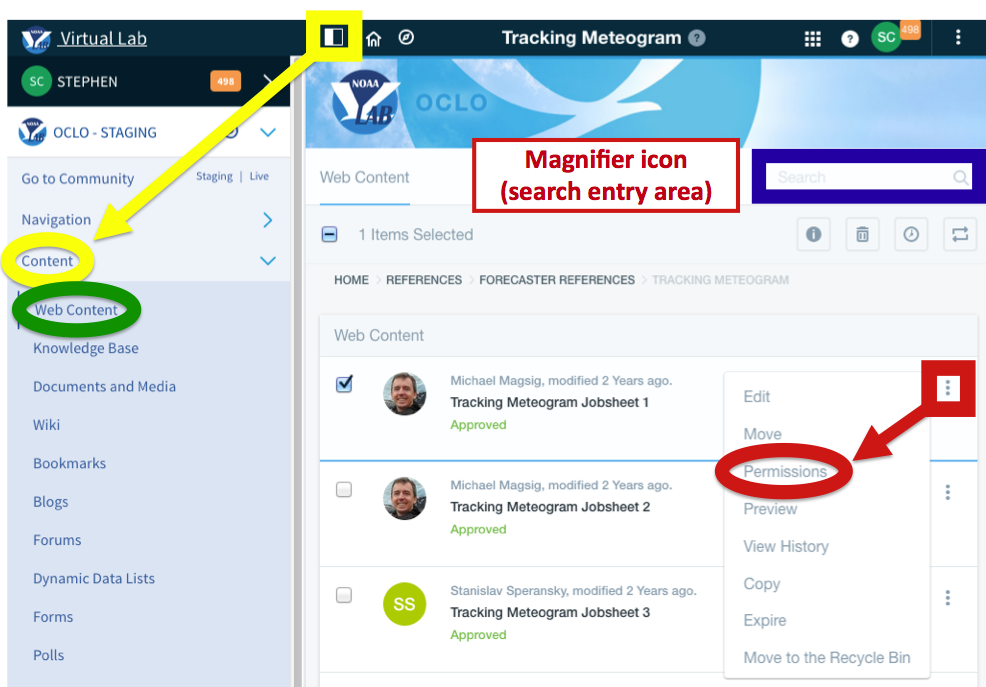
The steps involved in setting permissions for VLab content are similar to those for VLab pages. However, instead of selecting "Navigation" in the Product Menu drop-down, select the "Content" tab (yellow oval, below). Locate the content for which you want to change permissions. Note: To find your content, you can either scroll through the listing, or use the search feature (area next to magnifier icon, outlined here in blue box). Once you have located the content (here we have selected the web content piece titled "Tracking Meteogram Jobsheet 1"), click on the vertical ellipsis ( ) icon to the right of the content's name, outlined here in red. This opens a drop-down menu from which you select "Permissions" (red oval). This action displays the same Permissions Selection page shown in step 37. Using that page's check boxes, toggle the boxes "on" or "off" to assign the appropriate permissions. When finished, scroll to the bottom of the page and click the "Save" button.
Now we'll set portlet permissions. First, go to the page that contains the portlet of interest by using the Product Menu drop-down menu on the left side of your community's lading page. Here we have selected the "Damage Surveys" page in the "Misc" and "VLab" sub-directories under the "Forecast References" directory. Make certain that the page's edit controls are "on." Recall that the "eye" icon ( ) in the middle of the Control Menu bar does not have a slash through it when the controls are set to "on;" if there is a slash through the icon, click the icon to remove the slash and turn the edit controls "on." Next, locate the gray portlet bar whose permissions you want to change, and move your mouse over it. This displays the three-dot or ellipsis icon ( ) on the right end of the portlet bar (here, outlined by red square). Click on the icon to open the portlet control menu drop-down (here, enlarged and outlined in red), and select the "Permissions" tab.
On the Permissions selection page that subsequently appears --- as in step 37 above --- locate the role for which you want to change portlet permissions, and toggle the check boxes "on" or "off" for the appropriate permissions. When finished, scroll to the bottom of the page and click the "Save" button. (Note: As in the illustration for step 37, only the top part of the permissions selection page is shown here).
To add a survey to a page,
Sign out of the VLab when you are finished working