


All-Layer Grid Jobsheet - OCLO
All-Layer Grid Jobsheet
Generic Model All Tilts/All Layer Jobsheet
Summary: This jobsheet documents how forecasters can turn any bundle in a procedure with grid data into an all tilts-like “all layer” bundle with some tweaks to a copy of the bundle using the localization perspective. This allows the left and right arrows to navigate through forecast hour and the up and down arrows to tilt through the vertical layers, which can be pressure levels, height levels, isentropic coordinates, etc.Height and isentropic coordinates are the most intuitive where up arrows tilt higher in coordinate value. Procedures with vertical coordinates that decrease with height like pressure levels work but are a little counterintuitive because tilting up increases pressure and decreases height. The instructions below contain a big-picture summary of the process and step-by-step instructions. Most should follow step-by-step instructions.
Successful User Feedback: “It works like a charm; I’ve already used it to consolidate a lot of stuff… Although the jobsheet seems long, most is graphics. The process is not very time consuming. You can’t break and/or lose anything (if you keep your old procedures until the new ones are working).”
---------- Big-Picture Summary for Changing a Bundle ----------
- Load your bundle in D2D for display and copy it using the Save Editor Display in the CAVE menu.
- Open the copy of the bundle using the Localization Perspective.
- Find the gridResourceData tags and change sampling=”true” and spatial=”true”.
- For the constraintType and constraintValue tags immediately following the gridResourceData tags, change them to a low-to-high comma-delimited ordered list (with no spaces) of layers OR a low-to-high range of layers:
- layers-list approach - constraintValue=”$lowestvalue1, $highervalue2, $highervalue3"
- e.g. constraintType=”IN” constraintValue=”285.0,295.0,305.0” (note no spaces) when the level name is “K” for the three isentropic surfaces 285K , 295K, and 305K
- range approach - constraintType="BETWEEN" constraintValue=”$lowervalue--$highervalue” where your lower and higher layer values are separated by two minus signs:
- e.g. constraintType=”BETWEEN” constraintValue=”285.0--320.0” when the level name is “K” for all isentropic surfaces between 285K and 320K
- layers-list approach - constraintValue=”$lowestvalue1, $highervalue2, $highervalue3"
- Change numberOfFrames to what you need (#layers x #timesteps; e.g. 128).
- Save the changes and open the bundle copy using the Load/Save Displays from the CAVE menu.
- Try out your up/down arrows and left/right arrows.
- Troubleshooting: if it is not working, it is probably that you ordered your values from high to low (it must be low to high), or you did not use two dashes in your range (e.g. "285.0--320.0"), or you have spaces in your comma-delimited list.
---------- Detailed Step-By-Step Instructions: ----------
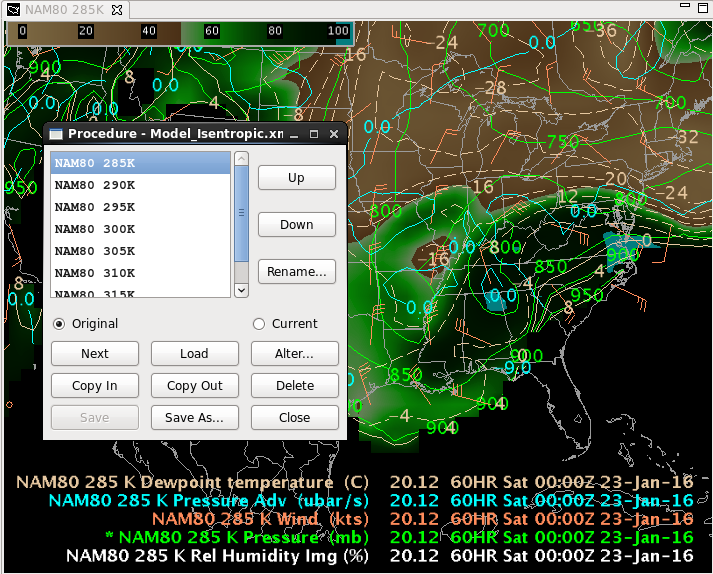
- Load your favorite bundle from a procedure that you want to be able to convert to all tilts (Fig. 1).
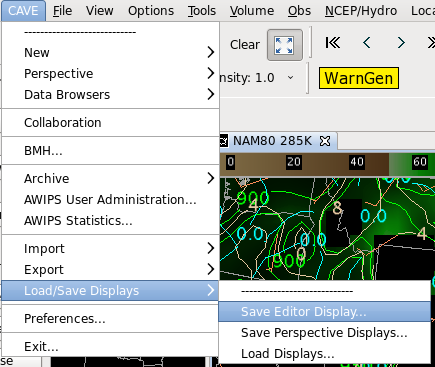
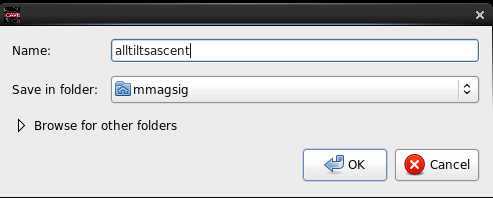
- Under the CAVE menu select the Load/Save Displays submenu and the Save Editor Display submenu. In the popup menu enter a new name for your procedure (e.g. alltiltsascent) and click OK (Fig. 2, Fig. 3).
- Load the localization perspective from the open perspective bar (Fig. 4).
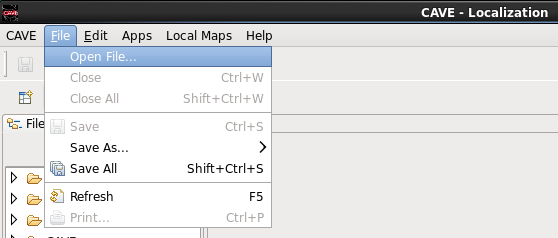
- Under the File menu in the Localization Perspective select Open File (Fig. 5).
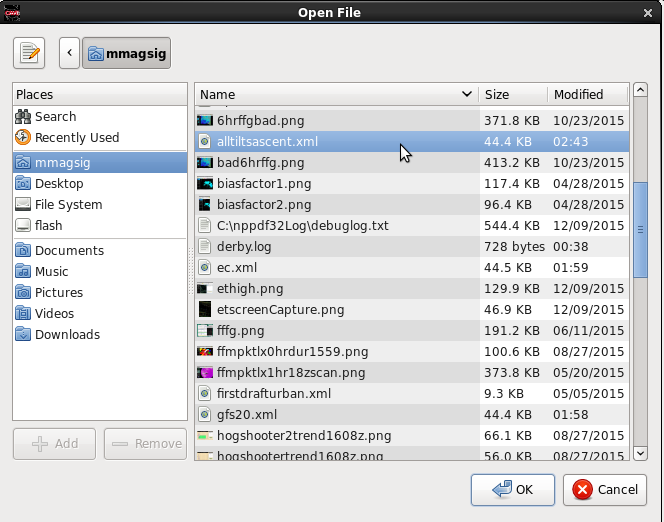
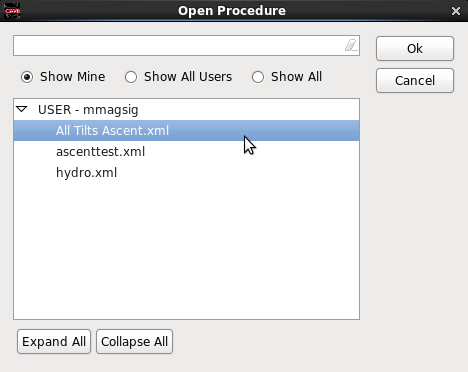
- Select the filename you entered in step #2 (e.g. alltiltsascent.xml) and click OK (Fig. 6).
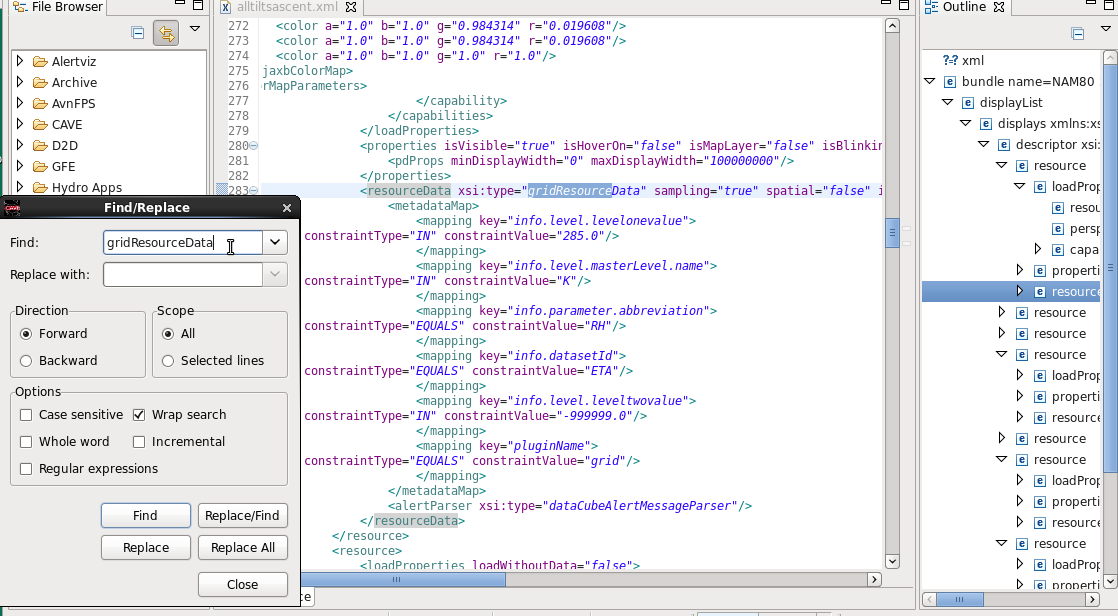
- Find the gridResourceData tag by using the Ctrl + F keys to launch the find/replace tool and enter gridResourceData (or just scroll down the file and look for the tag; Fig. 7).
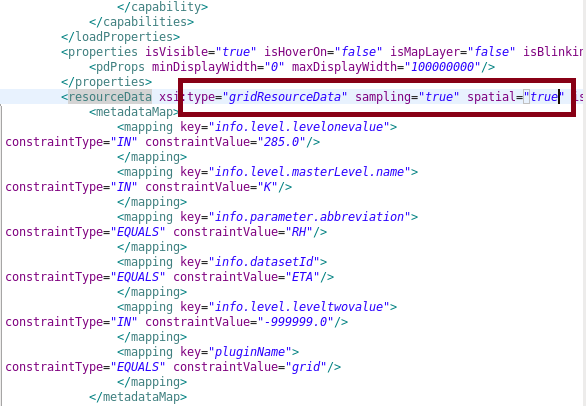
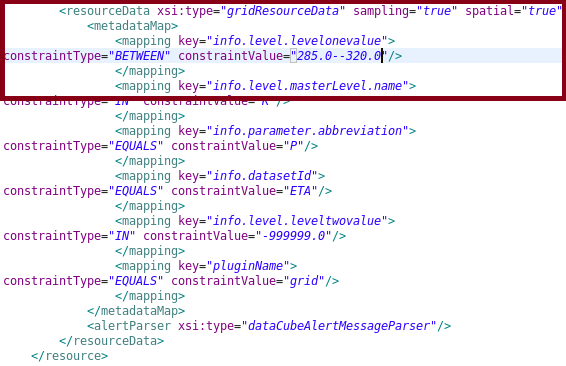
- In the resourceData tag line with type=” gridResourceData”, change the values of sampling and spatial to sampling=”true” and spatial=”true” (Fig. 8).
- The next two mapping tags tell you the coordinate value and units you had in your procedure (e.g. 285.0 and K for the 285K surface or 1.0 and km for a 1km height). In the line immediately below the gridResourceData tag change constraintValue to a low-to-high ordered list of comma-delimited values (with no spaces) for each level to use, OR change constraintType to constraintType=”BETWEEN” and constraintValue to be the range of vertical coordinate values from the lower value to the higher value for your vertical layers with two minus signs in between to use all layers available between the specified values. For example,
- Before: constraintType=”IN” constraintValue=”285.0”
- After: constraintType="IN" constraintValue="285.0,290.0,295.0,300.0,305.0,310.0,315.0,320.0" (note no spaces)
- OR
- After: constraintType=”BETWEEN” constraintValue=”285.0--320.0” (every level available between 285.0 and 320.0)
- If you had 850mb wind loaded, you might want constraintValue=“100.0-1000.0”
- If you had 1km temp loaded, you might want constraintValue=“0.0-10000.0"
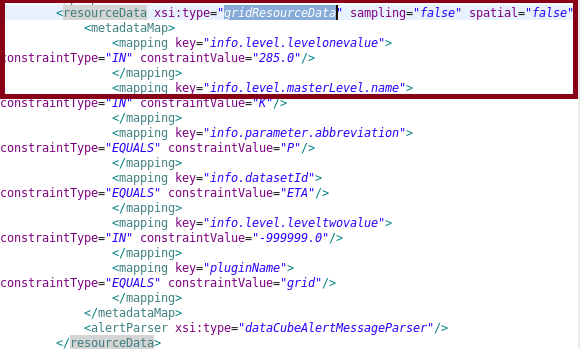
- Click the Find button (see step 6) in the Find/Replace tool to go to the next gridResourceData. Repeat steps 7 and 8, setting sampling to true, spatial to true, and constraintType and constraintValue appropriately. Note the info.parameter.abbreviation in the image in step 8 is for RH and the info.parameter.abbreviation in the image below is for P (Fig. 10, Fig. 11).
- Repeat the replacement steps in step 9 for each parameter loaded in the bundle (parameter loaded is identified by the info.parameter.abbreviation key). When you are done, click the Find button to step through each gridResourceData tag and verify each one has been modified correctly. They must all be set correctly for this to work.
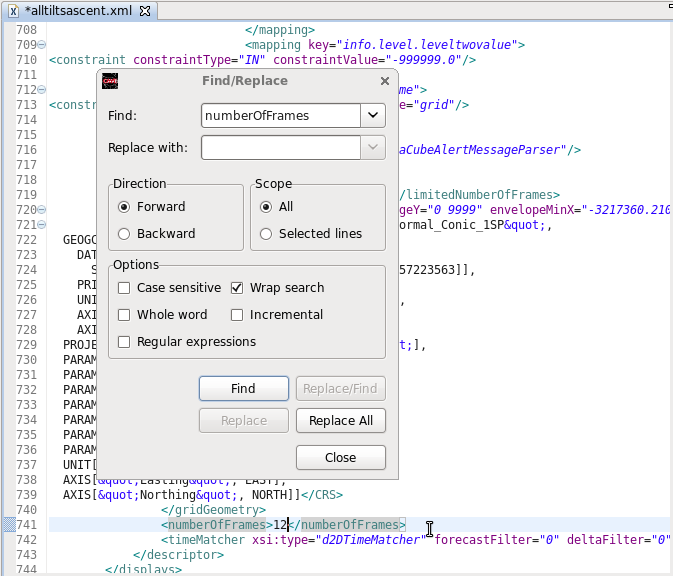
- In the Find/Replace search window, enter numberOfFrames in the search tool and increase the number of frames to allow a large number of levels and times (e.g. 88 or 128 frames). It may take some trial and error to determine how many vertical layers there are and the number of time steps. The number of frames you need should be the number of time steps times the number of vertical layers. Try not to use any more frames than necessary or you could have memory problems with CAVE (Fig. 12, Fig. 13).
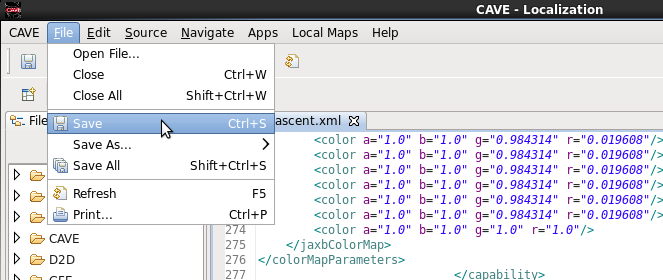
- Save the file by using Ctrl+S or under the File menu in the localization perspective, select the Save menu (Fig. 14).
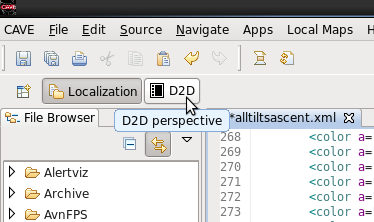
- Click on the D2D perspective button to swap from the localization perspective to the D2D perspective (Fig. 15).
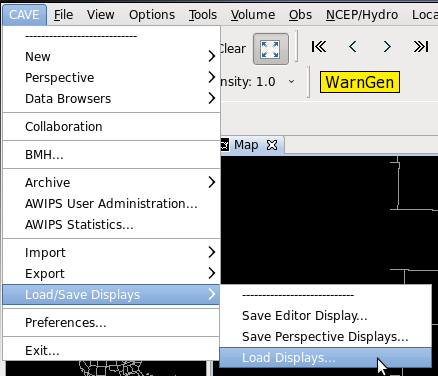
- Under the CAVE menu and Load/Save Displays, click on the Load Displays menu (Fig. 16).
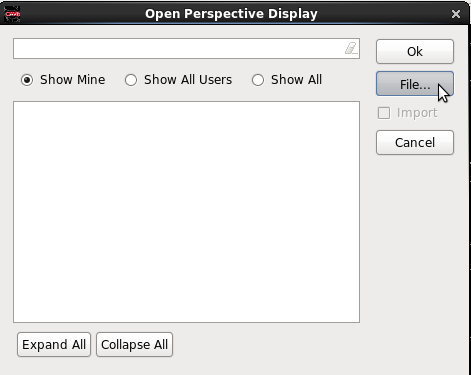
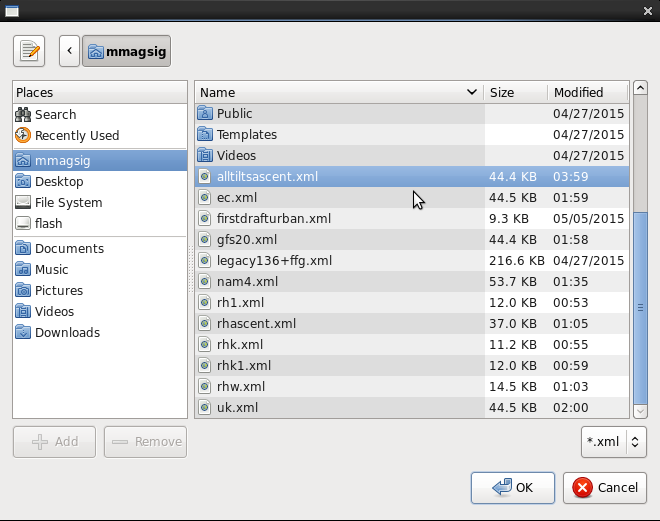
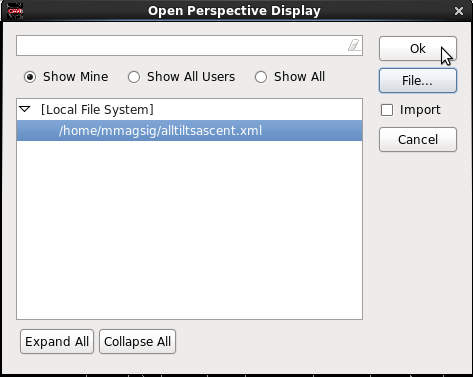
- In the Open Perspective Display, click the File…button. In the open select tool, select the name of the xml you saved in the localization perspective (e.g. alltiltsascent.xml) and click OK. Then click OK in the Open Perspective Display (Fig. 17, Fig. 18, Fig. 19).
- Navigate through the images using the up and down-arrow keys for space and left and right-arrow keys for time in your new all tilts-like all layers bundle.
- Troubleshooting: if it is not working, it is probably that you ordered your values from high to low (it must be low to high), or you did not use two dashes in your range (e.g. "285.0--320.0"), or you have spaces in your comma-delimited list.
- Navigate to an earlier time in the data using the left-arrow key, and then use the Ctrl key with the arrow keys to:
- Ctrl + right-arrow keys – most recent frame for all levels
- Ctrl + left-arrow keys – oldest frame for all levels
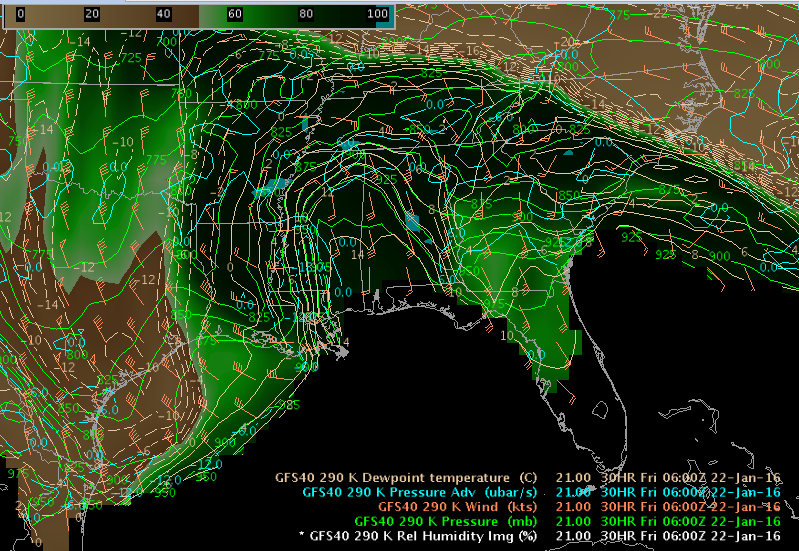
- Ctrl + up-arrow keys – highest layer for the time displayed (e.g. the 06:00Z 22-Jan-16 in step 16, note you may want to step into the middle of the data first)
- Ctrl + down-arrow keys – lowest layer for the time displayed (may want to step into the middle of the data first)
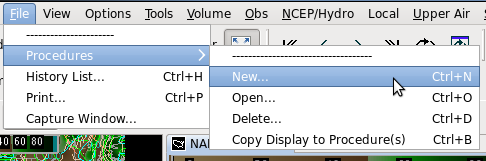
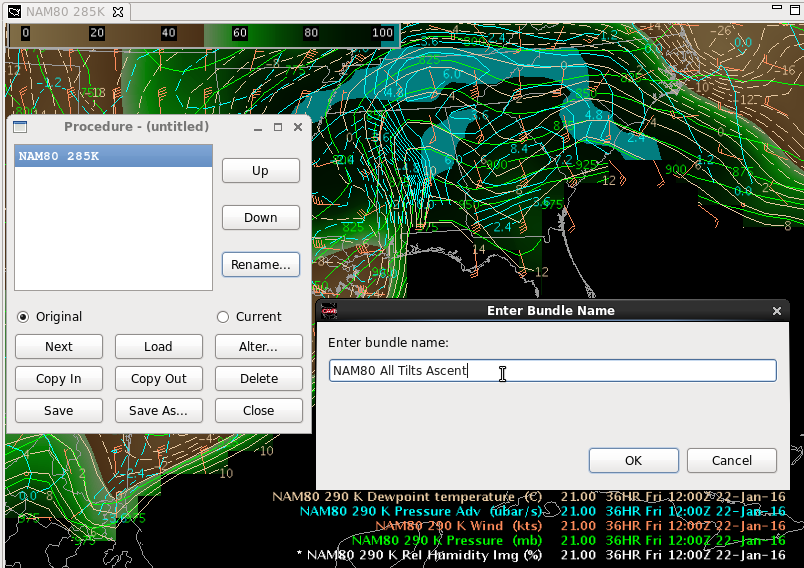
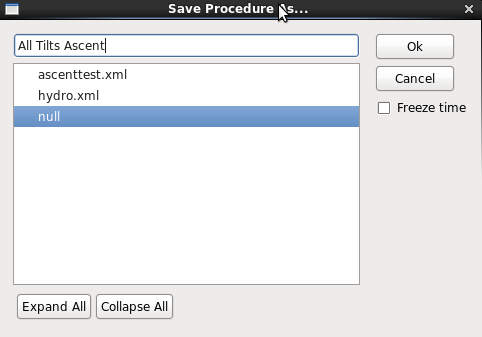
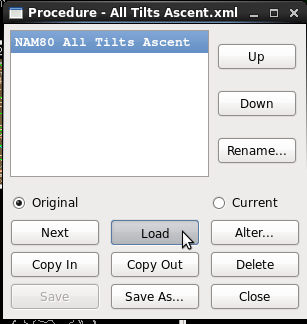
- Once you are happy with the bundle, go ahead and copy it into a procedure for easy access. Under the File menu and Procedures submenu select New (or use Ctrl+N). Click the Copy in button to copy the bundle into the procedure. Select the bundle name, and then click the Rename button and rename the bundle and click OK. Then click the Save As button and save the procedure containing the new bundle (Fig. 20, Fig. 21, Fig. 22).
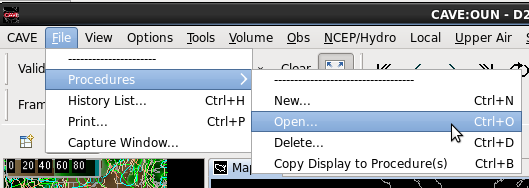
- Swap panes and load your all layer bundle from your procedure using the File menu and Procedures submenu and the Open menu (or Ctrl+O). Select your procedure and click OK.(Fig. 23, Fig. 24).
- Select your bundle and click the Load button. If you want to change models, just click on the Alter button, select the Grid check box, and click on the button next to Grid to select your new model (e.g. GFS40), and click Load. Your bundle should load with the new model (Fig. 25, Fig. 26).
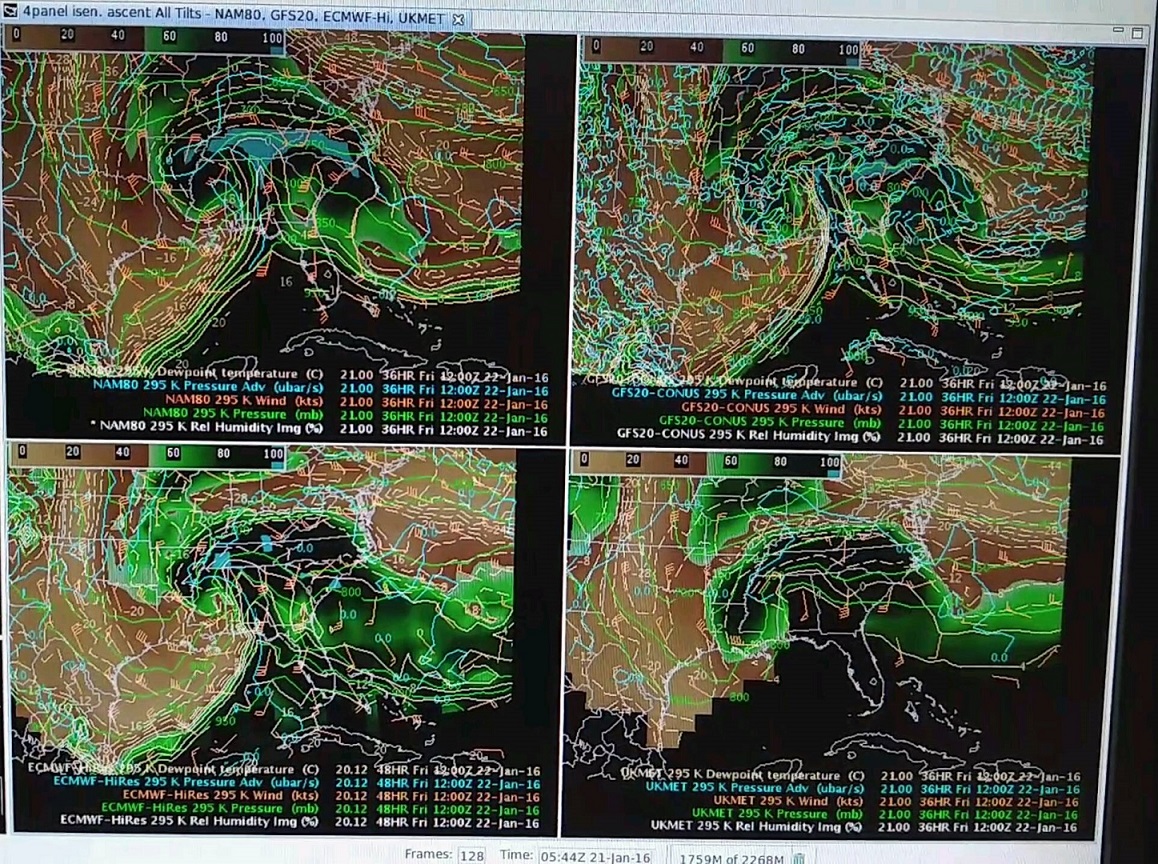
- It is possible to extend the bundle to 4 panels (Fig. 27). The general steps to do this are:
- Load new all-layer bundle
- Save a copy of the bundle using CAVE->Load/Save Displays->Save Editor Display
- Load Editor Display in Localization Perspective using File-Open and selecting copied bundle
- Select all the lines in the <displays> </displays> tag using a mouse click and drag (most of the file). Paste the <displays> </displays> content after each </displays> end tag (note this will be before the </displayList> end tag). Do this 3 times so you have 4 displays defined. Note you can see the big picture (4 displays defined) with the Outline view of the localization perspective on the right hand side of the perspective (see step 6).
- Then go into each display and change the model name for each parameter in the display. You will have to identify the models names by saving the altered bundle.
- You could also create the different model displays separately using the alter button in the procedure, and then paste those displays into the 4 panel bundle.
- For an example of these two bundles (NAM80 isentropic ascent all tilt and 4panel isentropic ascent All Tilts with NAM80, GFS20, ECMWF-Hires, and UKMET) see the attached All-Tilts-Ascent.xml procedure.