


Zooming In or Out of a Product View - OCLO
- 01- CAVE Fundamentals
- Setting the Time Match Basis of a Product
- Loading and Toggling Radar Graphic Overlay Products
- Overlaying CAPE on a Base Reflectivity Product
- Overlaying a Surface Plot on a Base Reflectivity Product
- Overlaying Model Image on Radar and Satellite
- Transferring Screen Products Between the Main Display Pane and Side Panes
- Loading, Arranging, Renaming, and Unloading Additional Map Editors
- Zooming In or Out of a Product View
- Panning a Zoomed-In Image in the Main Display Panel
- Switching the Color Table for a Radar Image Product
- Editing the Current Color Table
- Unload a Map Overlay
- Loading a Map Overlay
- Changing a Map's Display Characteristics
- Loading the Alphanumeric Information for a VWP Product
- Using the AFOS Browser to Load an Area Forecast Discussion
- Move and Adjust Width of AlertViz
- Launch Text Section Log and Display Detailed View
- Loading and Using the AWIPS Data Monitor
- Blinking a Range of Data Values
- Printing the Contents of the Main Display Panel
- Creating a Screen Capture of the Main Display Panel
- Saving/Loading Editor and Perspective Displays
- 02- D2D Fundamentals
- Create a New Procedure
- Opening an Existing Procedure
- Load a Product from the Product Inventory
- Clearing a Product from the Main Display Panel
- Manually Toggling and Looping Single Elevation Angle Products in Time
- Create an Image Combination and Toggle Between the Images
- Use Panel Combo Rotate and All Panel Sample on Dual Pol
- 03- D2D Radar
- Load Radar Products for Single Radar and Radar/MRMS Mosaics
- Toggling Product Displays
- Viewing Radar Cursor Readout Information
- Loading Products into Four-Panel Displays
- Submit an OTR for a Three Hour Precip (THP) Product
- Build a New Request in the RMR GUI
- Managing Active Requests in the RMR GUI
- Loading an All Tilts Product into the Main Display Panel
- Load a VWP Hodograph
- Load a Vertical Reflectivity Cross-Section Image Product Using the Volume Browser
- Load a Horizontal Reflectivity Cross-Section Image Product Using the Volume Browser
- 04- D2D Satellite
- 05- D2D Upper Air
- Load NSHARP into your CAVE Display
- Change NSHARP Configurations
- Cycling Through the Tables
- Toggling Display Insets
- Toggling Graphs and Statistics
- Interact with the Inventory in the D2D Skewt Standard Screen Configuration and Use Keyboard Shortcuts
- Configuring a Sounding and Hodograph Display
- Changing the Parcel Lifting Method
- Display Multiple Active Soundings
- 06- D2D Tools
- 07- D2D Applications
- Issue A New Severe Thunderstorm Warning
- Follow Up a Severe Thunderstorm Warning with a Severe Weather Statement
- Loading an FFMP Basin Trend Graph and Downstream Basin Trace
- Assessing QPE, Ratio, and Diff
- Closing the FFMP Table
- Loading the FFMP Basin Table
- Loading a SCAN Storm Cells Table
- Interacting with the SCAN Storm Cells Table
- Launching the MESO and TVS Tables
- Closing the SCAN Cell Table
Purpose:
This task will demonstrate the different ways to change the zoom factor in the main display panel.Tasks:
- Change zoom incrementally in the main display panel.
- To zoom in, move the mouse cursor to a desired center point and move the scroll wheel up.
- Every turn of the scroll wheel will cause the panel to zoom in incrementally one step until you reach the maximum level of enlargement (or minimum map size) for that particular scale.
- To zoom out, position the cursor to a point in the main display panel and move the scroll wheel down.
- The position you place the cursor will be the center point from which you zoom out.
- Every scroll wheel turn causes the panel to zoom out incrementally until you reach the minimum level of enlargement (or maximum map size) for that particular scale.
- To zoom in, move the mouse cursor to a desired center point and move the scroll wheel up.
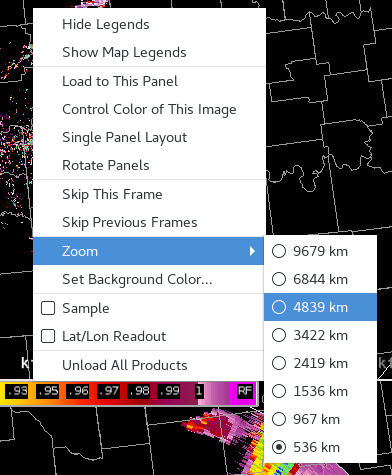
- Change zoom to a specific size.
- Position the cursor in the main display panel. Right-click and hold, select Zoom, then select the range (in km) that corresponds to the level of zoom wanted on the display.
- Position the cursor in the main display panel. Right-click and hold, select Zoom, then select the range (in km) that corresponds to the level of zoom wanted on the display.
- Task Complete!