


Editing the Current Color Table - OCLO
Purpose:
This task demonstrates how to make changes to the current color table using the Color Table Editor.Tasks:
Assumptions:
- You have an image product loaded in the main display panel.
- Load the Image Colors Editor using one of the following methods:
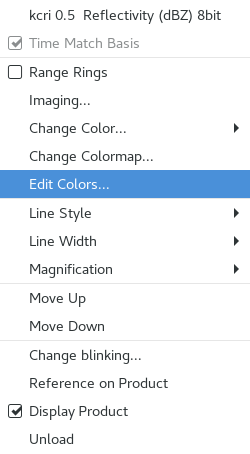
- Method 1: Position the cursor over the image product name in the product legend. Right-click and hold and select Edit Colors.
- Method 2: Open the Image Properties GUI using the keyboard shortcut <CTRL>+I.
- In the Image Properties GUI, select the “Edit [product_name]” button (where [product_name] is the product to which the color table is applied).
- Method 1: Position the cursor over the image product name in the product legend. Right-click and hold and select Edit Colors.
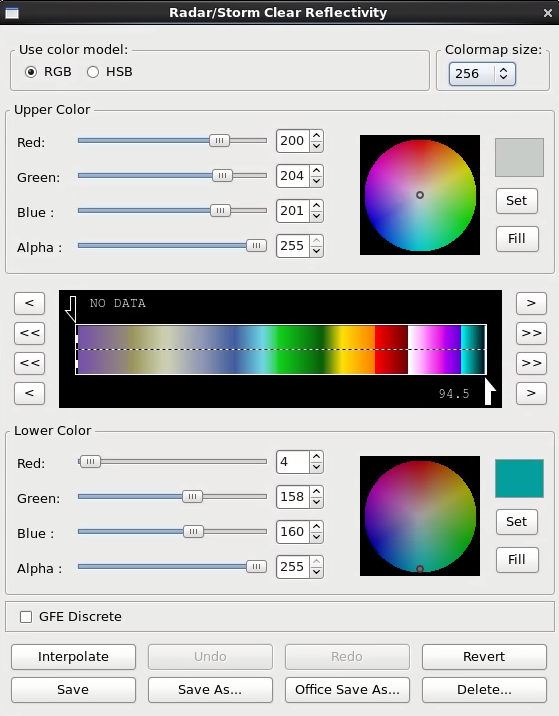
- Pick a range of values to edit by positioning half-arrows using one of the following methods:
- The arrow at the top should be at the lower end (i.e., left side) of the range, while the arrow at the bottom should be at the higher end (i.e., right side) of the range.
- The data values that correspond to the location of each half-arrow appear next to the arrow. Use this information when setting up your range of values.
- Method 1: Left-click on an arrow with your cursor and drag the arrow to the desired location in the color table scale. Repeat for the other half-arrow.
- Method 2: Utilize the directional buttons near the color table scale
- There are four buttons that control each arrow: “<”, “<<”, “>”, and “>>”.
- The “<” and “>” buttons move the arrows on small increments in each direction.
- The “<<” and “>>” buttons move the arrows in larger data ranges.
- The top two buttons on each side control the position of the top arrow while the bottom two buttons on each side control the position of the bottom arrow.
- Change the color in the upper or lower color panel using one of the following methods:
- Method 1: Choose the color model you want to use (e.g. RGB) and position the slider bar for each channel to create your desired color (the new color appears in the preview window in the upper right-hand side of the color panel). Then click the Set button.
- Method 2: Locate the color marker (i.e., the gray double circle, or “bulls-eye”) in the color wheel, then left-click on it and drag it to the desired position on the color wheel. Then click on the Set button.
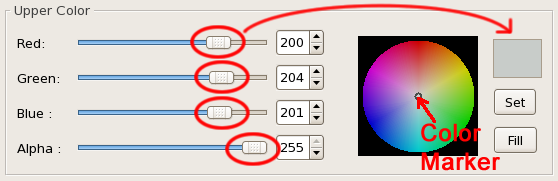
- You will only be able to change the Hue or Saturation values in HSB mode for a given color using this method. You will have to change the Brightness manually if you choose to change it.
- Method 1: Choose the color model you want to use (e.g. RGB) and position the slider bar for each channel to create your desired color (the new color appears in the preview window in the upper right-hand side of the color panel). Then click the Set button.
- Fill a range of values.
- Set the range of values using one of the methods in Step 2.
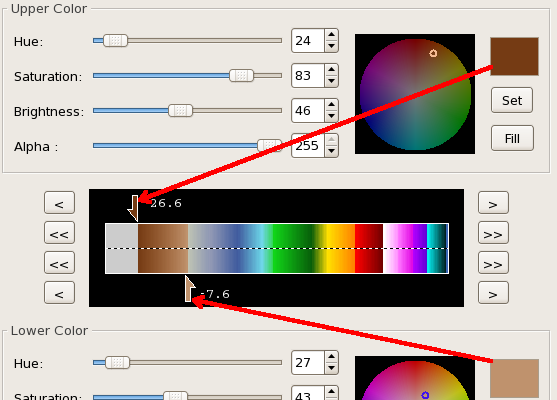
- Adjust the color(s) in the upper or lower color panel using one of the methods in Step 3.
- Left-click on the Fill button in the appropriate color panel.
- Set the range of values using one of the methods in Step 2.
- Interpolating a range of values between two colors.
- Set the range of values using one of the methods in Step 2.
- Adjust the colors in both the upper and lower control panels using one of the methods in Step 3.
- Left-click on the Interpolate button in the bottom button panel.
- Change the transparency of an image.
- Set the range of values to make transparent using one of the methods in Step 2.
- Slide the Alpha slider bar all the way to the left in both the upper and lower color panels (totally dark).
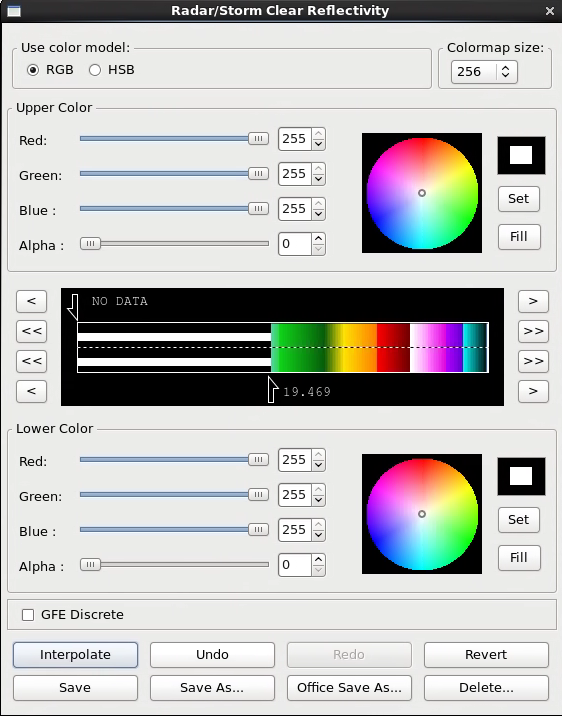
- Left-click on the Interpolate button in the bottom button panel.


- Undo, Redo, and revert to previously saved colors.
- Left-click on the Undo button to undo the last change to the color table.
- Left-click on the Redo button to reapply the last change made to the color table.
- Left-click on the Revert button to return to the last saved version of the color table.
- Save an edited color table using one of the following methods:
- It is a good practice to save changes to an existing color table to a file once you have made some desired changes.
- It is often preferable to save the changes to a new file, so you can change the new file without negatively impacting any of the existing color tables.
- Method 1: Left-click on the Office Save As button, enter a new name, then left-click the OK button.
- Choose this method if you want the new color table to be available to all users in your office. The change is not applied permanently to the product, so you would have to select it manually if you load a new product.
- Method 2: Left-click on the Save As button, enter a new name, then left-click the OK button.
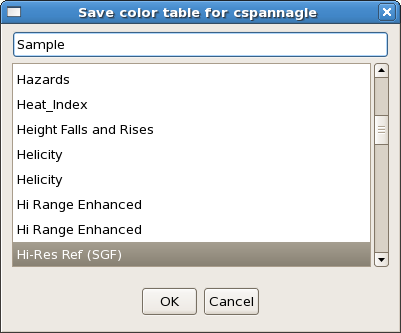
- Choose this method if you want the new color table to only be visible to the current user account. The change is not applied permanently to the product, so you would have to select it manually if you load a new product.
- Method 3: Left-click on the Save button.
- Choose this method if you want to make a user override color table with the same name that is accessible from the USER pullout menu in the color table selector located on the Image Properties window.
- Selecting the Revert button returns the color table to the previous settings, and then you can Save those settings to the product to effectively restore the setting.
- Task Complete!