Building Your Local RPS List - Warning Decision Training Division (WDTD)
Building Your Local RPS List
There are two ways go about building your local RPS list:
- Start a new file by using a default template
- Update an existing file
The steps will be slightly different depending on which method you choose. In either case, you will need to have access to your DX1/DX2 machine as you will need to copy files to and from the active directory. If you don’t have access to those machines, you will want to include your ITO in this process.
If you want to build a new file from a template, you should copy the default file from the active directory into one of the draft/backup folders. You will then need to change the name of the generic template file to match the file name desired for the radar and VCP for which you want to create a list. If you are just going to update an existing local file, copy that file from the active directory into one of the draft/backup folders. Assuming that file will be used for the same VCP as previously, you shouldn’t need to change the file naming convention for this file. Regardless of which method you use, one additional change needs to be made. You must add a “.rps” file extension to the file name while you are editing it in the draft/backup folders.

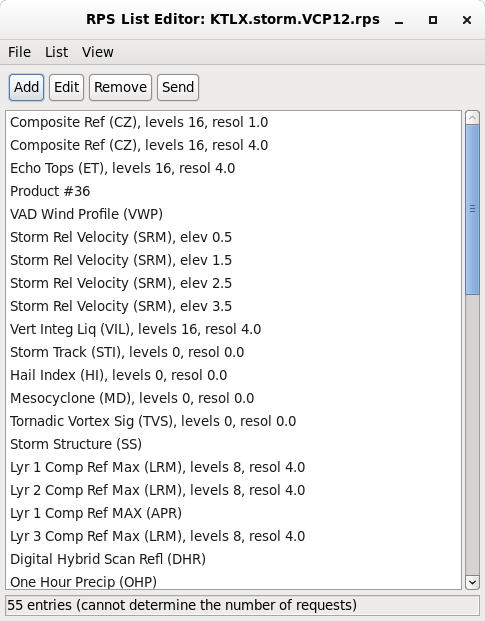
Once the file you want to work with is in place, you can edit the file using the RPS List Editor in CAVE. The folder where you copy the file will impact how you choose to open the RPS List Editor:
- If you copied your file into /home/<username>/caveData/common/site/<siteID>/rcm/, then you want to launch the editor from the “View” menu.
- If you copied your file into /data/fxa/rps-lists/, the you want to launch the editor from the “File” menu.
From this editor, you can add, edit, or remove products from the list as well adjust the order of products on the list. You can also send your RPS list to the RPG from here, but it will only last as long as the current VCP remains in use. To make your edits permanent, you will need to copy the file from the draft/backup folder back into the active directory. (NOTE: Remember that you need to remove the “.rps” file extension once you copy the file back to the active directory.) Once the updated file is in place, you will need to restart the RadarServer for the new RPS list file to be used.
It’s important to remember that some products, specifically elevation-based products, will potentially include several products per volume scan for one entry on your RPS list. Likewise, you may want to include a second product entry for some of these same products in order to receive extra products that are generated from supplemental scans such as SAILS or MRLE tilts. The request methods use choose for these elevation-based products are important, so we have provided a brief rundown for you here:
| Request Option | Behavior |
|---|---|
| All | Requests all elevations of a single product (excluding repeats) |
| All at or below | Requests all elevations of a single product at or below a specified elevation angle (excluding repeats) |
| All at or below/All cuts | Requests all elevations of a single product at or below a specified elevation angle (including repeats) |
| Lowest N | Requests the lowest N number of elevations (excluding repeats) |
| Lowest N/All cuts | Requests the lowest N number of elevations (including repeats) |
| Single | Requests a single elevation cut (excluding repeats) |
| All cuts | Requests a single elevation cut (including repeats) |


