


3 Panel Radar Cross Sections - OCLO
Contact
For questions about the OCLO community or if you have suggestions for how to evolve this community to be more effective, please contact Michael.A.Magsig@noaa.gov.
Asset Publisher
Purpose:
This jobsheet covers how to use the new cross section FSI replacement capability to interrogate radar data. Currently the development version is being checked in to 23.4.1 which is currently in regional beta, so this is primarily for forecasters who want to experiment with the new capability and provide more feedback in the cloud.Tasks:
Last update 10/3/24
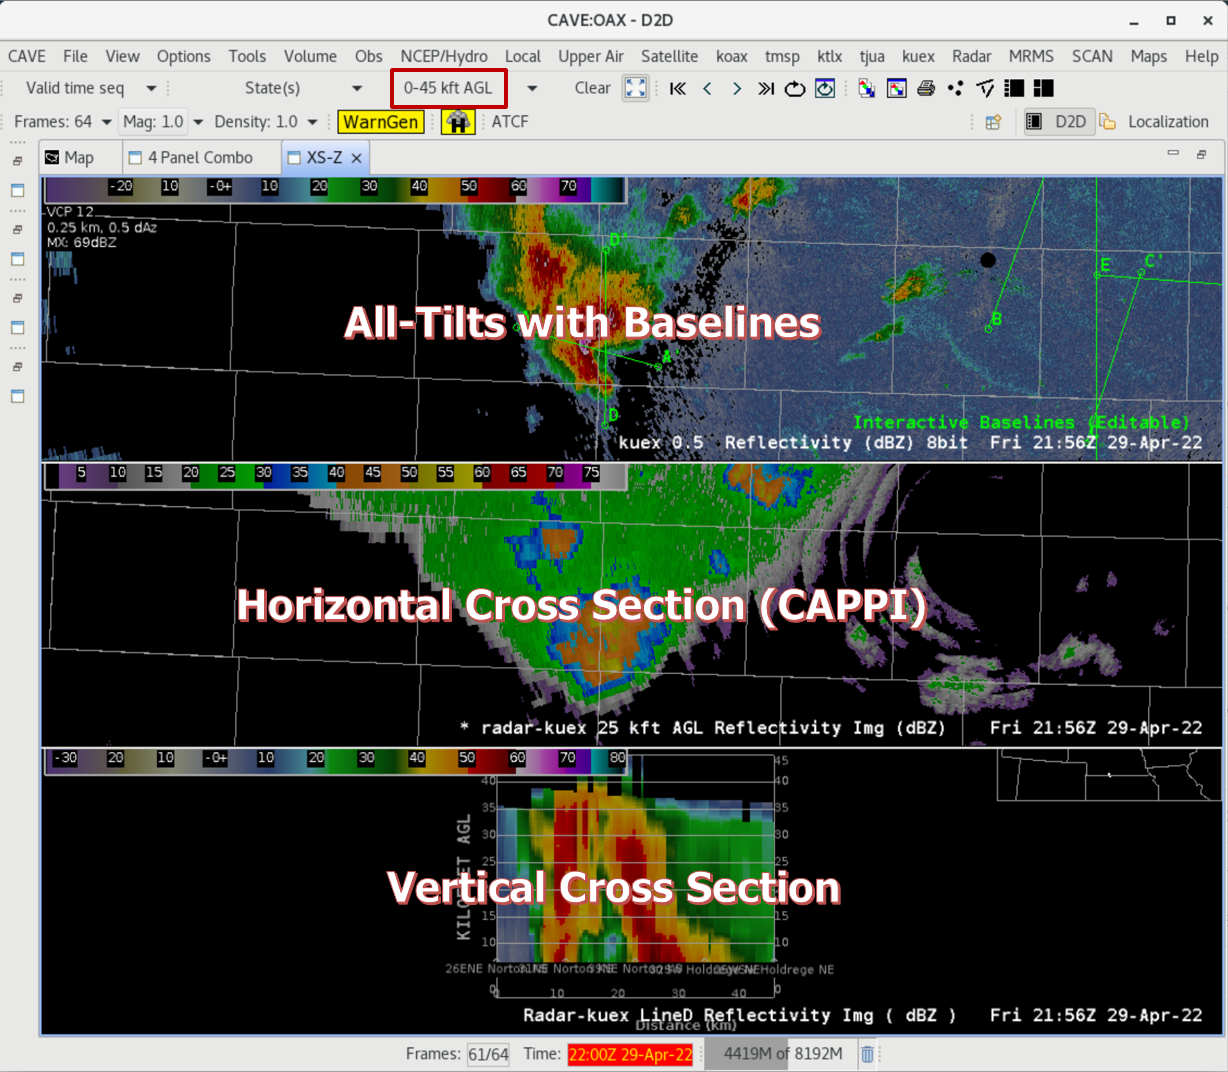
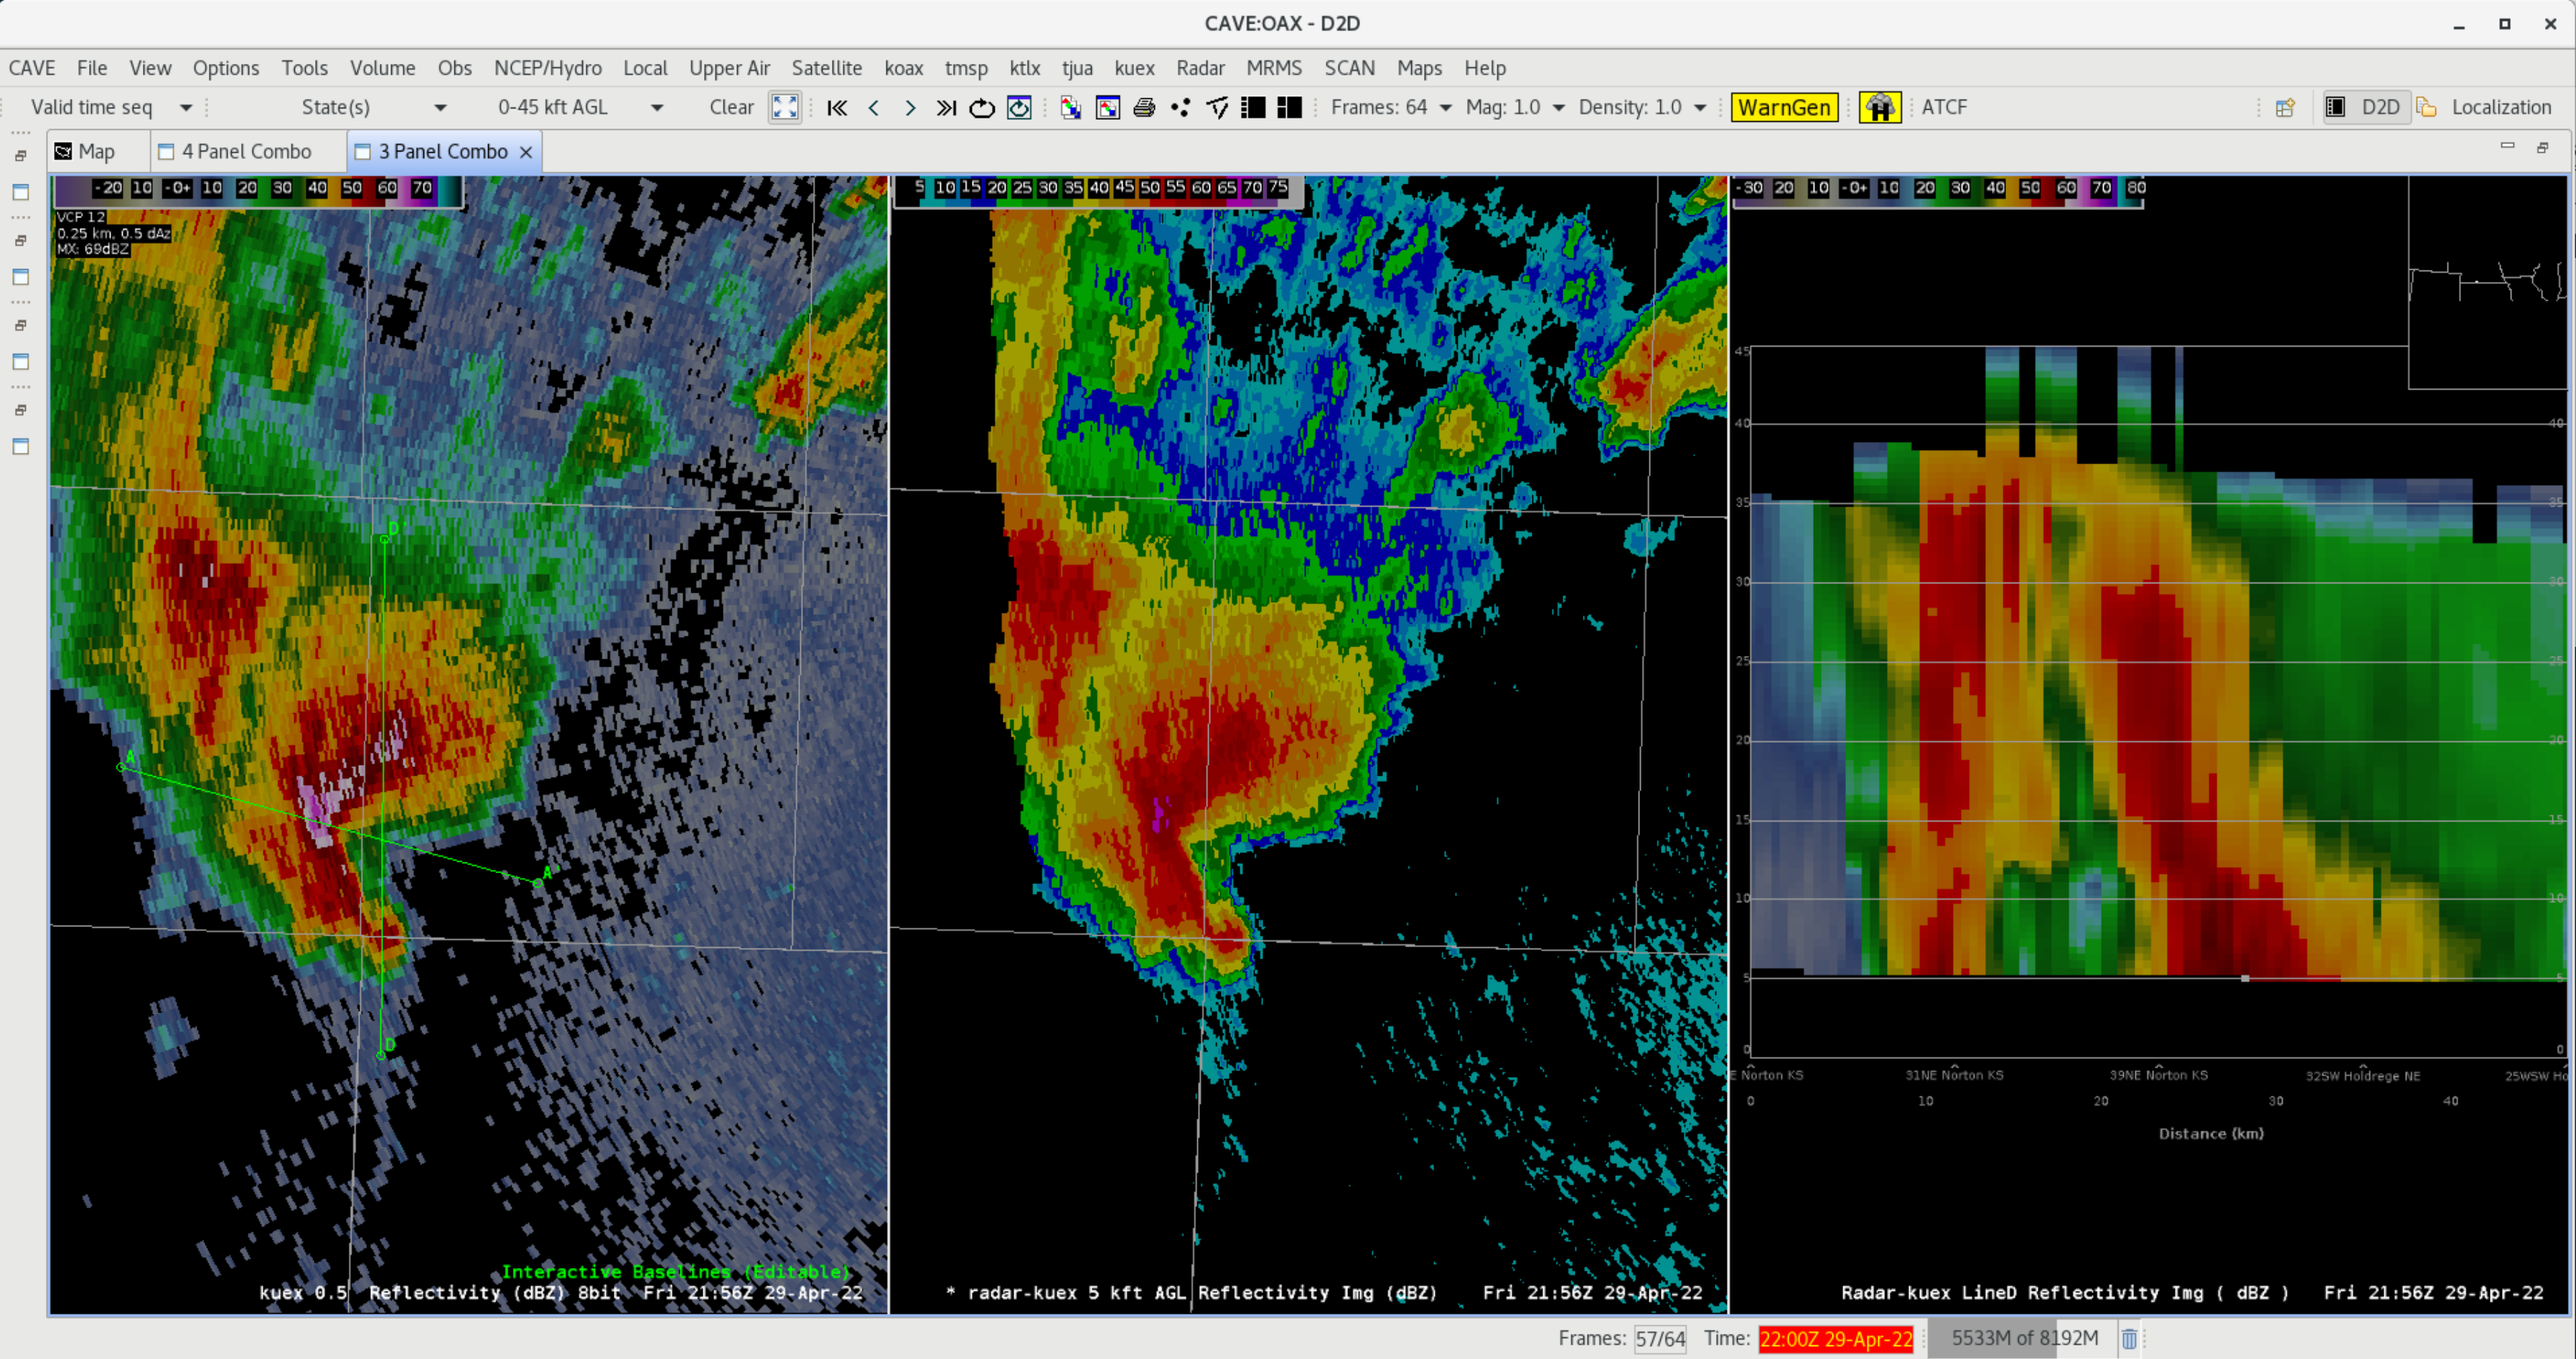
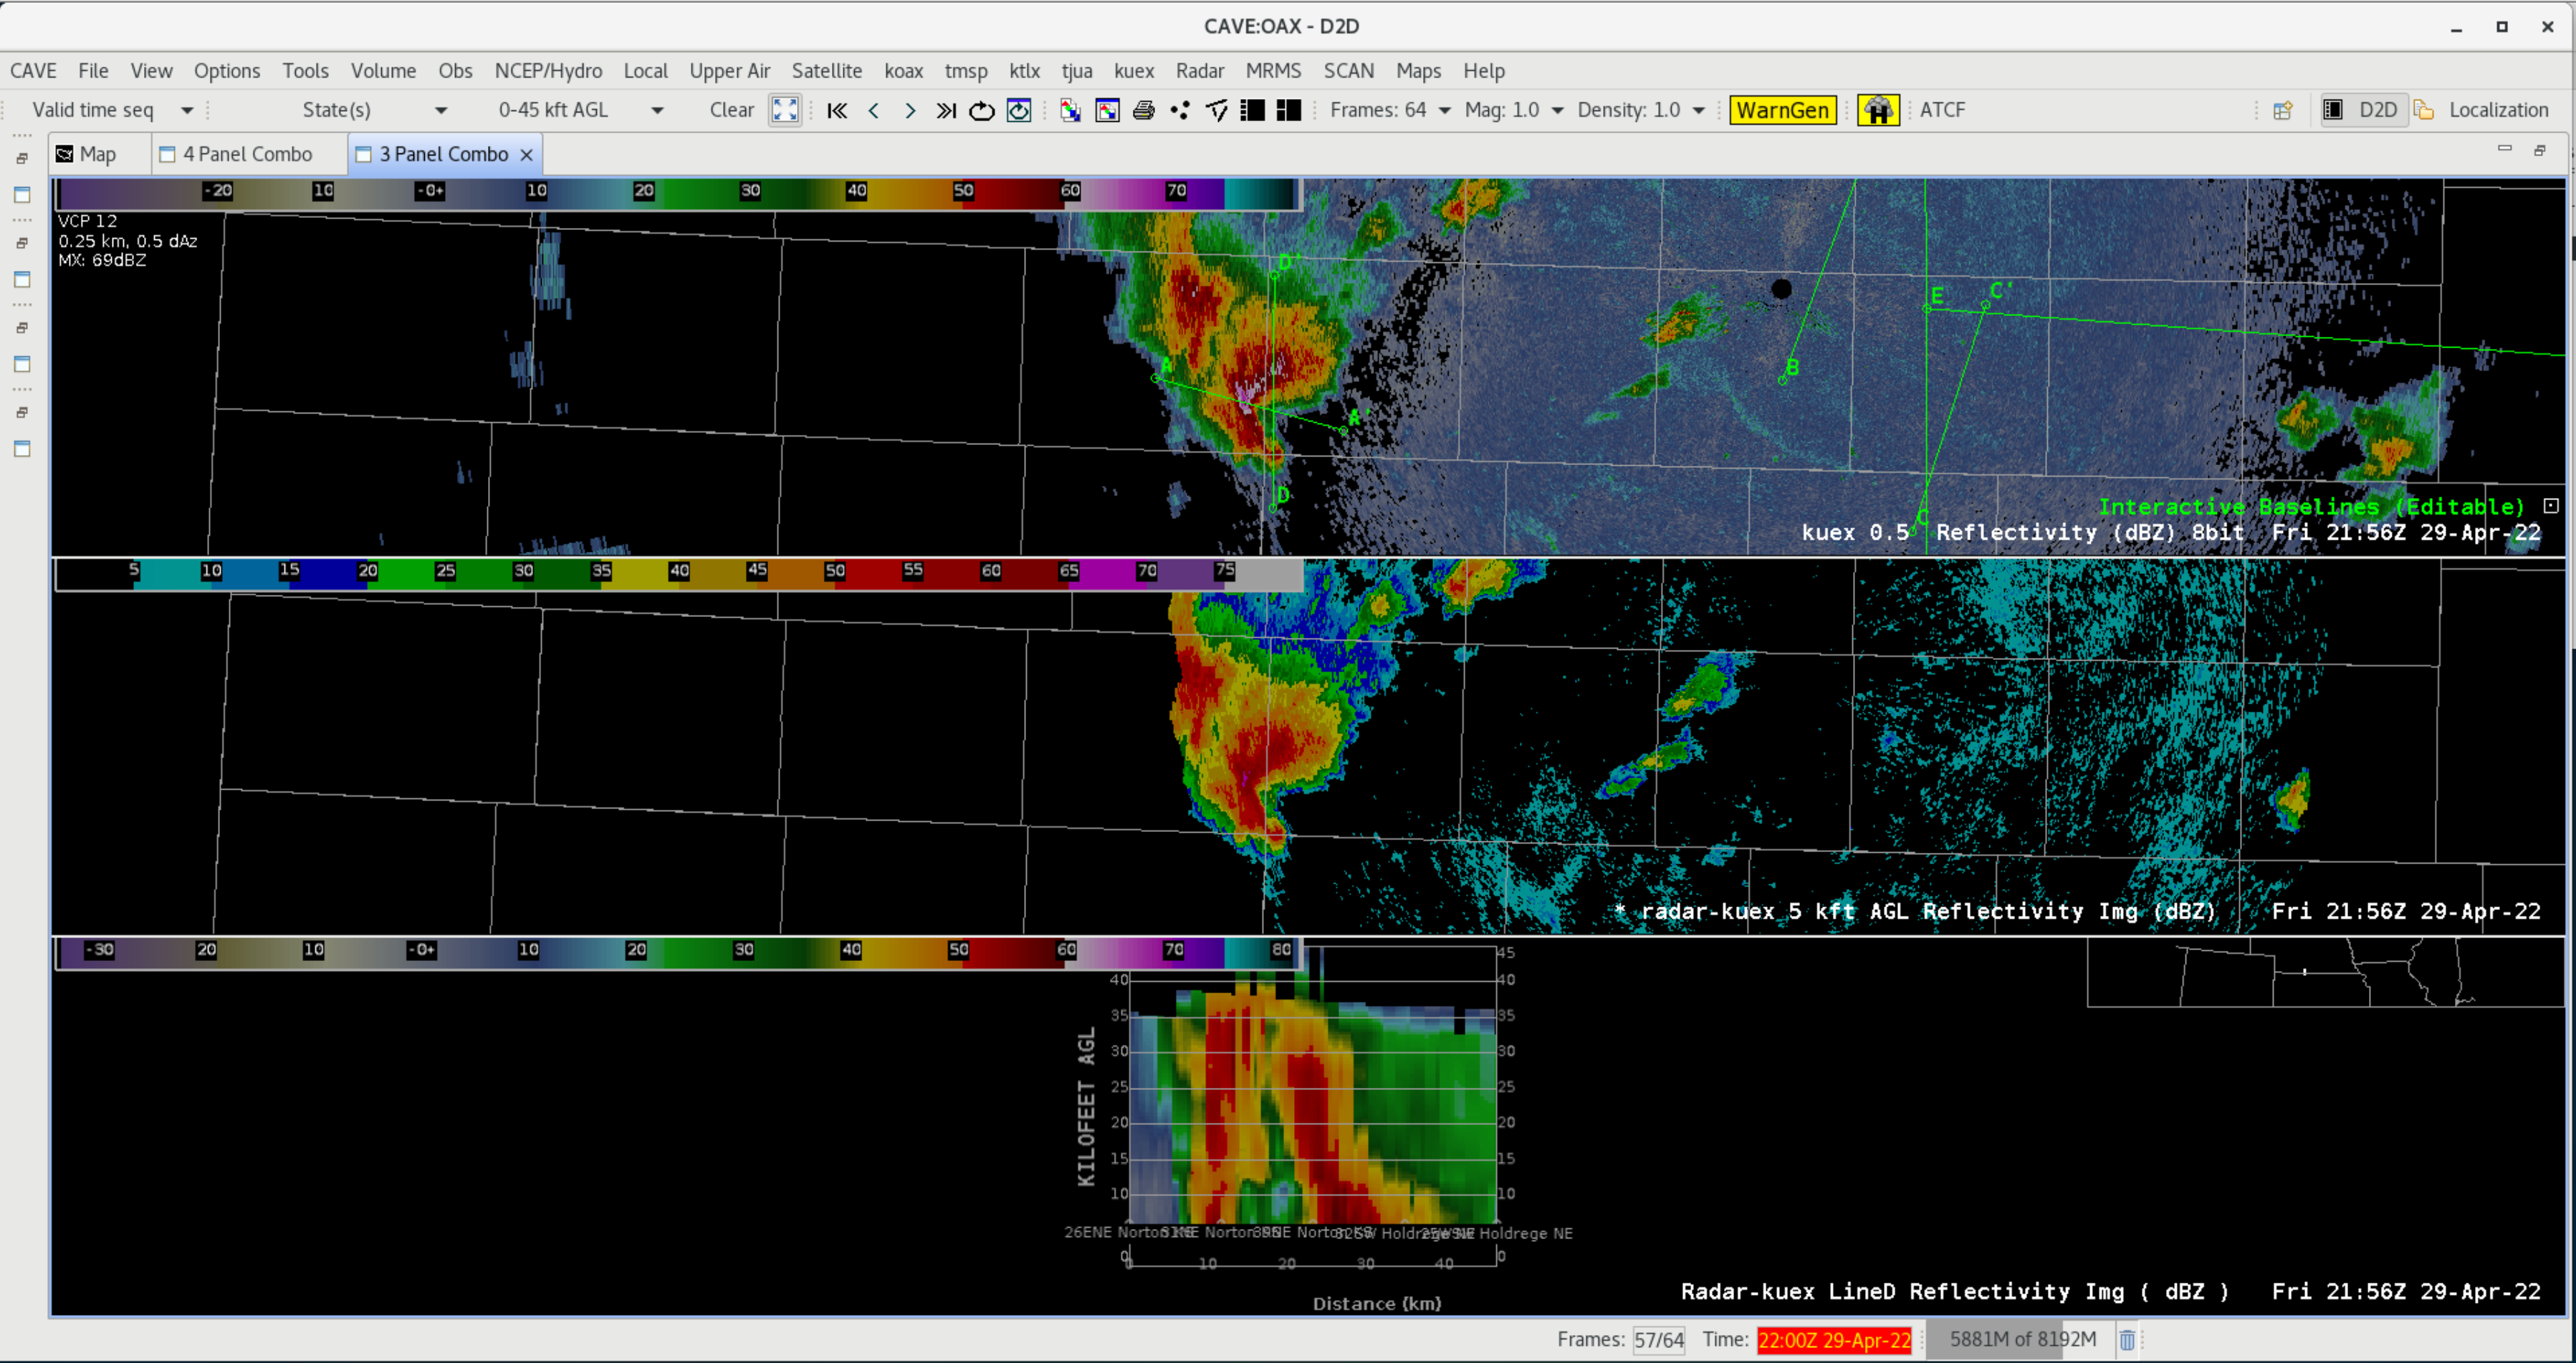
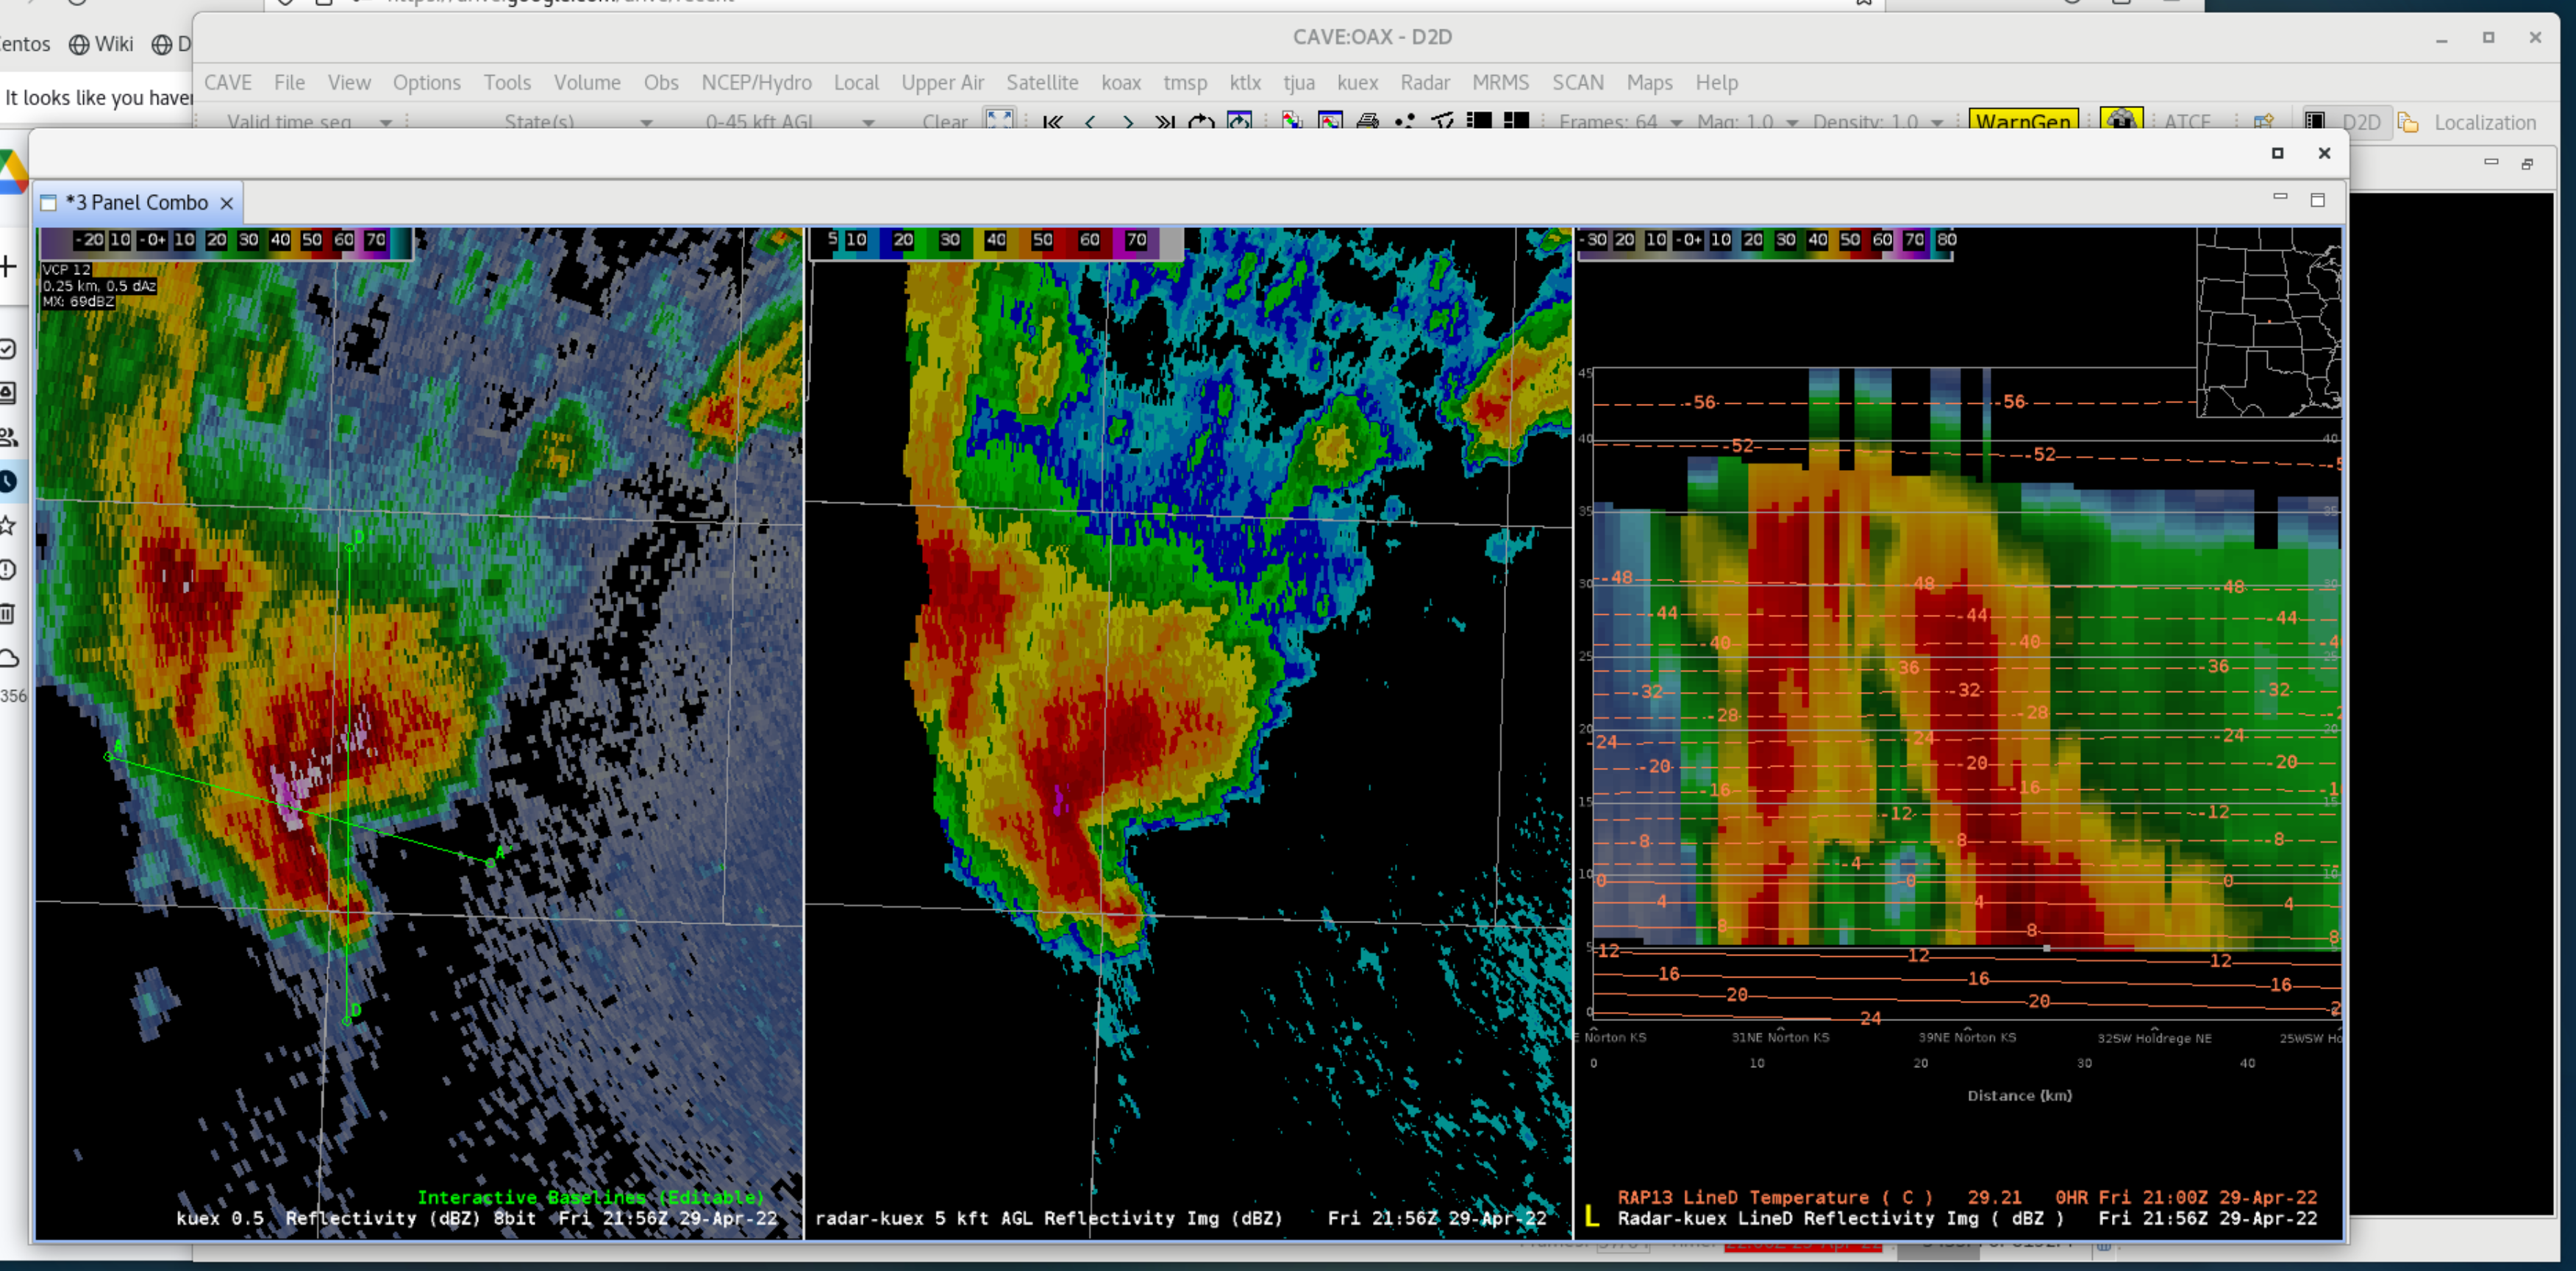
AWIPS 23.4.1 comes with a replacement for the Four-Dimensional Stormcell Investigator (FSI) featuring dynamic horizontal and vertical cross sections. While there is a default 3 panel combination integrating all tilts, horizontal (i.e. Constant Altitude Planned Position Indicator; CAPPI), and vertical cross sections, the cross sections can be loaded separately into existing procedures. The 3 panel combination contains:
- All-Tilts with Baselines - Navigate traditional all-tilts with up/down arrows and adjust baselines to generate vertical cross sections when you change baselines. This is the default time match basis for the 3 panel. One trick is to right click on two successive points (left to right or bottom to top) to grab a baseline and anchor it using those two points. Every time you move a cross section it gives you 7 seconds before it automatically updates the cross section if that baseline is selected in the vertical cross section panel.
- CAPPI Cross Section - When you right click and set the horizontal cross section to the be time match basis, then the up and down arrows will step through a pre-defined sequence of vertical levels (e.g 1.5Kft, 3Kft, 5Kft, 10Kft, 15Kft, 20Kft, 25 Kft, 30Kft, 35 Kft, and 40Kft for the default Deep Convection). Right clicking on the CAPPI text legend allows you to select Shallow Convection or other locally created presets.
- Vertical Cross Section - Right click on the vertical cross section (bottom) panel and select the appropriate baseline from the Update Baseline menu to use a different baseline for the cross section. Select the layer menu from the CAVE menu bar to change the vertical scale. The default is 0-60Kft. The cross section panel is the only one that will not update with a new volume scan automatically, and currently will generate a blank cross section if the required 5 tilts do not exist on the current cross section.
- Identify a radar to use for the cross section. If you are testing the capability in the cloud with the lowest 6 tilts of the level3 feed, then an optimal storm will be 60-90 miles from the radar to be able to sample well through a deep layer.
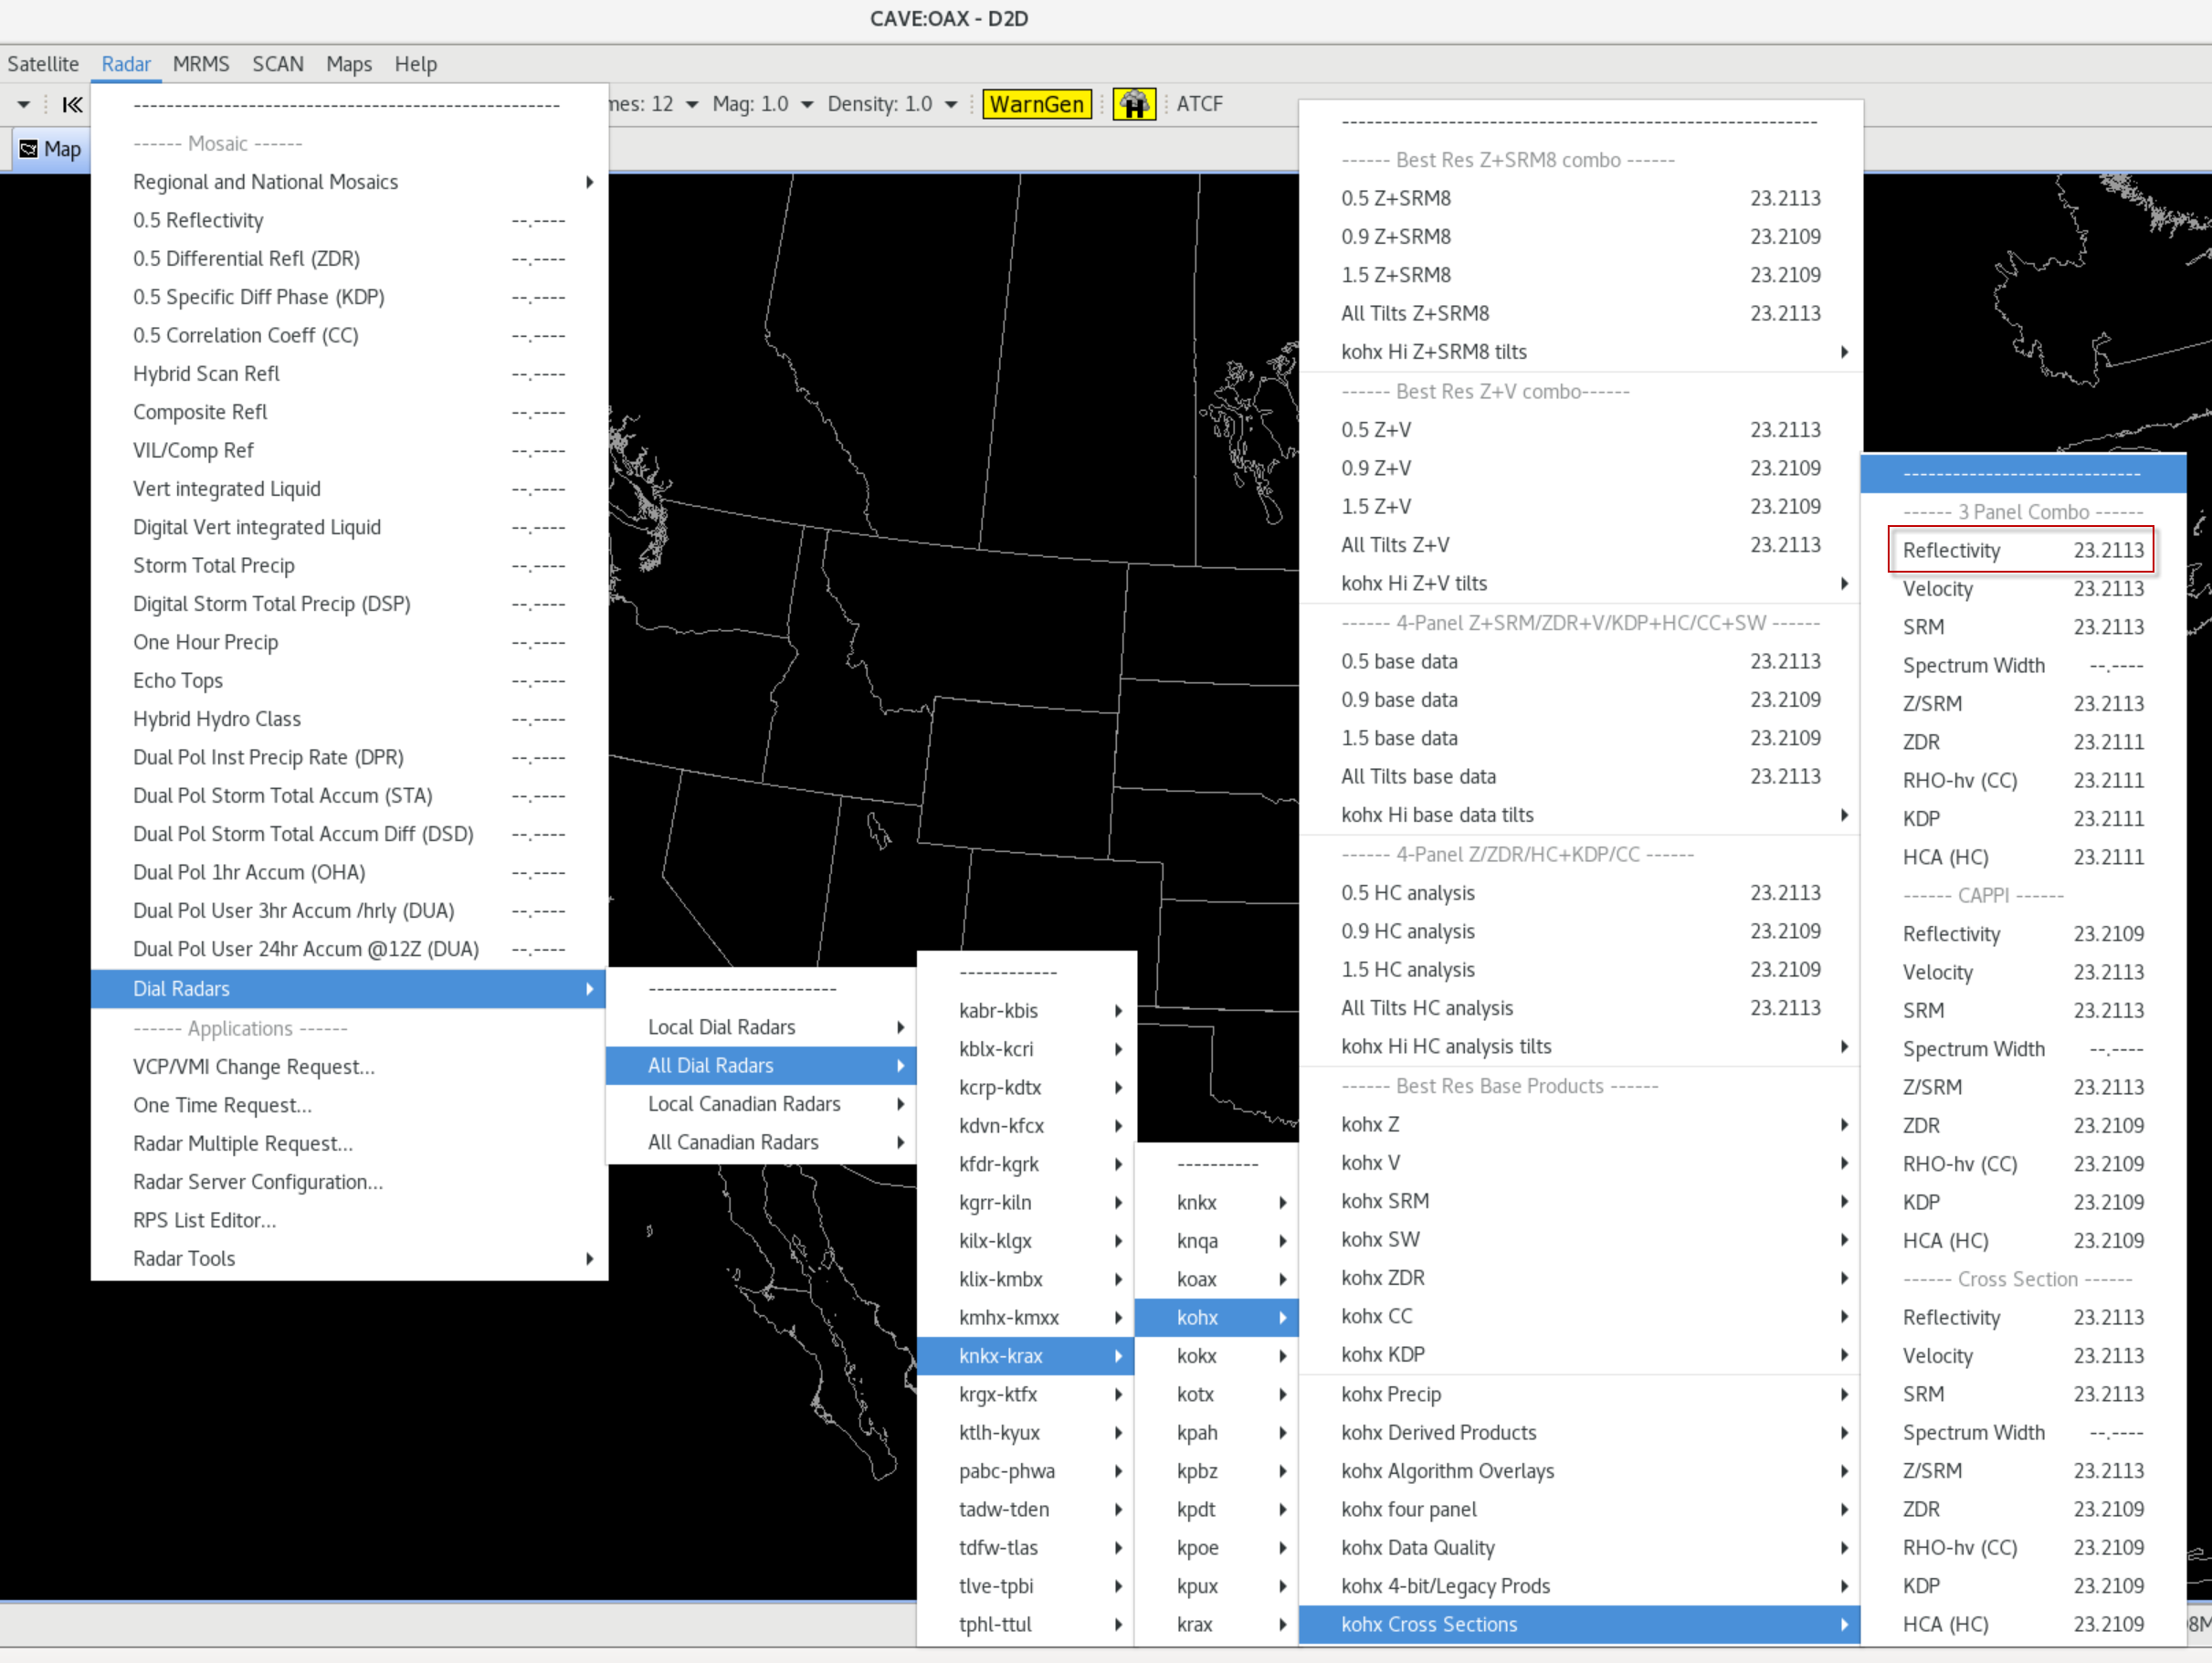
- In 23.4.1, each radar's menu has a ???? Cross Sections menu to load either the 3 Panel Combo, CAPPI, or Cross Section. Select Reflectivity from the 3 Panel Combo section. If you are testing this in the cloud or are viewing radars outside your CWA, then you may need to change to CONUS scale after loading.
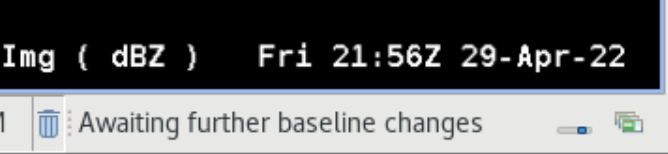
- Zoom in to a storm in the top all-tilts panel, and tilt up and down using the keyboard arrows until you get to a feature you wish to generate a cross section on. Then right click on the two points you want to use to draw a baseline from left to right. The baseline tool will grab Line A and anchor it on those two points, and the CAVE status bar in the lower right will say "Awaiting further baseline changes" for 7 seconds before it updates the cross section panel on the bottom. You may want to change the image properties (e.g. Ctrl + i) to reduce the brightness to 60% to be able to see the baseline better.
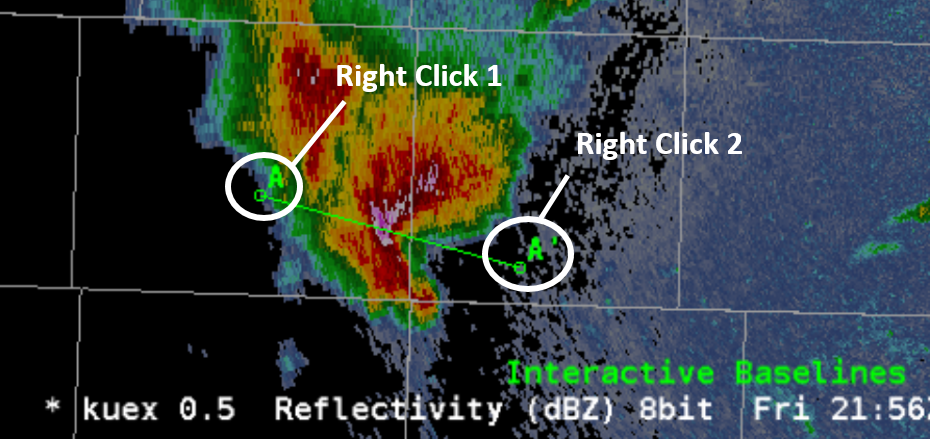
- Note that if you create the baseline from right to left with A on the right and A' on the left it will plot backwards in the cross section.
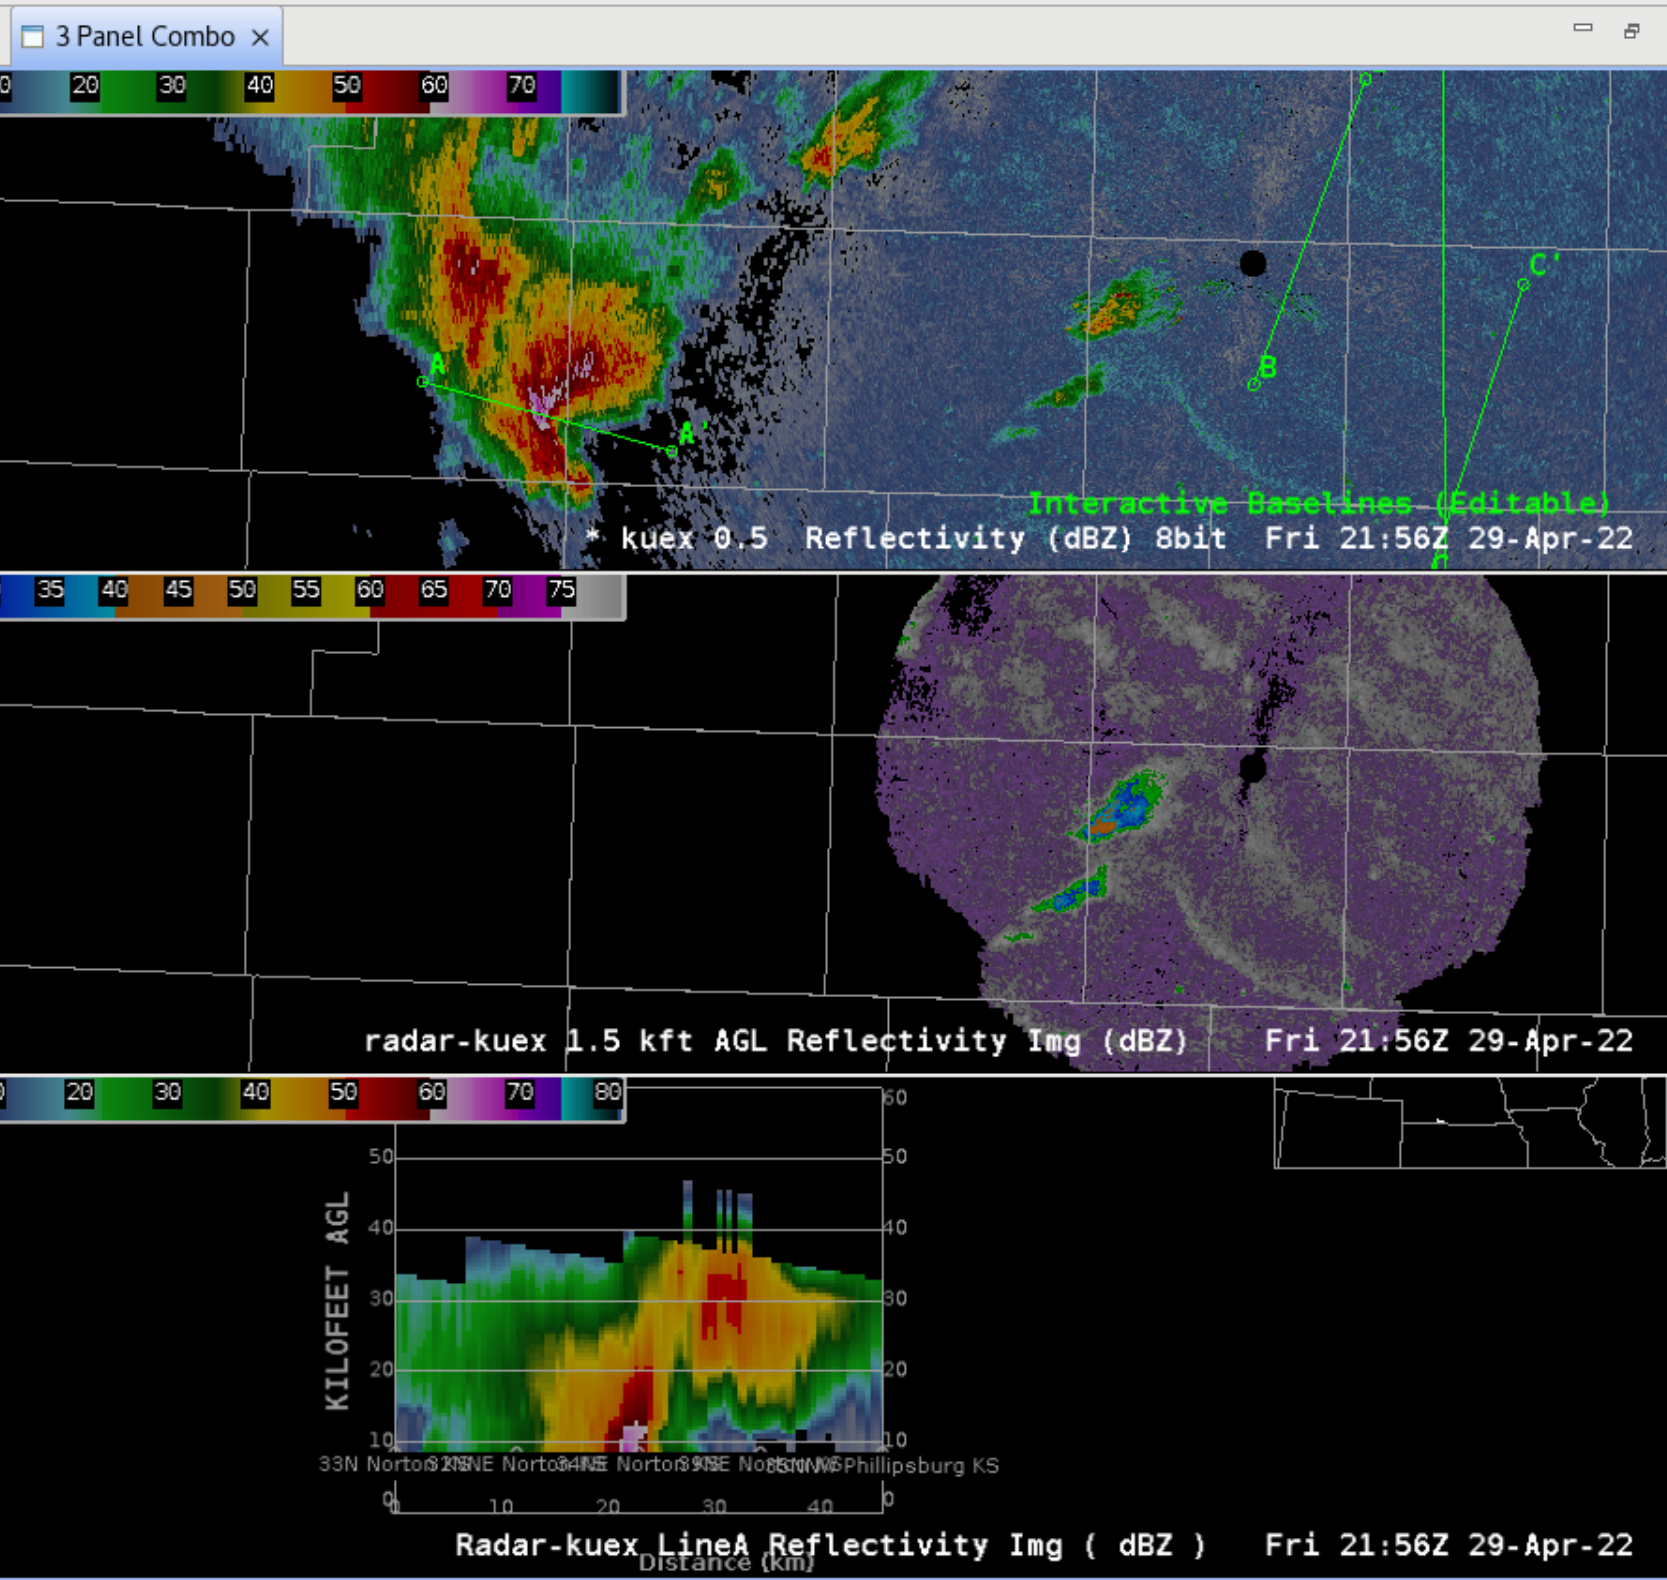
- The cross section display on the bottom defaults to the Line A baseline. In the top all-tilts panel click on two points from bottom to top that are perpendicular to your first line. The baseline tool will draw a second baseline using a new line from one of the nearby baselines. Then right click and hold in the bottom vertical cross section panel (not on the text legend) and select the baseline you just made from the Update Baseline menu (e.g Line D).
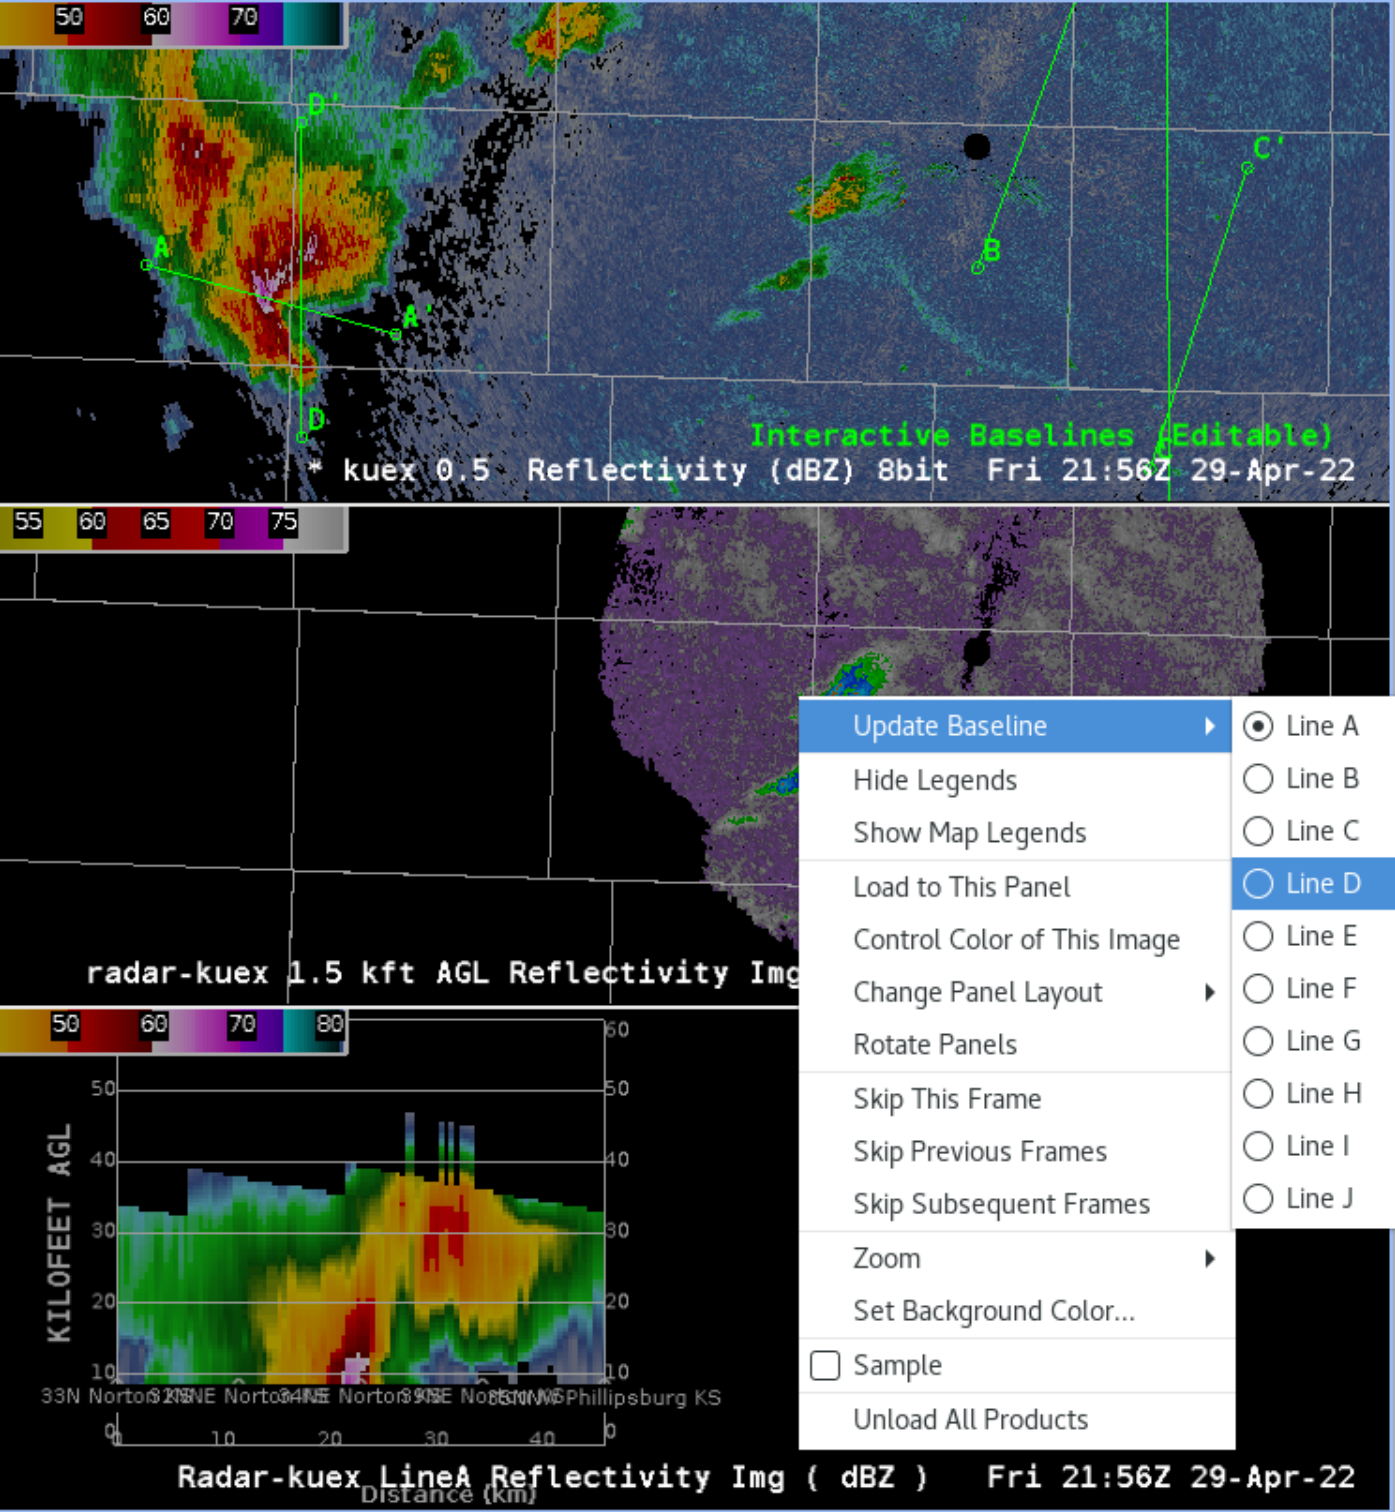
- The vertical cross section will change to the second baseline that was made.
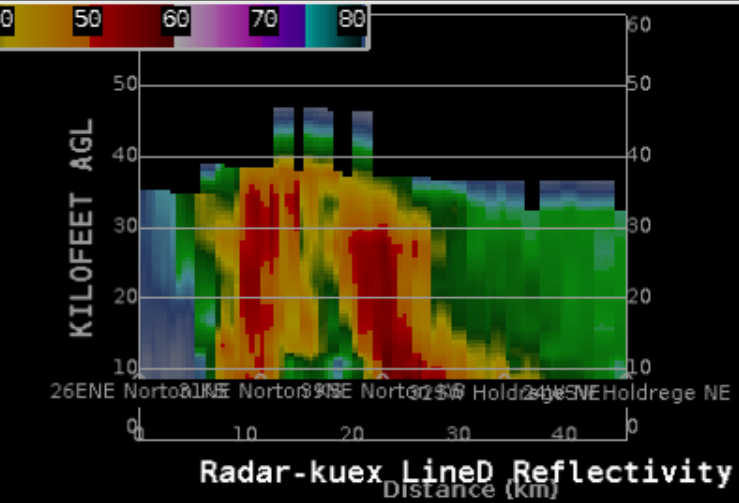
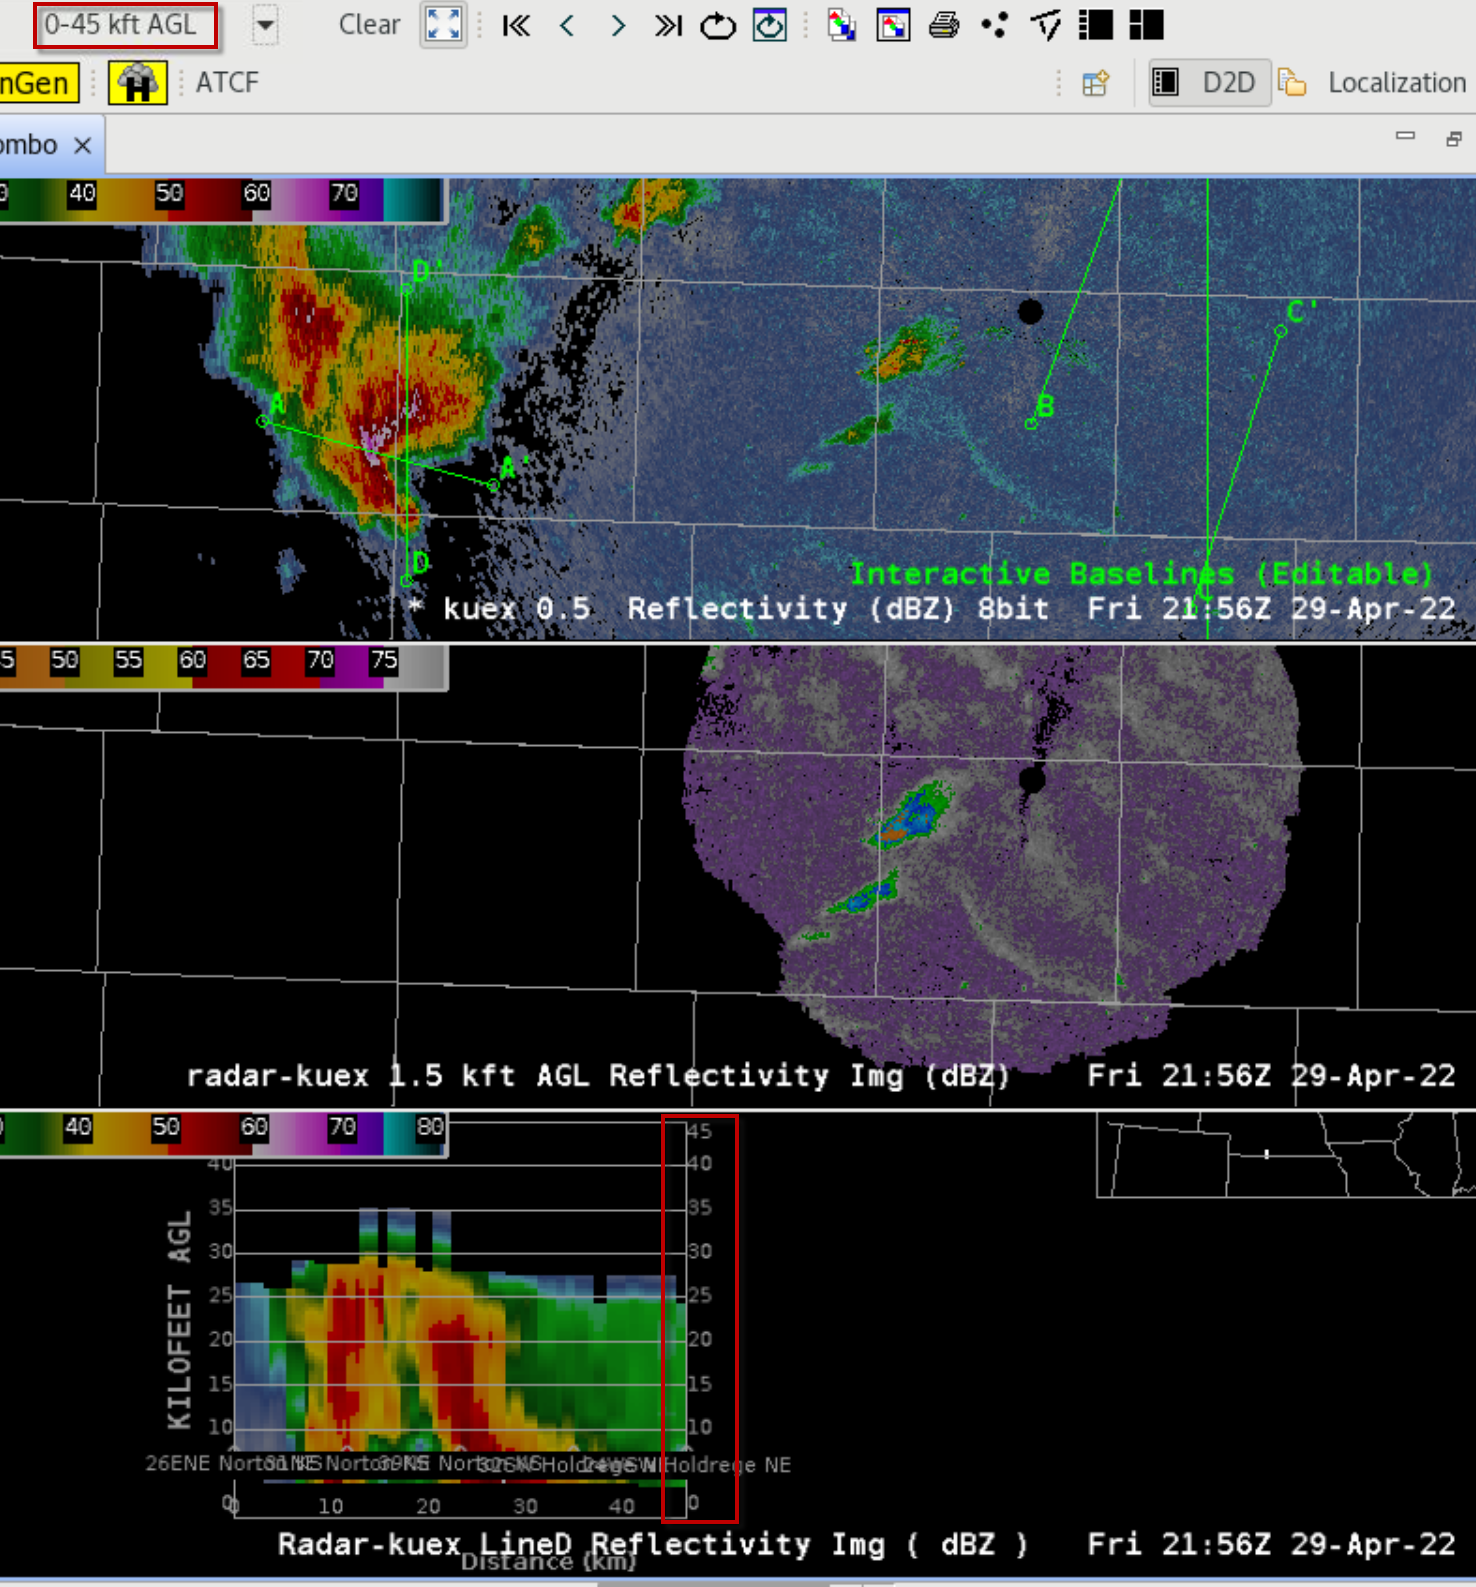
- In the CAVE menu bar change your vertical scale from 0-60 kft AGL to 0-45 kft AGL.

- Your cross section vertical scale should change to 0-45Kft AGL.
- Step through the loop and notice your cross section will update. Notice the cross section can be blank on the current volume scan if it doesn't have the 5 tilts required to generate the cross section.
- In the top panel, move one of the vertices of the baseline associated with the vertical cross section and note the "Awaiting Further Baseline Changes" message in the bottom-right status message of CAVE. The cross section updates 7 seconds after the baseline is moved in the top panel when that baseline is displayed in the bottom panel.
- Note the top all-tilts panel initially has a * next to the product legend for the all tilts to be the time match basis. Right click on the product legend in the middle panel and select Time Match Basis to change the time match basis to be the CAPPI horizontal cross section in the middle panel.
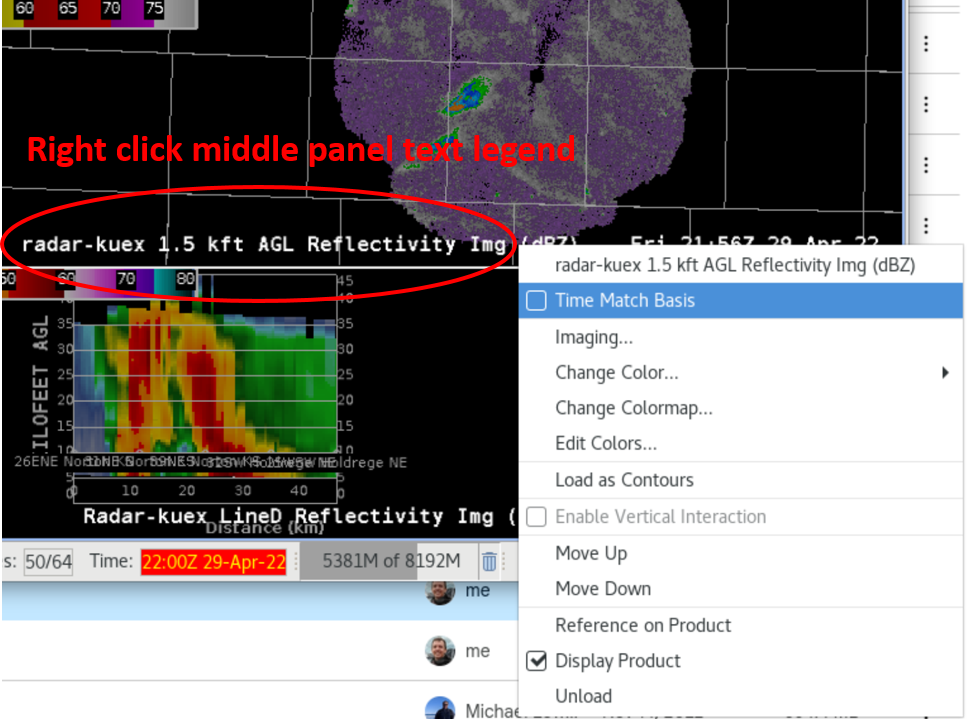
- Once the middle panel is the Time Match Basis, the Vertical Interaction menu in the right click of the middle panel product legend will automatically select the Deep Convection (1.5-40Kft) selection, and the up and down arrows will now step through the sequence of pre-defined levels of the CAPPI. The all-tilts top panel is typically better for vertically interrogating a storm, but it can be helpful to set the horizontal cross section at a useful height like in the hail growth zone or in low levels to provide a reference point when using the top and bottom panels.
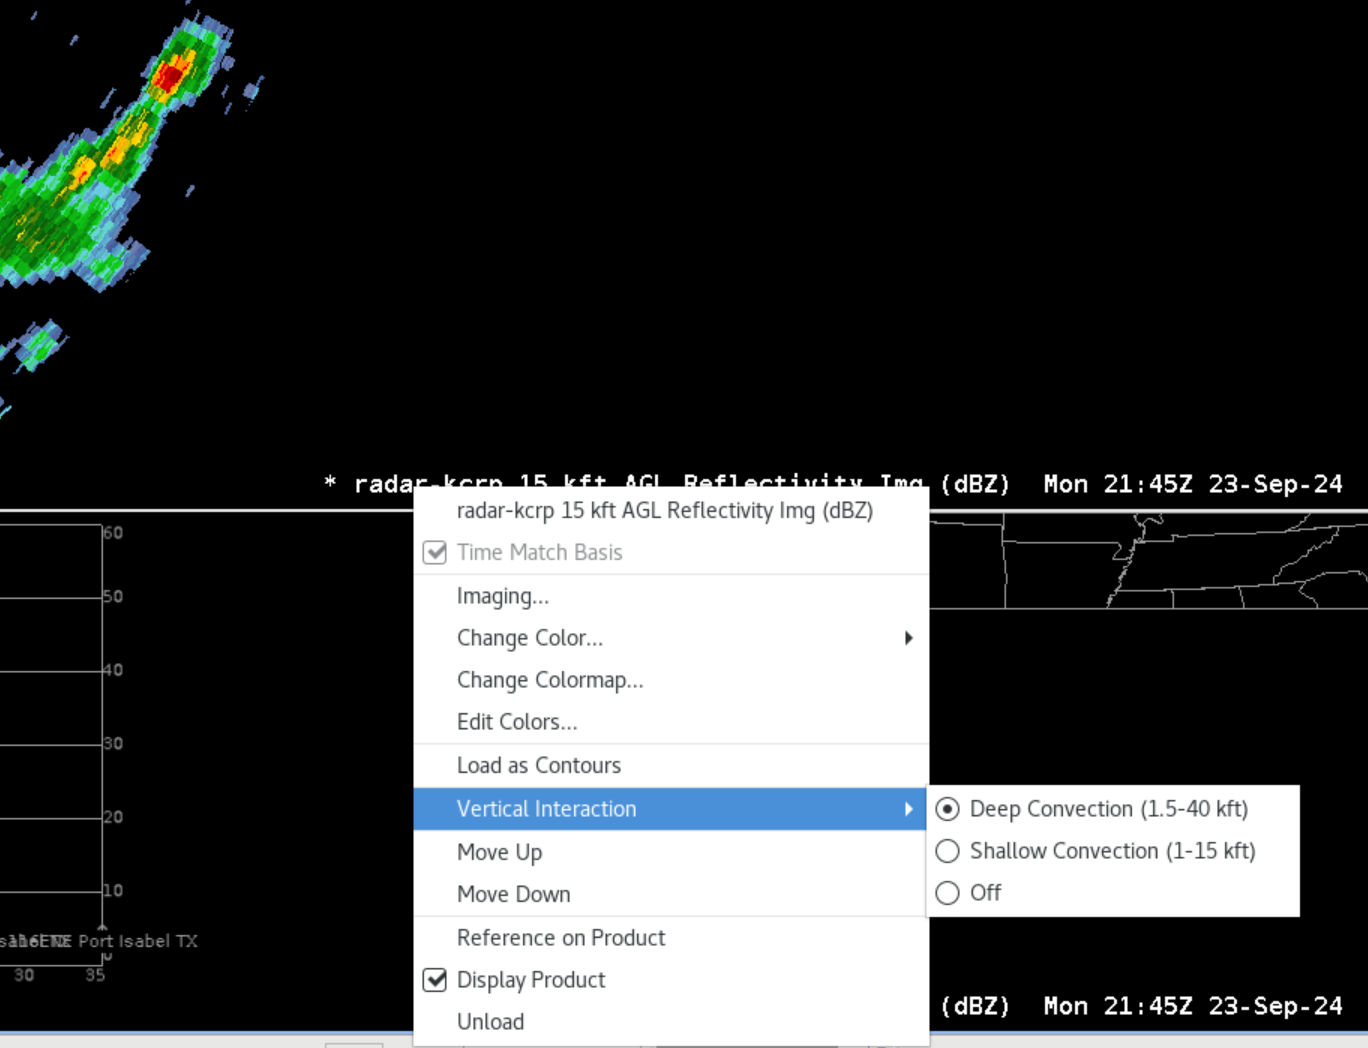
- You can change the CAPPI preset levels by selecting Shallow Convection (1-15 kft) or by selecting Off from the right click Vertical Interaction menu options on the CAPPI text legend. Off will leave the CAPPI on the current height. You will need to manually select the Time Match Basis on the All Tilts top text legend to return to the All Tilts driving the navigation.
- The Vertical Interaction options are configured in D2D->Vertical Integration Levels->VerticalInteractionLevels.xml.
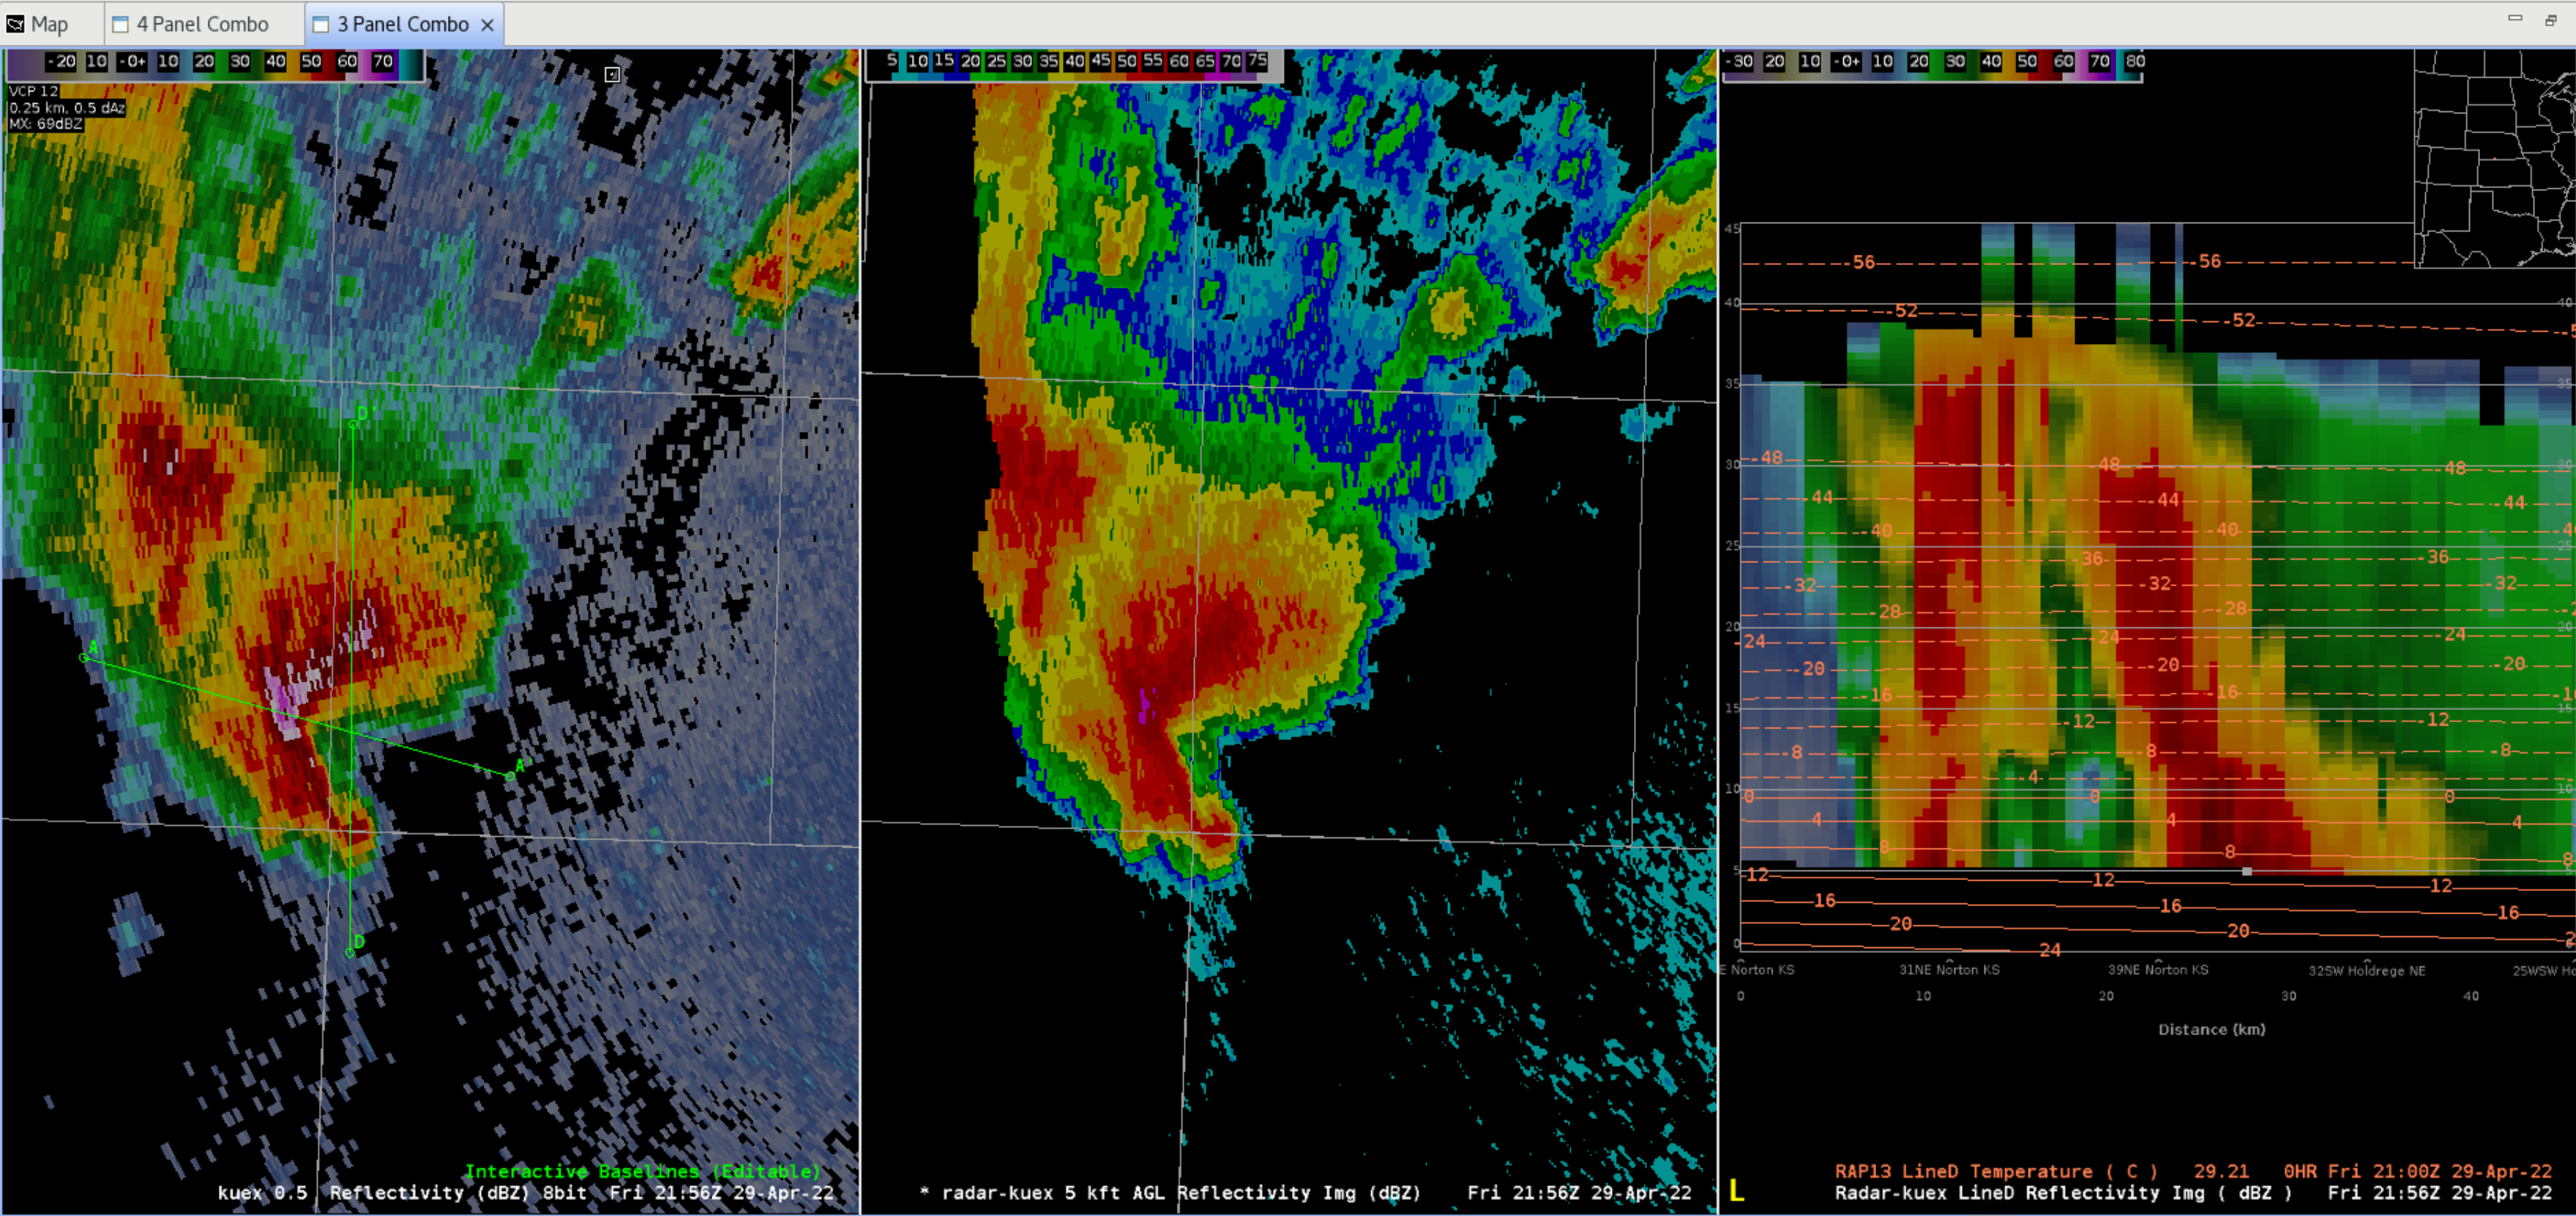
- Right click on one of the panels in the 3 panel layout and select the 3x1 panel layout for 3 columns by 1 row.
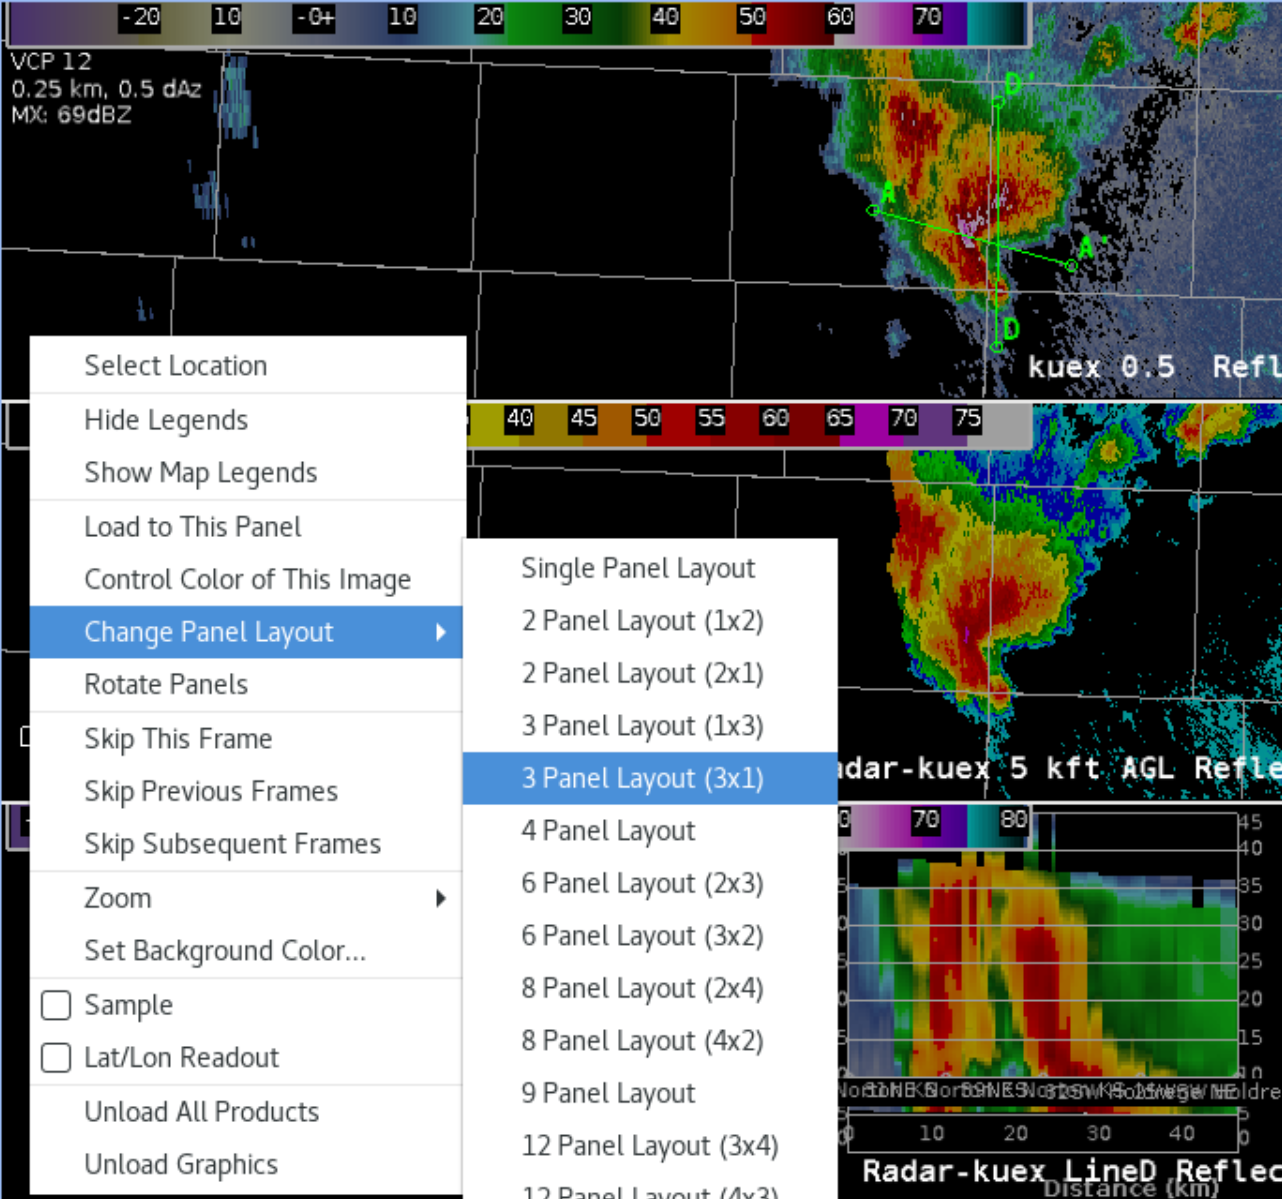
- Note that a landscape-oriented monitor will more effectively fill the space in a 3x1 layout vs the original 1x3 layout.
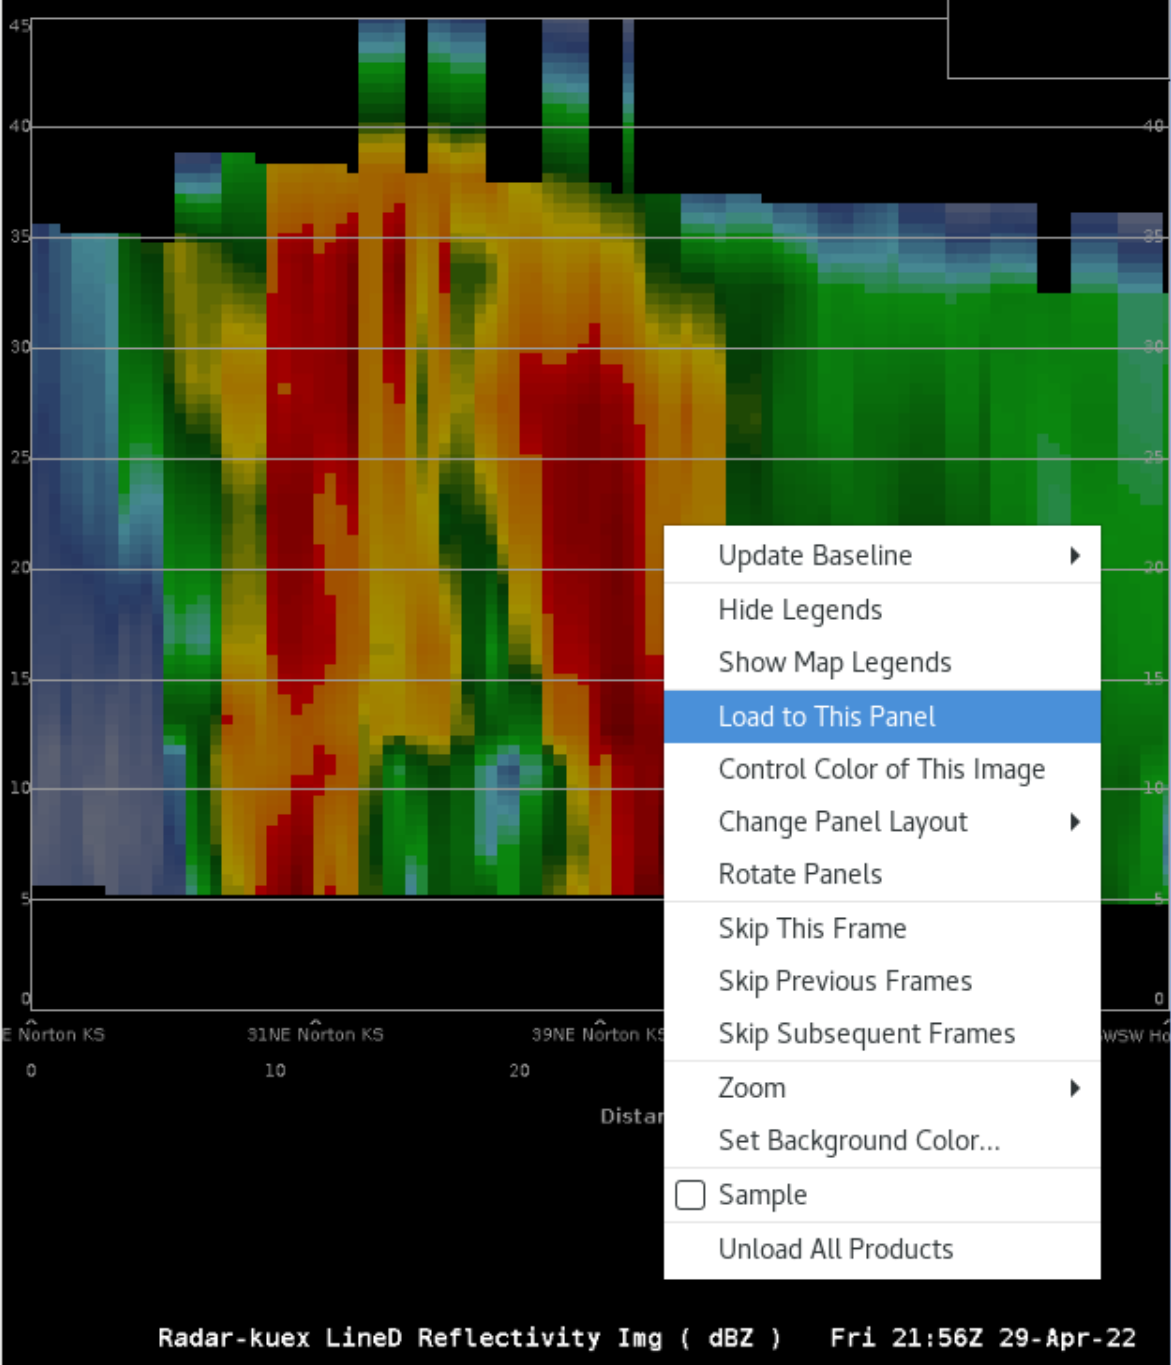
- Next, let's load the temperature data from a model grid like RAP13. First, right click on the cross section panel and select Load to This Panel.
- Under the CAVE Volume menu select Browser. In the Volume Browser, configure the following:
- Change Plan view menu to Cross section at the top
- Change the Log 1050-150 vertical scale menu (to the right of the Time menu) to match the cross section scale set in the CAVE toolbar (e.g. 0-45 kft AGL; next to the Clear button).
- RAP13 (or your model of choice; sometimes RAP40 has to be used instead of RAP13) under Sources->Volume
- Temperature under Fields->Basic,
- Your cross section line (e.g. Line D) under Planes-Specified
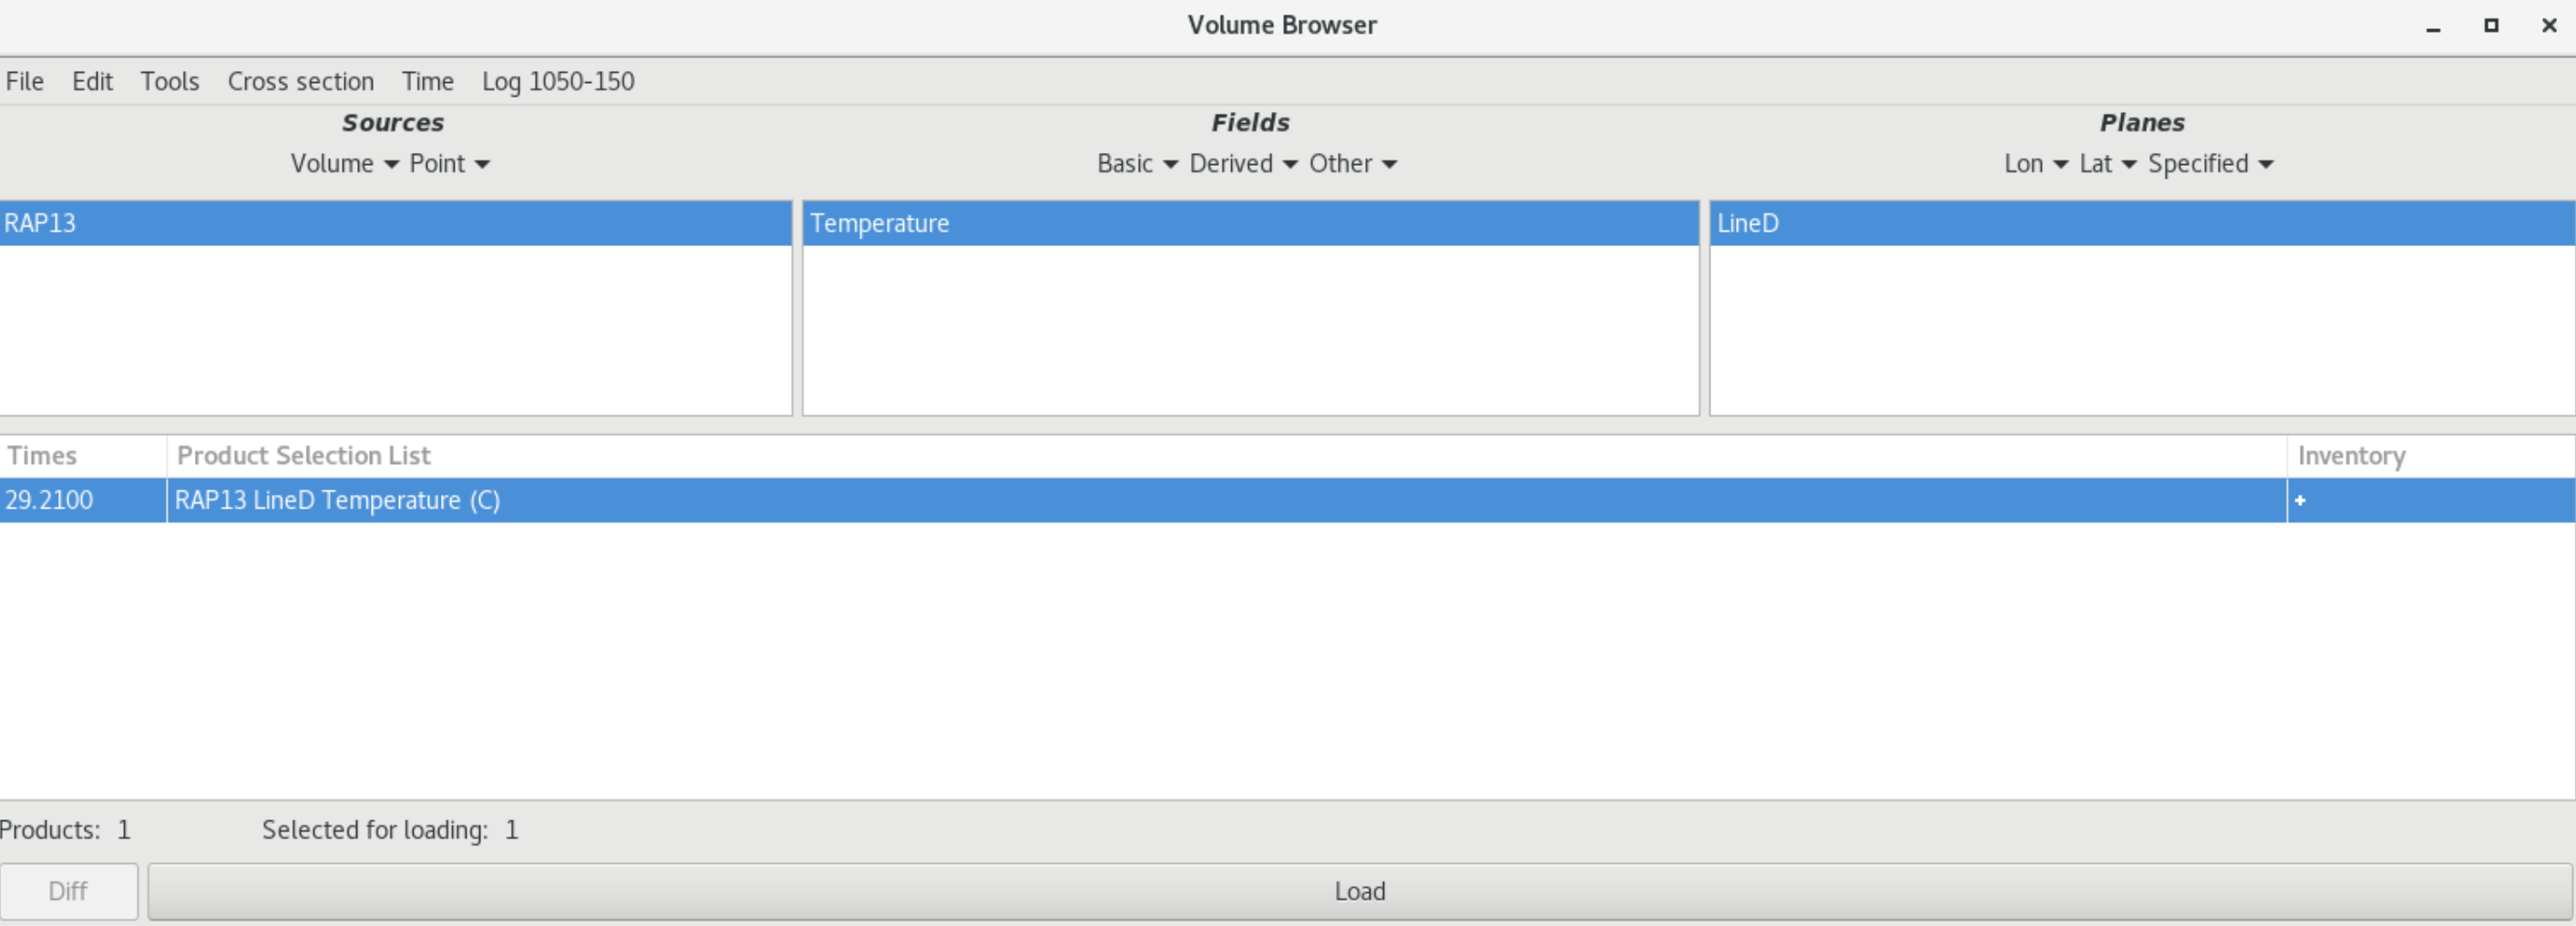
- Then select your product and click Load. Temperature contours should display over your vertical cross section panel. You may wish to reduce the density of the contours by right clicking on the temperature text legend and changing the Density from 1.0 to 0.5 or 0.33
- Note that if one of the fields in the Volume Browser does not allow you to select it, you can clear the Sources/Fields/Planes from the Edit menu.
- Note that if one of the fields in the Volume Browser does not allow you to select it, you can clear the Sources/Fields/Planes from the Edit menu.
- If you want the 3 panel cross section outside of CAVE, you can drag the tab outside of CAVE and drop it on the desktop when CAVE is not full screen. To reattach it to CAVE, drag the tab name and drop it on the CAVE bar with the other map editor names.
- Once you get your settings optimally configured, save this bundle into a procedure. You can use the Alter button in the procedures for the radars you have in your localization.
- Next, we'll test the virtual volume scan capability, but first let's start with a full cross section.
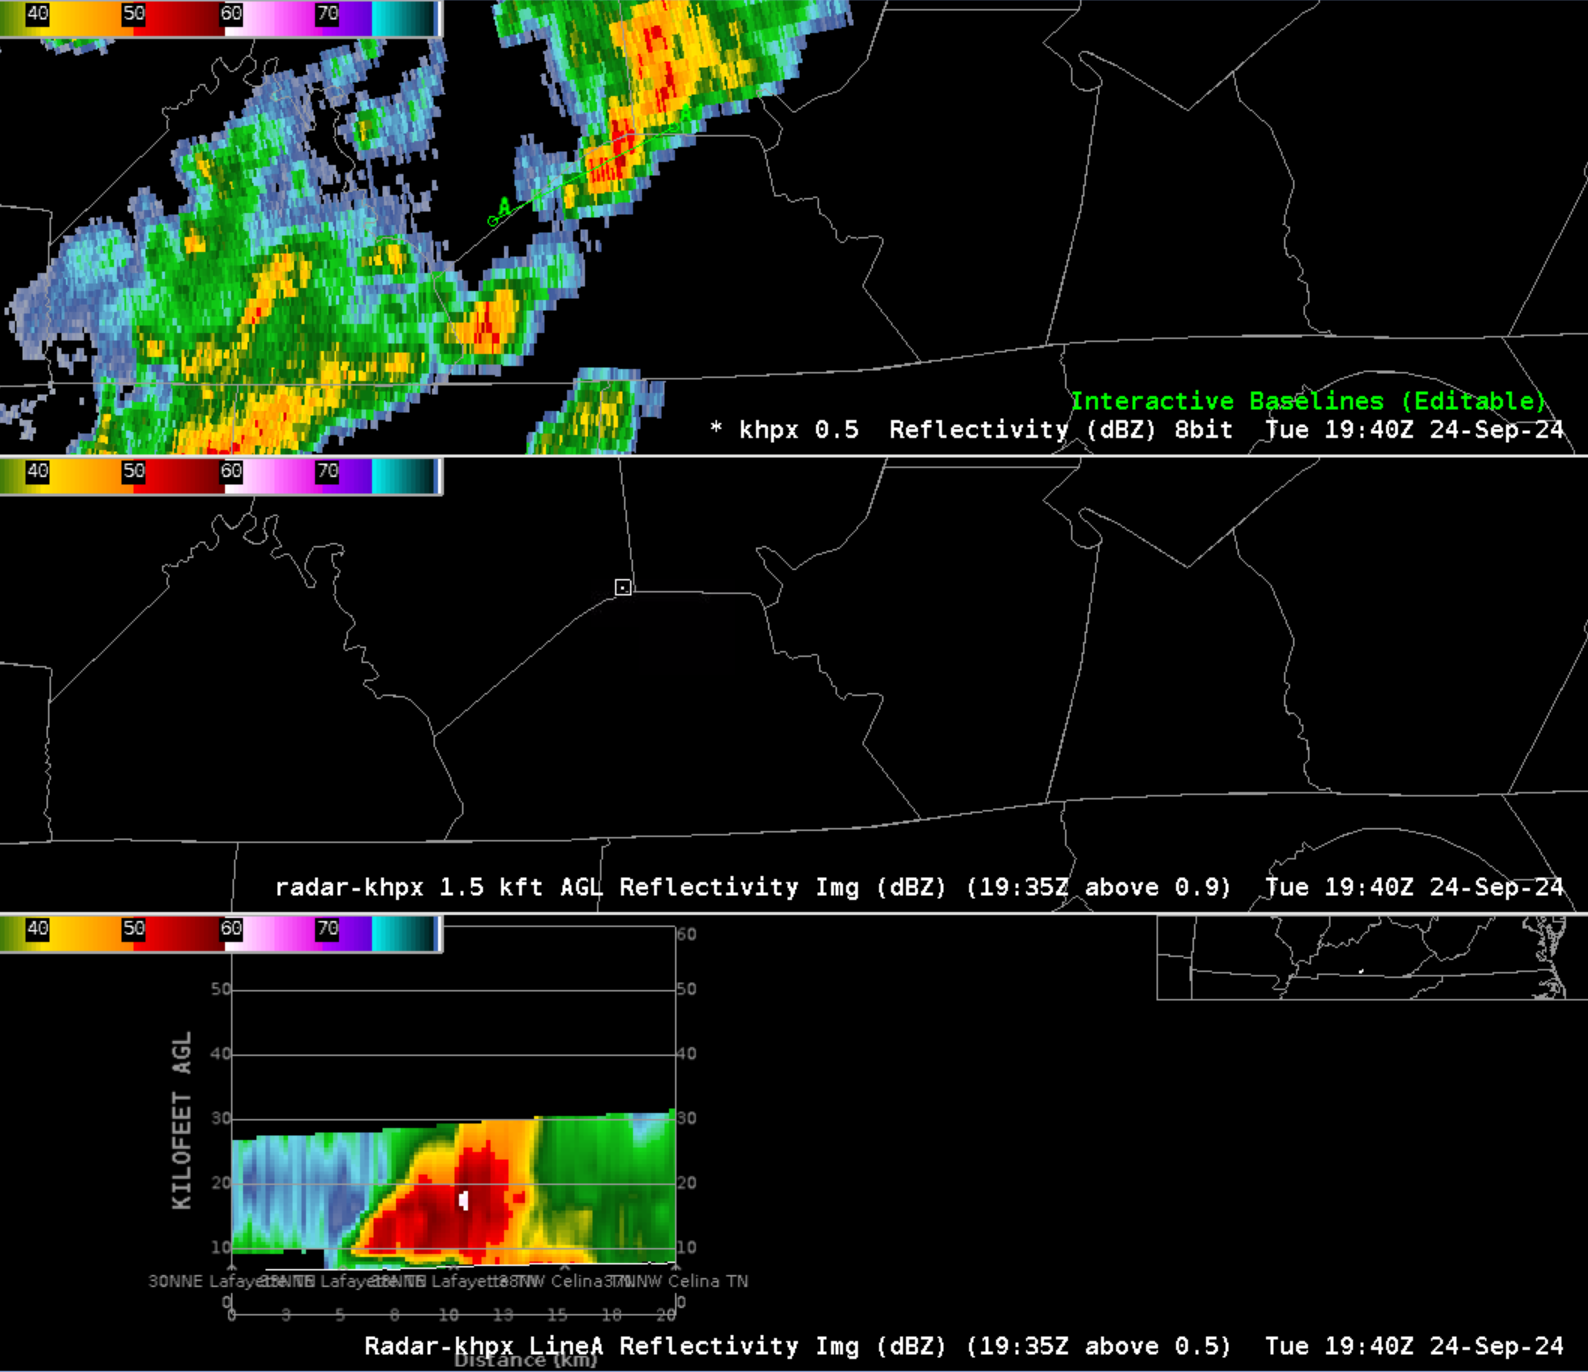
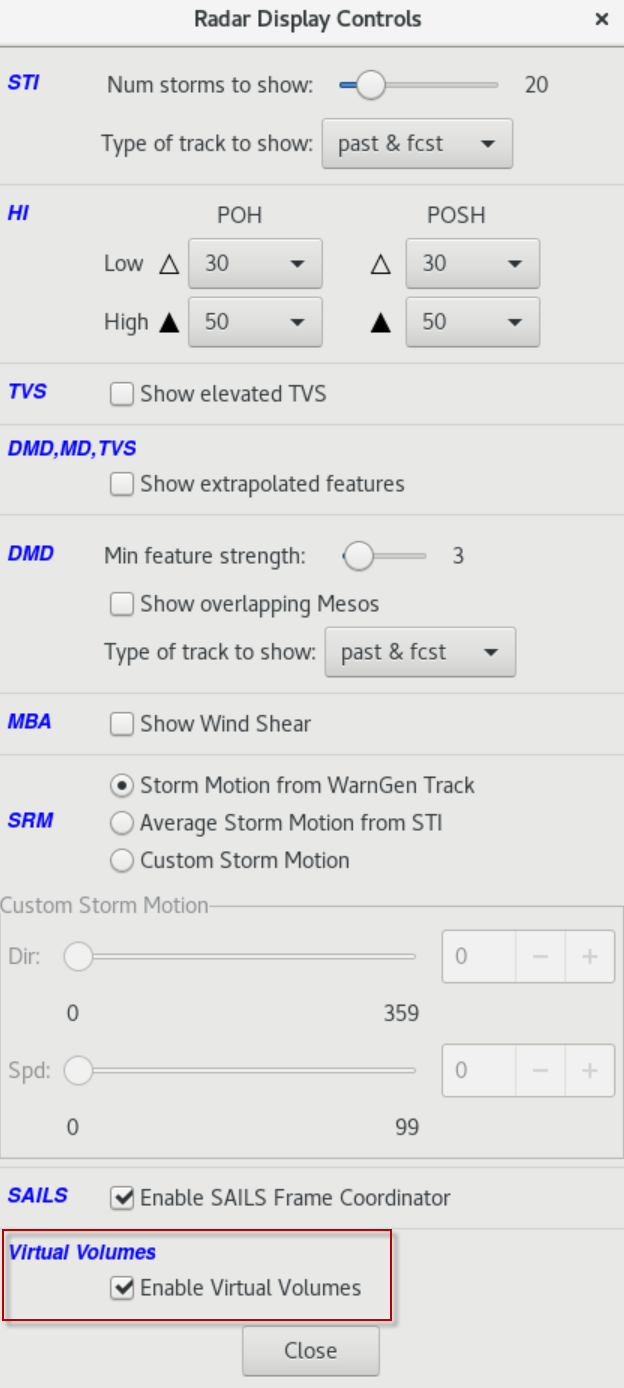
- From the Tools menu, select Radar Display Controls, and select Enable Virtual Volumes. The vertical cross section will then draw a white line separating the new data below the line and the old data from the previous volume scan above the line. There will be a discontinuity between the old and new data, and it is not uncommon for this to be challenging for some forecasters to interpret. This setting is toggled off by default.


- Below is the complete volume scan. Note how this has limited utility with fast moving storms.
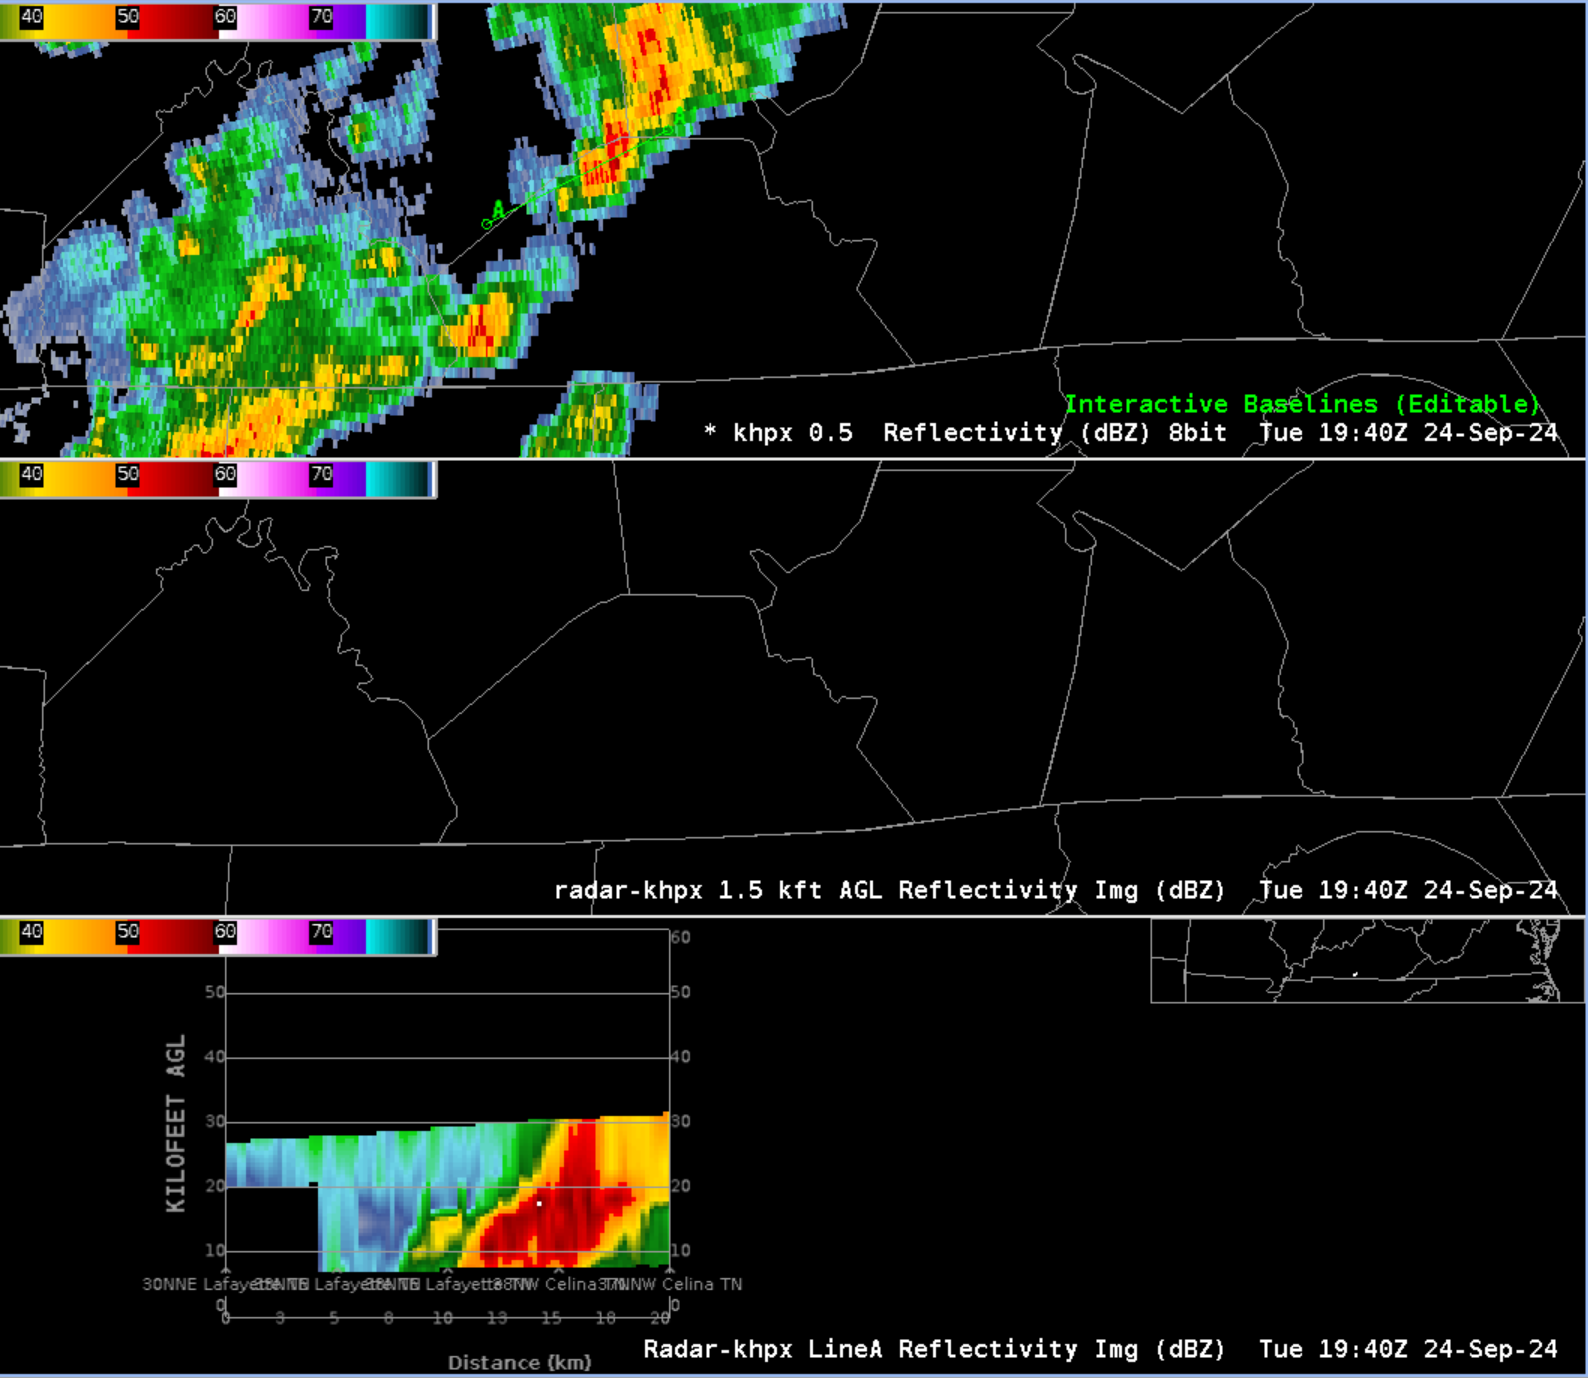
- Under the Tools menu, select Radar Display Controls, and de-select Enable Virtual Volumes to toggle off virtual volumes.
- You can clear the display and try loading the CAPPI-only or cross section only in another editor or multi-panel cross section combination if you would like to further explore the other data.
- Tip: It can be easiest to start from the 3 panel cross section, and then:
- right click on the panels and select Change Panel Layout to select a different layout, like 4x2 (4 columns by two rows)
- unload the panels you want to change by right clicking on the text legend and selecting Unload
- right click in the panel and select Load to This Panel
- note if you overlay temperature data per steps 18-19, remember to match the vertical scale in the CAVE toolbar and adjust the density of the contours
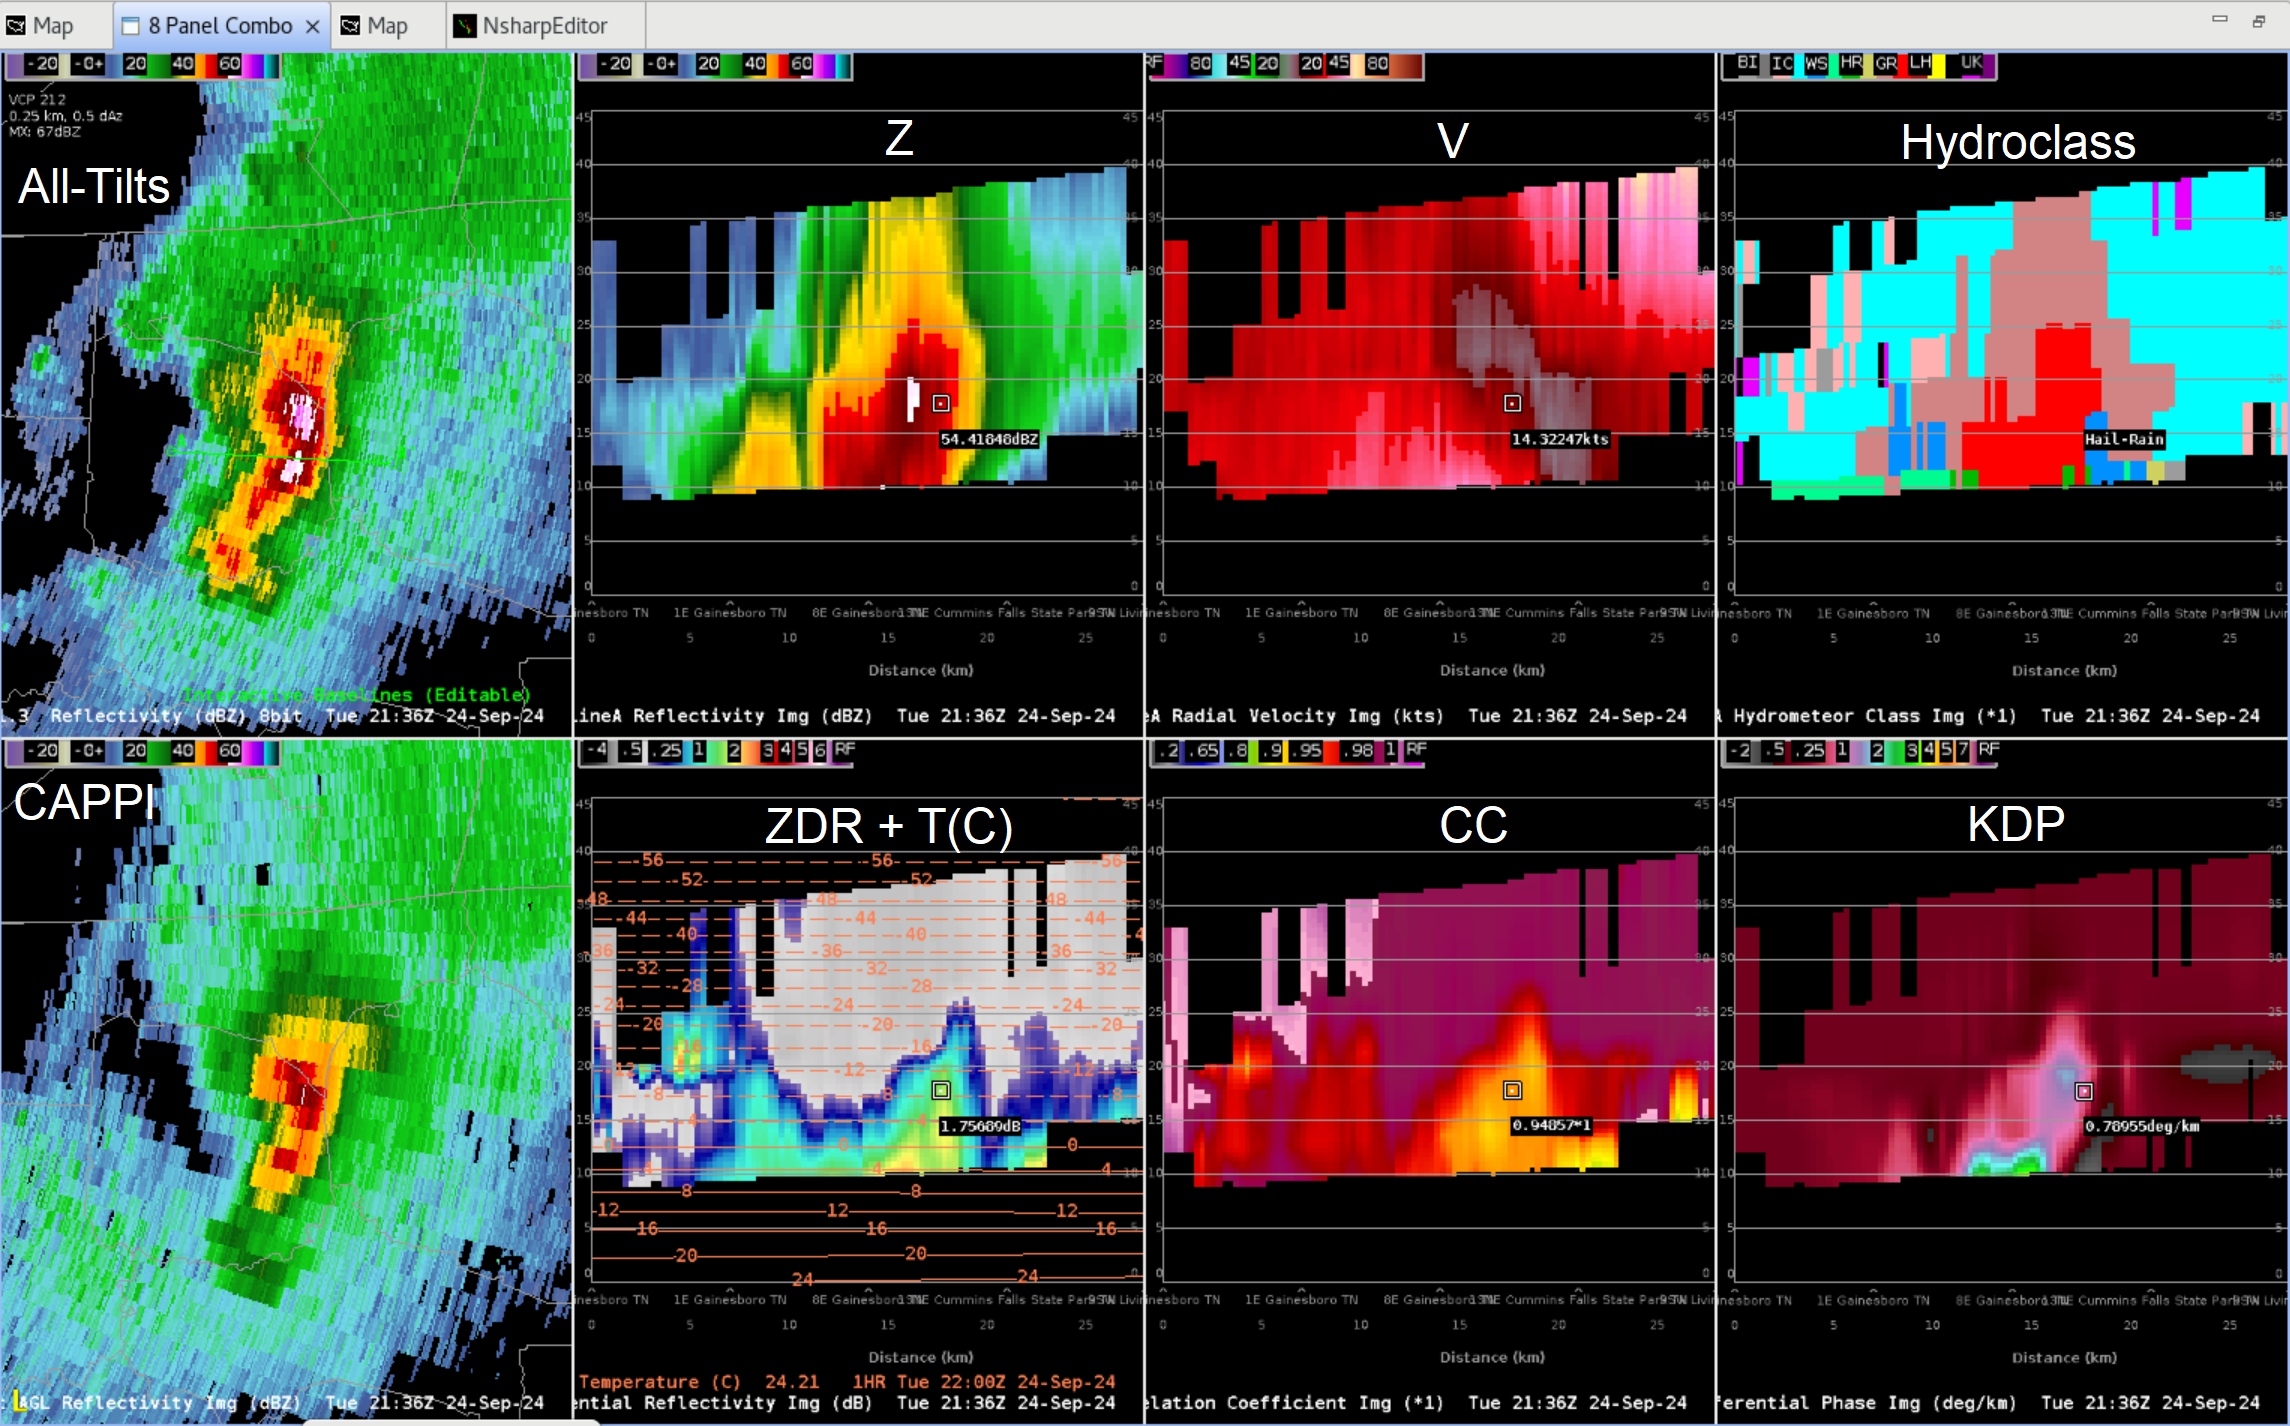
- Here is an 8 panel with All Tilts Z and Z/V/Hydroclass cross sections on top with CAPPI Z and ZDR/CC/KDP cross sections on bottom:
- Here is a version with All Tilts Z/SRM (with temperature sampling) and just vertical cross sections with temperatures overlaid:
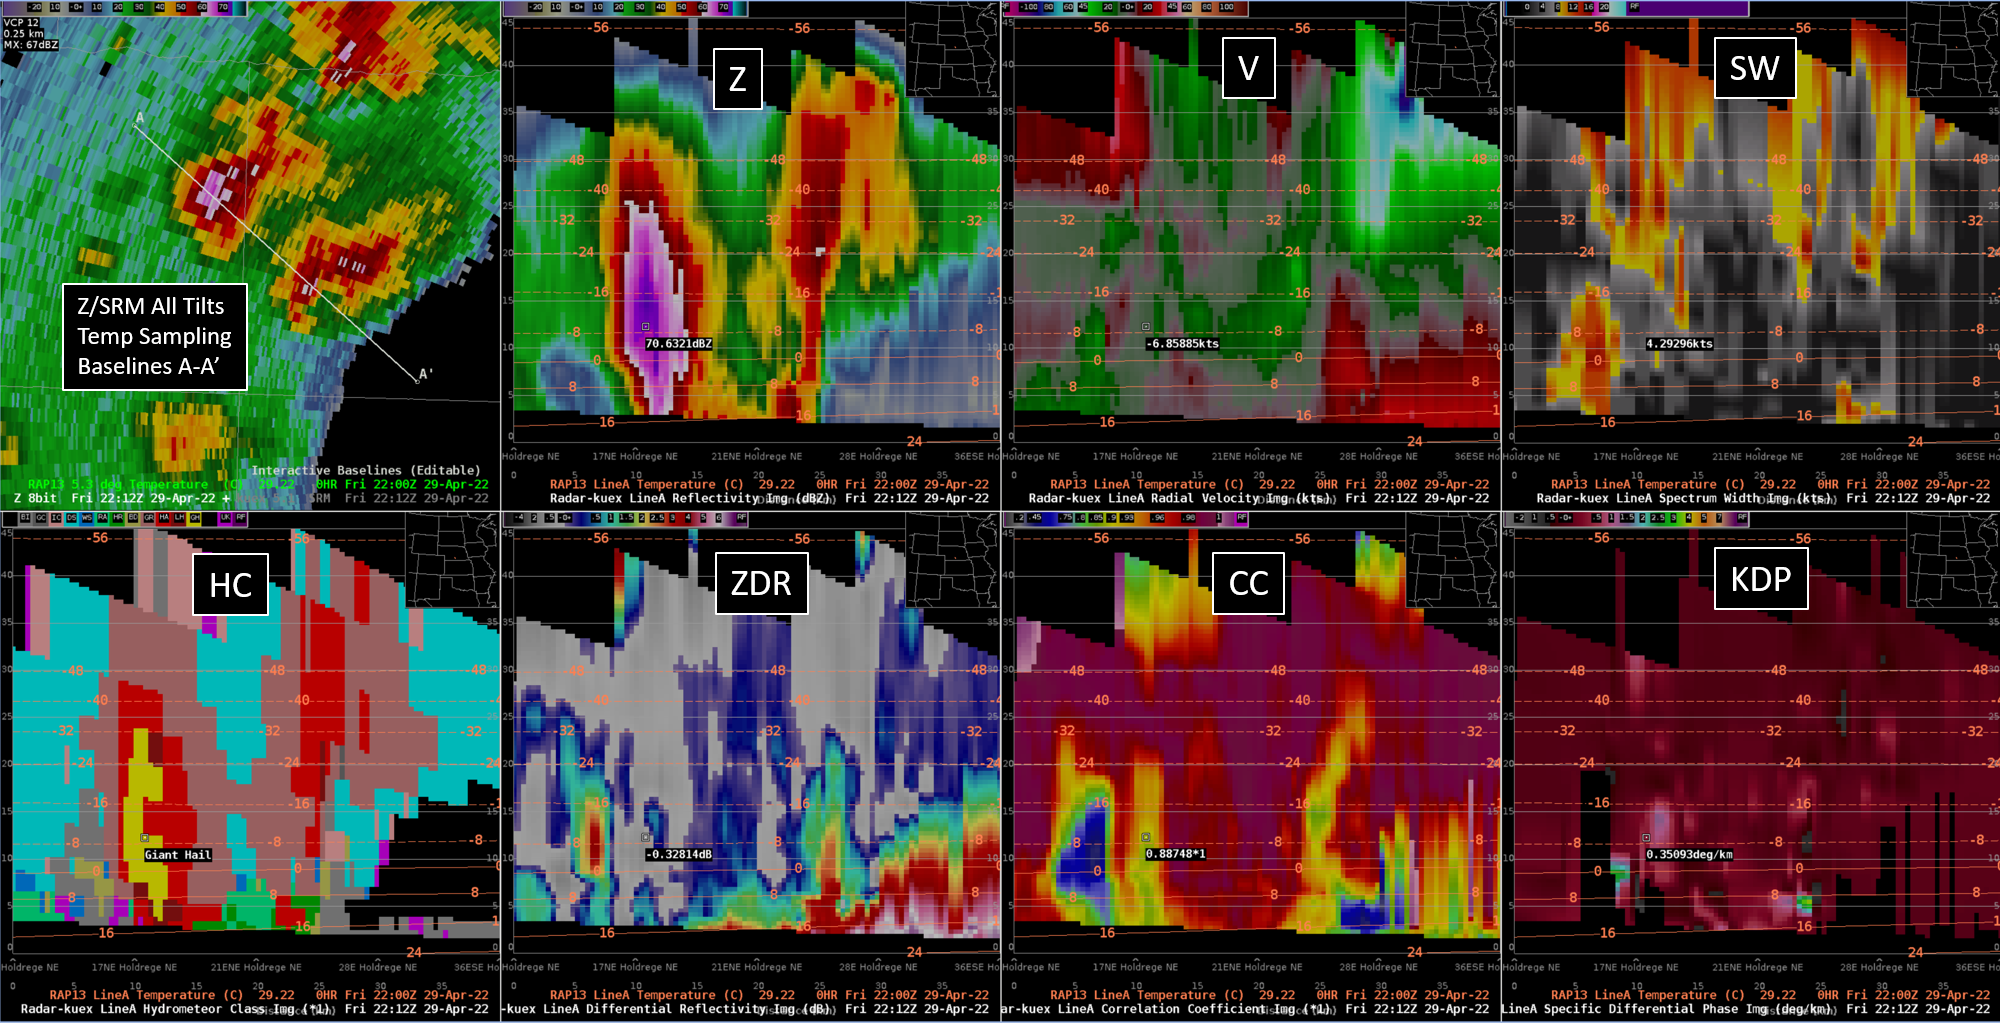
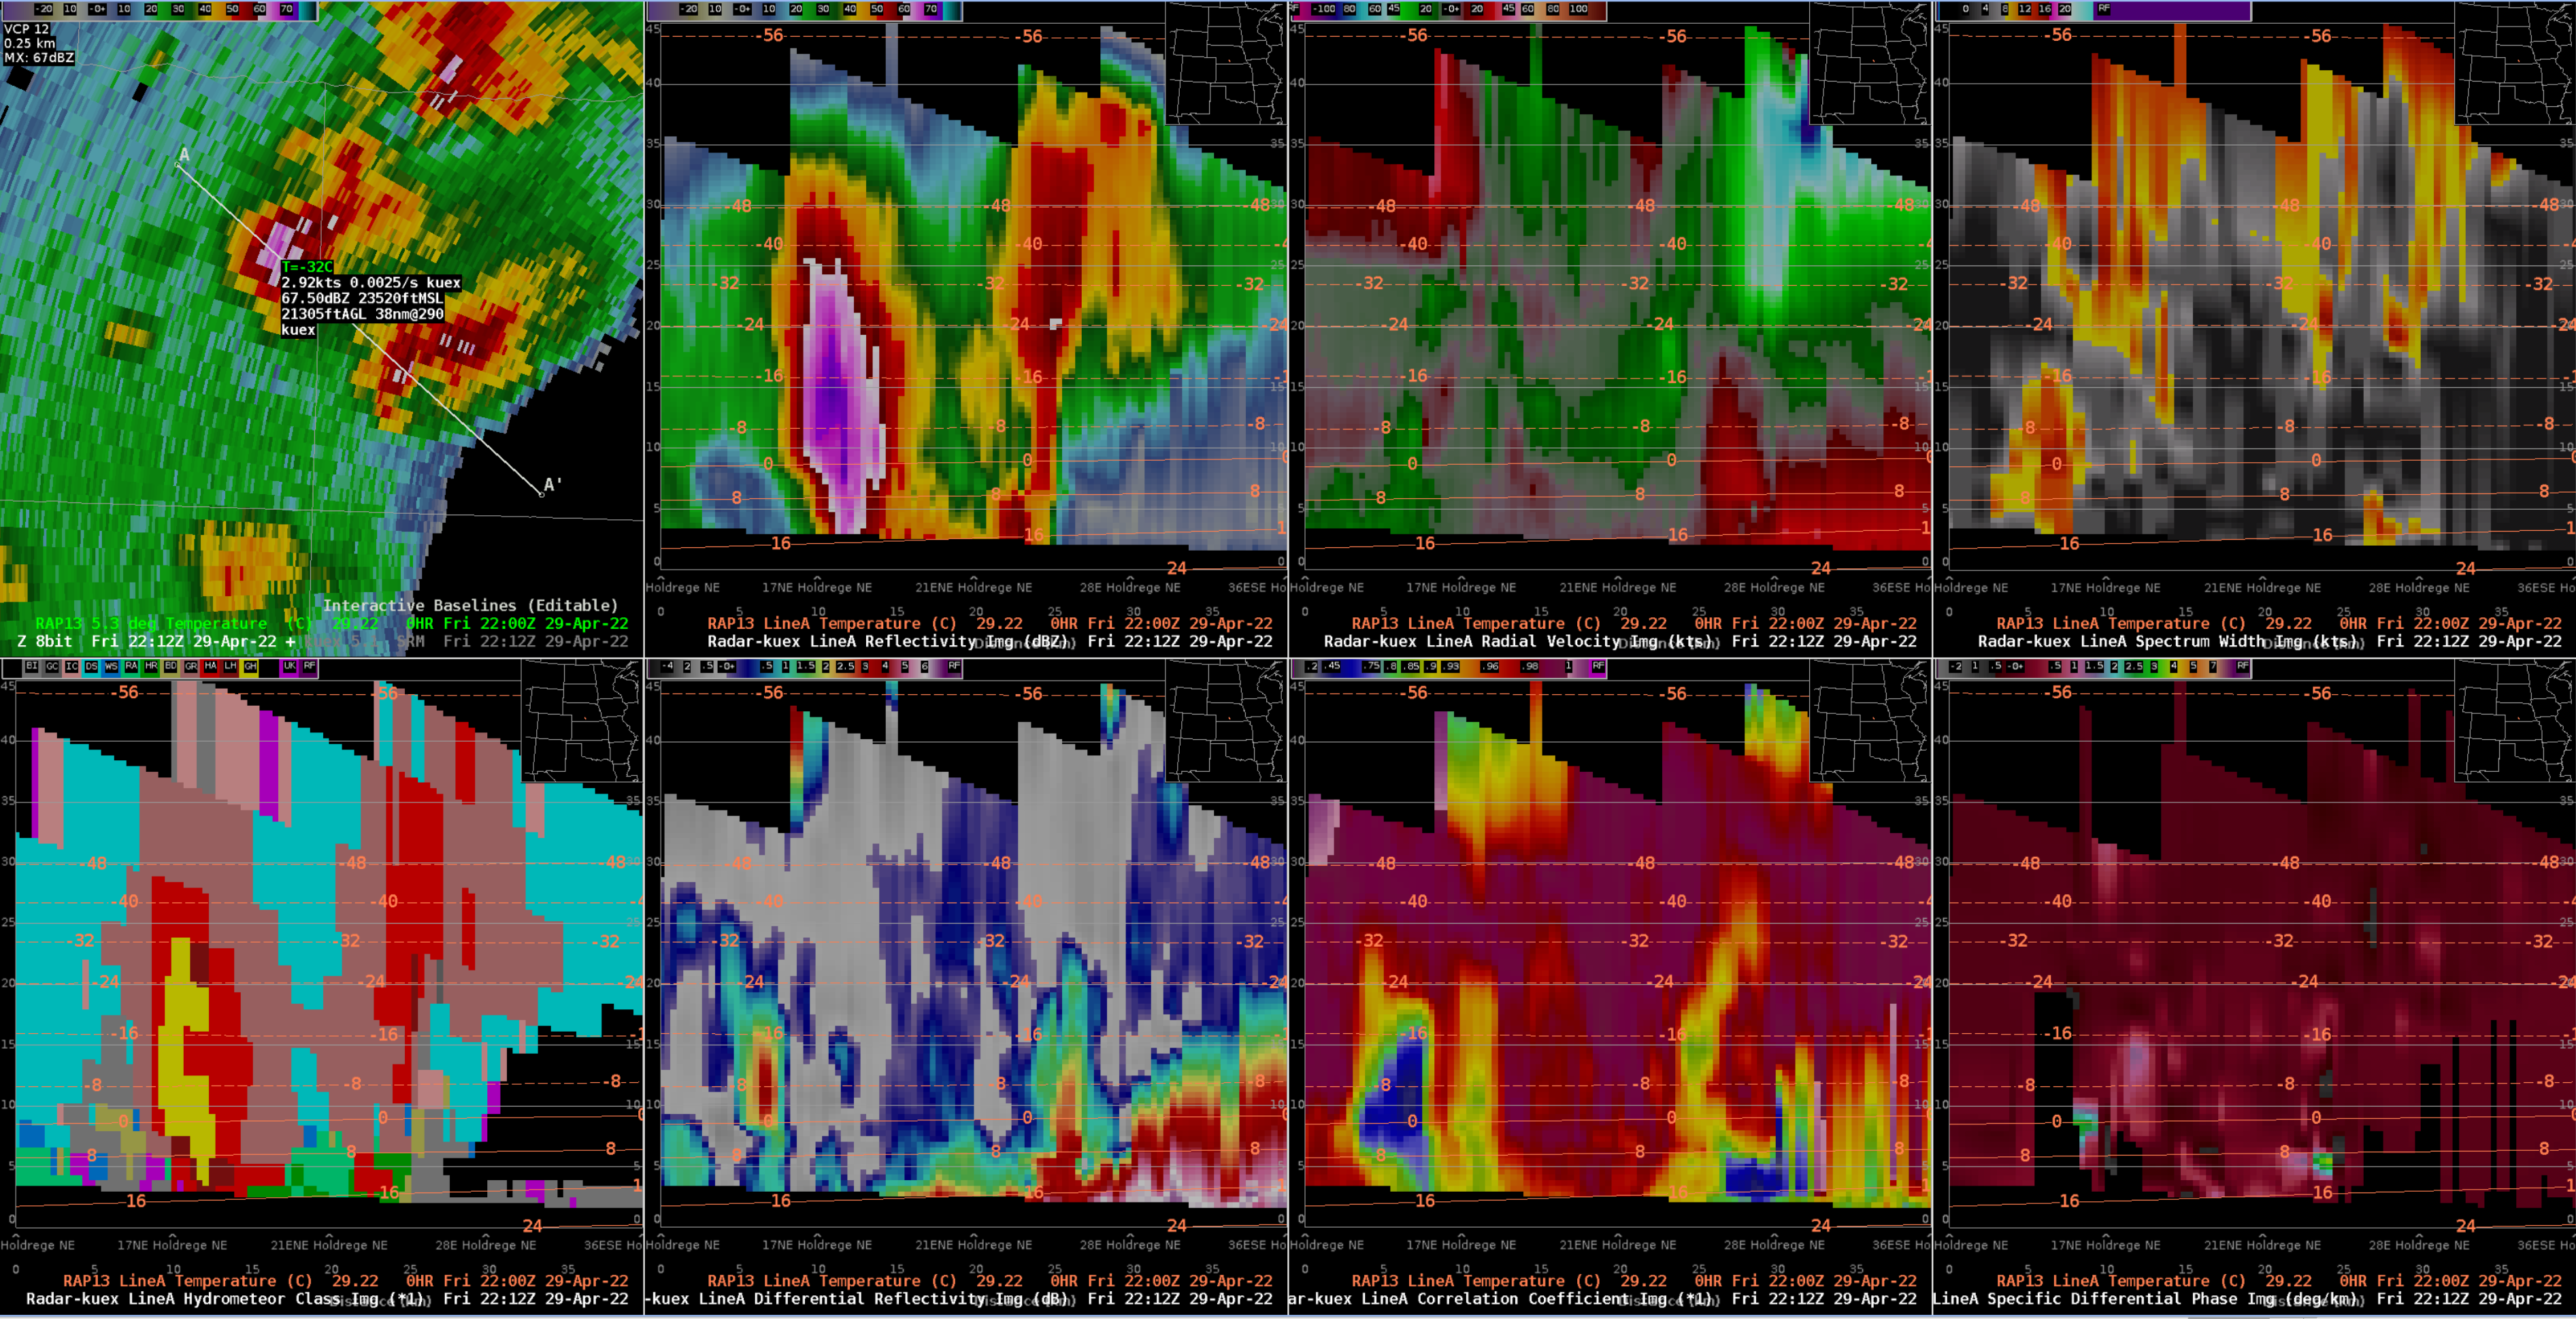
- Note the vertical cross sections can be particularly helpful to visualize dual pol data if you can combine multiple variables with temperature data.
- Tip: It can be easiest to start from the 3 panel cross section, and then:
- This is the end of the jobsheet